After our Ethereum Classic mining tutorial one of our users said they mined ETC to Metamask wallet but can’t see their funds, it shows a balance of 0.
How to view ETC Ethereum Classic token? If you sent Ethereum Classic (ETC) over to your Metamask address but Metamask is not displaying the ETC balance in your account then do not worry. First using explorer ensure that you have and see ETC in your address. To see your available ETC balance in Metamask you need to connect Metamask to Ethereum Classic network. You just need to switch from ETH to ETC network. By default you won’t find the ETC network. However you’ll find the option of setting up Custom RPC server in the app. You have to setup a custom RPC server that connects Metamask to Ethereum Classic network.
Can I add Ethereum Classic to Metamask? Sure, why not. Ethereum Classic is a fork of Ethereum and and it uses the Ethereum Virtual Machine (EVM) codebase. So you can add the Ethereum Classic (ETC) network to your Metamask Wallet. Not just Ethereum Classic but if you do not know already Metamask supports all EVM blockchain networks.
Here in this guide we’ll show you how to add Ethereum Classic to Metamask and use Metamask with ETC blockchain. Once you connect to Ethereum Classic (ETC) network you can use your Metamask as a wallet to manage and store ETC and its tokens. Also you can use it to interact with DApps and DeFi applications built on the ETC network.
Now before we add Ethereum Classic Mainnet (ETC) To MetaMask in short let’s look at what Ethereum Classic network is and What Metamask is. If you do not want to read all of this then directly jump to connecting MetaMask to Ethereum Classic part.
About Ethereum Classic
What is Ethereum Classic? Ethereum Classic network is a hard fork of Ethereum network that occurred in 2016 after a DAO hack. The native coin of Ethereum Classic is ETC. The main functions of this blockchain are smart contract capability and the ability to host and support decentralized distributed applications.
After the launch of Ethereum in 2015 many developers started to build on Ethereum network. One of the project called DAO was build by a company named slock.it. As DAO slowly became popular a lots of investors started to invest their money into the DAO smart contract Dapp. But sadly there was a fault with the DAO code which lost around $50 million dollars of users locked funds in the DAO to a hacker.
This disaster later let to a discussion of how to proceed further with the network. There were two communities 1. Agreed to keep it the network the way it is and continue the same and the another one 2. Agreed to hard fork the blockchain which will have the hackers transaction reversed.
Majority followed the Ethereum’s co-founder Vitalik Buterin decision that is hard fork the Ethereum blockchain. The others who did not agree on this decided to stick to the original chain. This eventually lead to a chain split. 1. The Ethereum Blockchain – the forked blockchain with reversed hackers transaction which is the bigger chain currently and 2. The Ethereum Classic network – the original blockchain without having the hack reversed.
Today ETC blockchain is the essence of the original Ethereum PoW chain except it has gone thorough few changes over the years. One of the major change is the cap on max supply. While Ethereum has no supply limit; Ethereum Classic hard capped its max supply to 210,700,000 ETC. With Ethereum today there is a burning mechanism to make its supply deflationary. Ethereum classic on the other hand has a block reward reduction which reduces 20% of block rewards every 5 million blocks.
Besides this there has not been much changes and the network functions almost the same way as it is during the launch. Ethereum Classic network is set out to preserve the integrity of the original Ethereum blockchain and it values trustlessness, immutability and decentralization above all else. Decentralized Applications (dApps) built on this network cannot be censored, modified or shut down by any central authority. For this reason there are still many users and developers that prefer Ethereum Classic over Ethereum.
Dapps on Ethereum Classic
Ethereum Classic even Today functions the same way as Ethereum except ETH is a PoS blockchain with validators and ETC is PoW blockchain with miners. In theory any DApps that is available on ETH can also be easily deployed on ETC network. However there are not many Dapps that are built on top of ETC.
Rather than ETC many developers prefer other similar chains and EVM based networks like Binance Smart Chain, Solana, Fantom, Polygon, Avalanche, Optimism, Harmony One etc. It makes sense because these are efficient networks with improved transaction cost and speed. Whereas ETC still struggles the same problem as ETH. Being a PoW chain it is slow and is not so efficient.
Anyways there are still some DApps and DeFi protocols like Hebeswap, Phoenix available on the Ethereum Classic network. Also you got on chain NFTs called ETC punks which is similar to Crypto Punks on Ethereum. The network has some applications and use cases to it. Whether you are a miner or wish to explore the ETC network configure your Metamask to ETC network and you’re all set.
MetaMask
Metamask is a wallet and a browser extension. It is one of the most popular wallet available for crypto users across the world.
It lets you to buy, send, spend and exchange your digital assets. Not only you can make payments to anyone but it’s a bridge that allows you to visit the decentralized distributed web of tomorrow right from your browser. When connected to decentralized applications (dApps) it lets you trade assets, lend assets, borrow assets, publish content, play games and buy rare digital arts.
You can connect Metamask to different blockchains. It’s a simple and easy to use app that grants you access to multiple blockchain networks. After the connection you can access cryptocurrency tokens, digital assets and NFTs (Non Fungible Tokens) native to that specific blockchain.
Setting up Metamask to other blockchains is easy. To connect to blockchains other than Ethereum (ETH) you only need to add its network connection details. Previously we’ve explained how to add BSC to Metamask. Connect Arbitrum One to Metamask, Adding Polygon network to Metamask, Connecting to Fantom network and Avalanche.
Now the steps to add Ethereum Classic is also the same.
Using MetaMask with Ethereum Classic
To use Metamask with Ethereum Classic (ETC) you first need the Metamask application. Metamask is available both as a browser extension and as a mobile app for Android and IOS. In case if you don’t have Metamask installed yet, then download it from the official metamask.io website. The browser extension is available for Google Chrome, Brave and Firefox. Add the extension to your favorite browser and start the installation.
Note: If you are setting up the wallet for the first time then make sure to backup your recovery phrase. For beginners we recommend you to go through this Metamask guide.
Once the Metamask wallet installation is complete and the wallet creation step is done its time to configure the wallet that connects you to the Ethereum Classic Mainnet (ETC Network).
Here are three simple steps to connect your MetaMask to the Ethereum Classic network.
1. Open Metamask >> Go to Settings and select “Add Networks”. 2. To add the Ethereum Classic to MetaMask copy and paste the Ethereum Classic RPC details onto network page. 3. Once the network details are entered click save and you’ll be automatically connected to the Ethereum Classic network.
How To Add Ethereum Classic Network in Metamask
Login to your Metamask wallet and open it up on full screen. Click on the three dotted account options and select expand view.
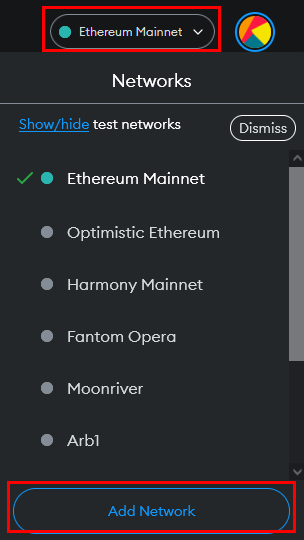
Now at the top right of the application you’ll see “Ethereum Mainnet” chosen as the network. Click and drop down Ethereum Mainnet and select add network.
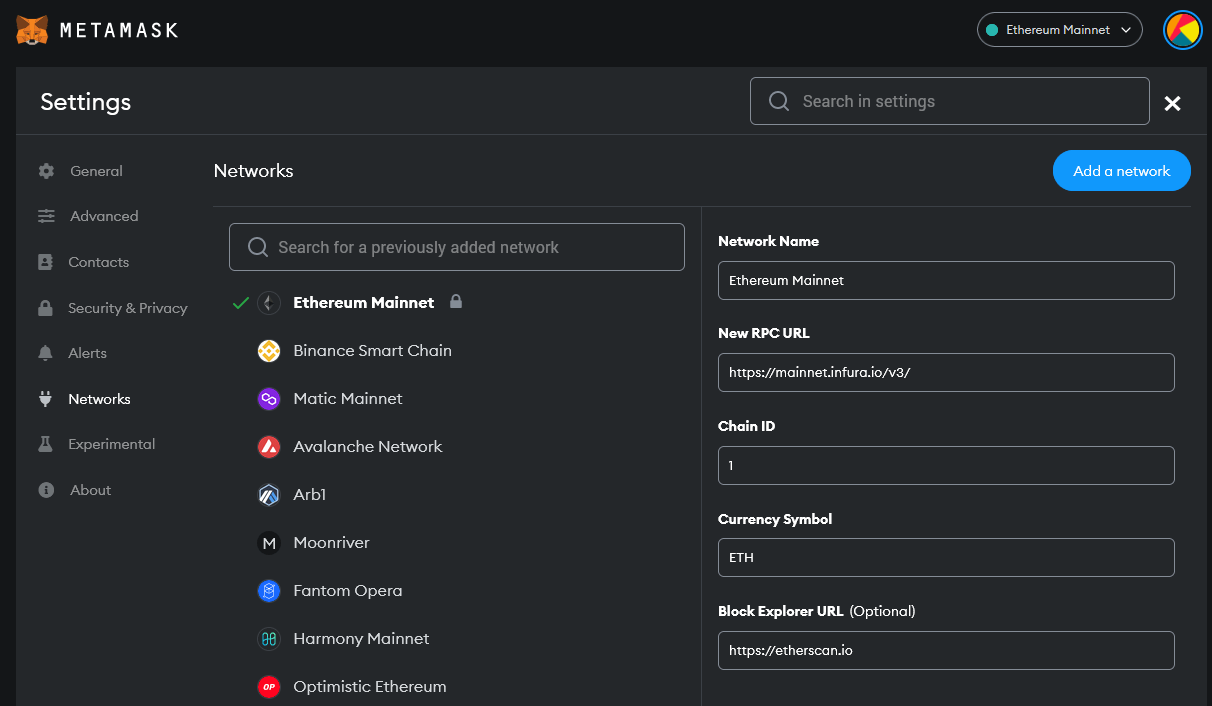
Or you can . Go to “Settings” from the account options and select “Networks”. Here you’ll find the list of main networks and testnets that your Metamask can connect to. Press the “Add a Network” button.
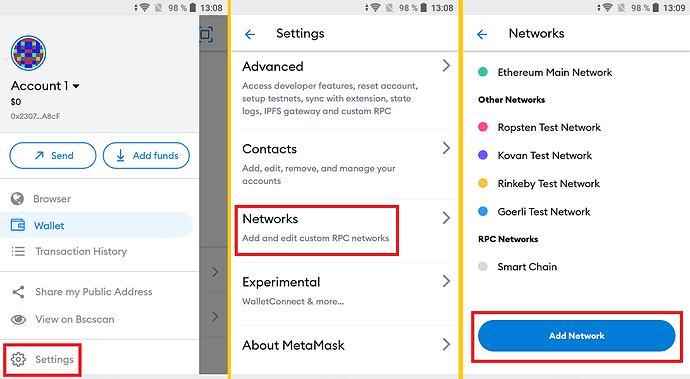
If you are using Metamask on your mobile then go to settings >> networks and tap Add network.
This opens up the network window. This is where you’ll have to add the custom RPC information that connects Metamask to specific EVM blockchain network of your choice. In this case, its Ethereum Classic.
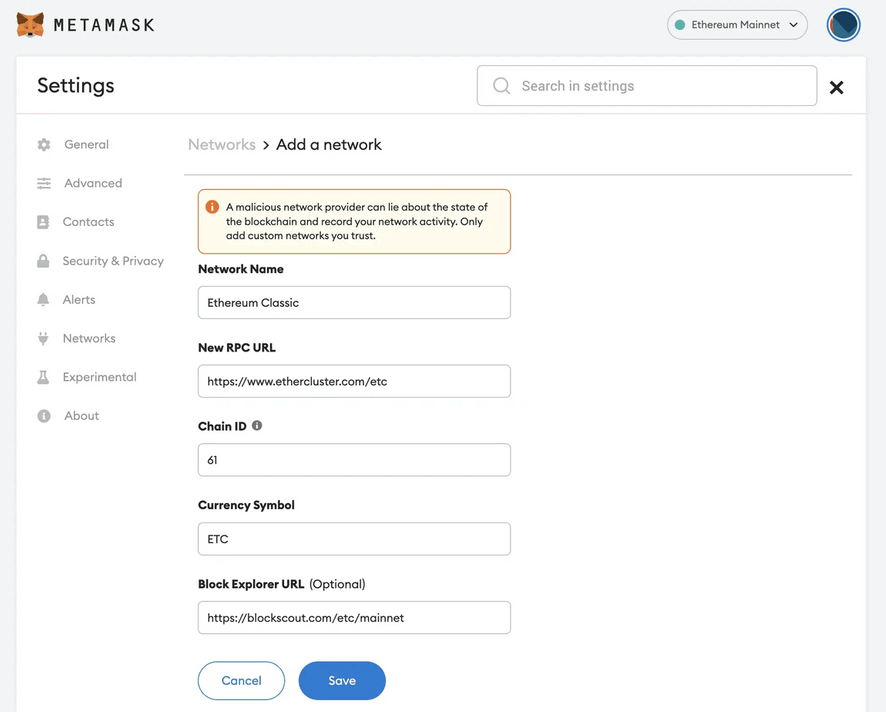
To add the ETC network input the following information as you see in the table below.
| Blockchain Network | Network Information |
|---|---|
| Network Name | Ethereum Classic |
| New RPC URL | https://www.ethercluster.com/etc |
| Chain ID | 61 |
| Currency Symbol | ETC |
| Block Explorer URL (optional) | https://blockscout.com/etc/mainnet/ |
Explanation:
- Network Name: Name of the blockchain network your want to add. i.e. Ethereum Classic.
- New RPC URL: RPC details: RPC stands for “Remote Procedure Call”. “Custom RPC” is the option to add custom networks and this is where you add the URL of the network. The one in the table (Ethereum Classic RPC Details: https://www.ethercluster.com/etc) is the verified RPC endpoint for the Ethereum Classic network. This is the URL that Metamask uses to access the Ethereum Classic blockchain network.
- Chain ID: The ID of the chain that Metamask uses to sign transactions for the network.
- Currency Symbol: Currency symbol is the native token of the blockchain. Currency of that particular network. For example “ETH” is the currency for Ethereum network and for Ethereum Classic its “ETC”.
- Block Explorer URL (optional): Block explorer of the Ethereum Classic network. Although the “block explorer URL” is optional it is recommended that you input this information. It allows you to evaluate your accounts, balances and transactions.
For instance the popular block explorer of Ethereum is etherscan.io and for ETC network its blockscout.com/etc/mainnet/. BlockScout is the preferred blockchain explorer but you can also add your own preferred explorer.
That’s it! Once you’ve configured the settings click save to add the ETC network to MetaMask. You have successfully added Ethereum Classic to your MetaMask wallet.
ETC accounts / address
Metamask will automatically connects you to the new ETC network and you’ll be brought back to the wallet main screen.
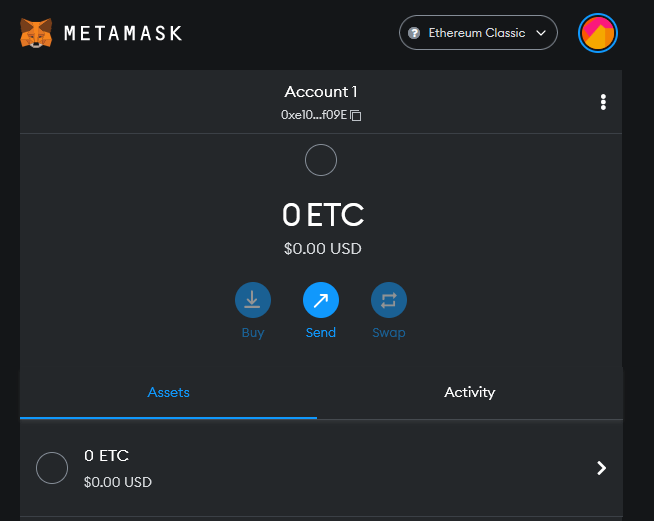
If it is still connected to the ETH network then drop down networks and select the ETC network that you have just added. Likewise to get back to normal Ethereum mainnet that is to switch your wallet back to the main ETH network choose “Ethereum Mainnet” from the networks drop down menu.
Go to your account and you’ll notice both ETH and ETC having same account / address format that starts with 0x. So you can use the same accounts for both Ethereum and Ethereum Classic. Only the network differs. To see your ETH balance choose Ethereum Mainnet and to see your ETC balance and transactions switch to Ethereum Classic network. Using the same account / address you can move back and forth to Ethereum and Ethereum classic networks. The same way you can switch between other EVM blockchains as well.
Now to deposit ETC obtain your wallet address by clicking on it. Then transfer the ETC token to your address. Make sure Ethereum Classic network is chosen to transact and interact with dApps on the Ethereum classic network.
Importing ETC tokens
Other than ETC the native token there are also other tokens on the Ethereum Classic network. Here is how you can import such tokens to your wallet.
First find the contract address of the token from ETC block explorer. Copy the contract address of the token.
Open Metamask and click on “Add Token”. Paste the copied contract address, enter the token name, symbol and click Add Token. That’s it! You’ve successfully added custom token.
To learn more here is guide on adding custom tokens to Metamask.
Note: When sending ETC or ETC based tokens to your Metamask or from Metamask to your exchange make sure you are using the Ethereum Classic network. Sending coins to incorrect network will result in loss of funds.
Also if you own Ledger or Trezor hardware wallets the you can use it with Metamask. Learn how to connect Ledger and Trezor with Metamask.
That’s it!