Bitcoin security is very important. If you own Bitcoin it is your responsibility to keep it safe. To secure Bitcoin many use hardware wallets. Some take things a step further and use advanced multi-signature setups. Hardware wallets with single sig setup is more than enough. It is a great way to protect your funds but multi signatures will elevate your wallet security even further.
Multisig wallets are useful in many ways. The idea with multisig wallet is that it allows multiple people to cooperatively control funds in the wallet. It is most useful in various business endeavors. Let’s say you and your friend run a company and you both decide that the company funds should be spendable only if you both agree and sign. This way you and your partner (cosigners) collaboratively control your company funds.
Another common use case is that Multisig is used on personal wallets to improve the wallet security. Instead of holding your bitcoins with a single set of keys you can have control over multiple private keys to spend from the wallet which is a great security measure.
For example you can setup 2 wallets on 2 different computers. 1 wallet on your main machine and another one on a offline computer. To make a transaction you need to sign from both the wallets. Since you have each wallets installed on a different machine it makes hackers job more difficult to access your wallet. This is particularly useful for those who don’t have a hardware wallet.
Previously we’ve explained what is Multisig and how multisig wallets work? Here in this beginners guide we’ll show you how to setup and use Multisig Bitcoin wallet.
Creating Bitcoin Multisig wallet
Hope you’ve learned everything about Multisig. Now let’s setup and use a Multisig wallet so that you’ll better understand how Multisig works.
There are many Multisig wallets available for Bitcoin but here in this guide we’ll be using Electrum. Even with electrum wallet you can pair hardware wallets like Ledger, Trezor etc. But here we’ll not go through that. Instead we’ll only use Multisig Bitcoin wallet with electrum.
Why Electrum? Electrum is the most popular desktop wallet that is simple, light weight and has been around for many years. It is feature rich, trusted open source wallet and even supports integration of hardware wallets such as Ledger and Trezor. For example you can create a multisig wallet like this. A 2 of 3 setup with Ledger, Trezor and an air gapped coldcard using Specter and Electrum.
Most advanced users prefer using multiple combination of hardware wallets for setting up Multisig. Anyways here we are not going to get you into such complex setups. In this tutorial we’ll show you how to create a simple 2 of 2 Multisig wallet using just electrum where 2 person need to sign off to approve a Bitcoin transaction. You can also use it as a personal wallet where you control both the wallets.
A 2 of 2 multisig setup consist of 2 separate wallets. Both the wallets will have the same set of receiving address and both the wallets are needed to be used in conjunction in order to spend funds from the wallet. This kind of setup is useful for both business endeavors as well as personal setups to enhance the wallet security.
Once you understand this and learn how to setup 2 of 2 multisig wallet you can easily setup any other M out of N signature wallets. For example a 2 of 3 multi signature wallet, 3 of 5 multisig etc. You can basically determine both the overall number of keys and the threshold (signatures) required to spend the coins.
How to setup multisig wallet using electrum
Creating and using a Bitcoin multi signature wallet with Electrum is very easy, but it may seem tricky at first. Not to worry. In this tutorial we’ll walk you through all the steps that helps you to create, setup and successfully operate a multisig wallet.
We’ll show you how to setup and receive funds to your multisig wallet? How to spend coins from multisig that is signing transactions. We’ll also cover how to backup and how to recover your multisig wallet. That is recreating the whole multisig setup.
The purpose of this guide is to give an idea of how multisig wallet works. For this we’ll be using 2-of-2 setup which means 2 signatures out of 2 are needed to spend funds. Using this method you can also create a 2 of 3 multisig wallet in which 2 signatures out of 3 are needed to spend funds. Likewise for 3 of 5 multisig wallet 3 signatures out of 5 are needed for any outgoing transaction. As we said the process is same for all M out of N signature wallets.
For the purpose of the tutorial we’ll be creating a multisig wallet using Electrum testnet. Electrum Testnet is great for demonstrating and practicing. Experiment with electrum multisig on the testnet first. Once you get familiar and comfortable with the setup you can move on to the mainnet.
We’ll create a test multi signature wallet using electrum, fund it with small amount of testnet Bitcoin and then show you how to spend coins using 2 signatures since it is a 2 of 2 wallet.
Download Electrum from https://electrum.org/#home. Here is how to connect electrum to Bitcoin testnet. Also here are two more electrum guides which you may find helpful before you get stated with electrum multisig.
How to verify electrum signatures
Guide to safely update your electrum wallet
Also do note that a 2 of 2 setup consist of 2 separate wallets which is usually installed on 2 separate machines and is potentially controlled by 2 separate people. Likewise a 2 of 3 setup consist of 3 separate wallets on 3 separate computers controlled by 3 individuals.
Here for demonstrating we’ll be setting up both the multi sig wallets on same PC. Remember that it is only good for practicing on the Testnet. Don’t do this with mainnet as it doesn’t bring any added security. There is no point of having multisig wallets installed on the same computer. If your PC gets hacked then the hacker can also access your Multisig wallets. Its same as having single key wallet.
Electrum Multisig setup
The process of creating a multisig wallet can be divided into 3 main steps:
- Setup your wallet which is 1 out of 2 if it is a 2 of 2 multisig or 1 of 3 if it is a 2 of 3 multisig. While you setup your wallet on your PC your co-signers should also start setting up their wallet on their PC. Setup includes generating of mnemonic seed and master public key.
- Next you communicate your MPK (Master Public Key) to your co-signers and receive their MPK from them. MPK is for coordination.
- Once multisig wallets are created verify that the receiving address on your wallet and your co-signers wallet matches.
Alright! Its time to setup the wallet.
Bitcoin Electrum Multisig 2 of 2
A 2 of 2 multisig consist of 2 separate wallets. It can be you and your friend, you and your family member or you can control both the wallets. But as we said, if you are using Multisig to enhance security then install both the wallets on a separate machine.
Now before we start here are few things you’ll need. A piece of paper or a notebook and a pen handy. This is to write down your seed words which will act as a wallet backup.
Alright! Let’s start with the creation of wallet 1.
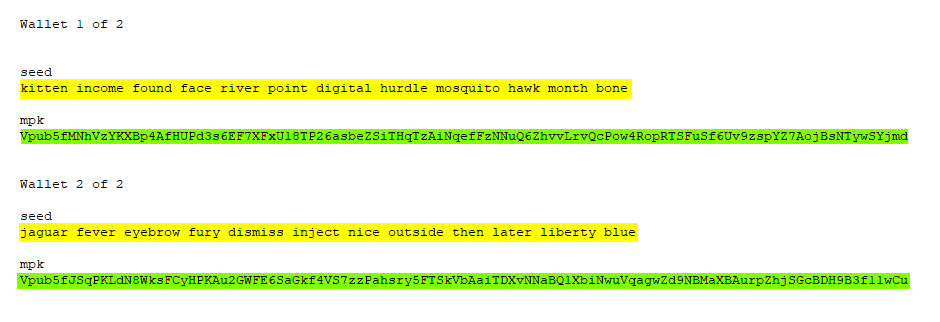
Wallet 1 of 2
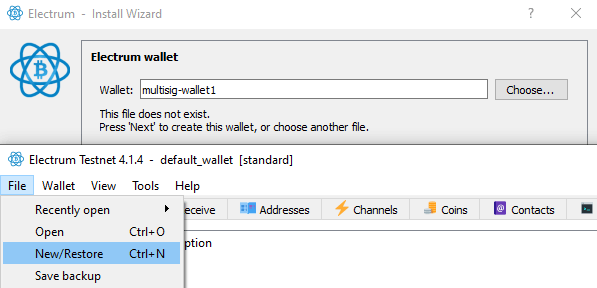
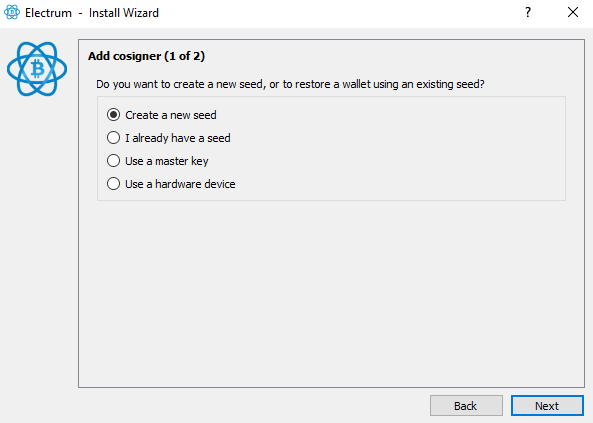
1. Open Electrum, drop down file and click New / Restore. Then name the wallet and click next. Here we’ve named as multisig-wallet1.
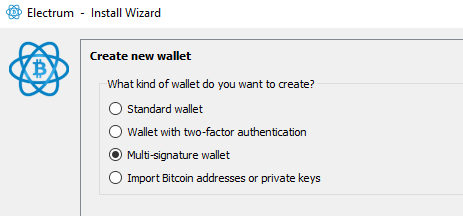
2. Next on the installation wizard choose Multi-signature wallet and click next.
3. On the next screen you’ll be asked to choose the number of signatures needed to unlock funds in your wallet:
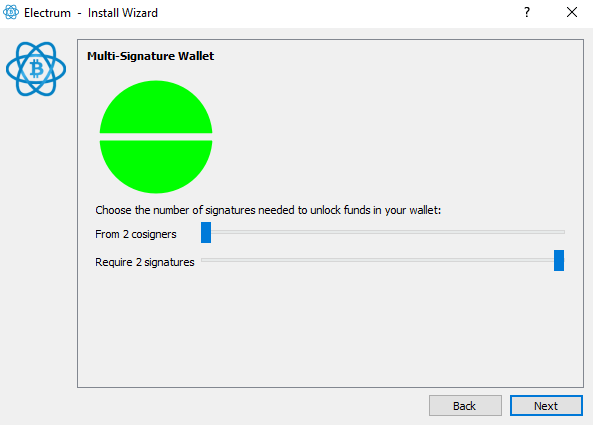
The first slider indicates the total number of participants or cosigners (wallets). The second slider indicates how many cosigners are needed for signing in order to unlock funds.
Since this setup is a 2 of 2 we have chosen 2 cosigners and 2 signatures.
If it is a 2 of 3 setup you should choose 3 cosigners and 2 signatures. Electrum supports up to 15 cosigners.
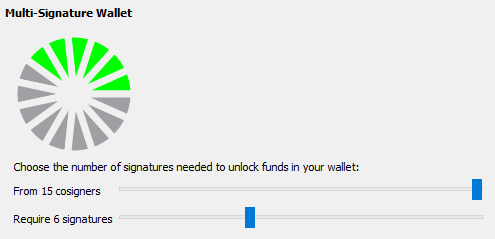
Note: The number of required signatures in a multisig wallet should never be 1. A Multisig wallet should require two or more signatures to sign a transaction. If you choose 1 signature then it will act as single sig wallet. You should never be able to spend from a multisig wallet with only 1 signature. If you can do so then the setup is flawed and it is not a true multisig wallet. Also don’t complicate yourself by choosing maximum number of signatures. If just any one of the wallet gets locked out then all the funds in the multisig wallet will be locked forever.
Select the slider to 2 / 2 and click next.
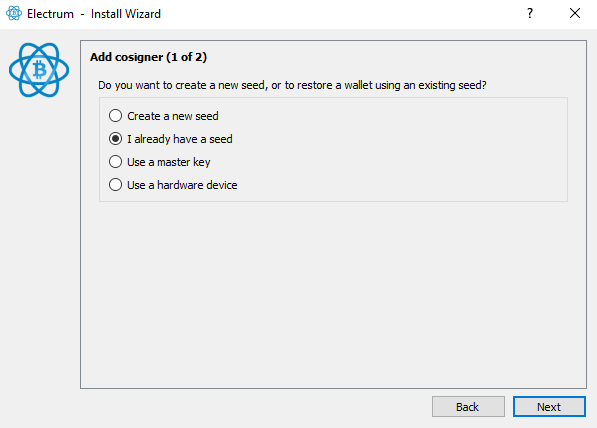
4. On the next screen choose create a new seed and click next.
The wallet will generate a new seed and this seed is for wallet 1 of 2. Write down the 12 words in a piece of paper and click next. On the next screen re-enter the words to confirm seed. Then click next.
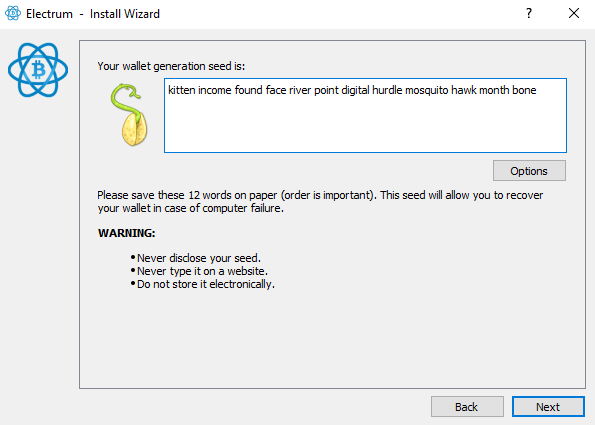
5. Next the wallet will generate a Master Public key. Again this is for wallet 1 of 2 which you’ll need to share it with your cosigners. Copy this information and save it in a notepad.
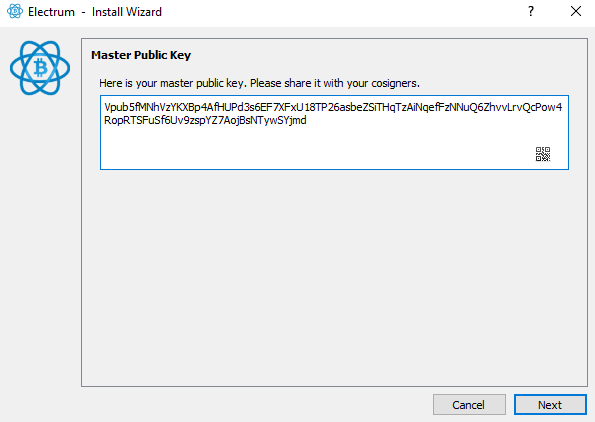
Note: You can have a copy of MPK information on your computer, there is no harm. But do not save your mnemonic seed word on your computer. Also do not reveal your seed words to your cosigners. Only MPK (Master Public Key) should be shared for communication purpose.
Once you have the seed word and Master Public Key from wallet 1 we’ll stop with the creation of wallet 1 and start with the creation of wallet 2. Because on the next screen you’ll be asked to enter your cosigners MPK which we do not have yet.
Wallet 2 of 2
If the second wallet should be controlled by your friend or a family member then tell them to create a 2 of 2 multisig using the steps above and ask them to share the MPK. You should share your MPK to them.
If the wallet is for personal use then you should install the second wallet on a different computer.
Now just follow all the 5 steps which you carried out for wallet 1.
Click File >> New / Restore. Name this wallet as multisig-wallet2. Choose Multi-Signature wallet. Choose 2 cosigners and 2 signatures in slider. Click create a new seed and make sure to write them down in a piece of paper. Confirm the seed and on the next screen copy the MPK (Master Public Key). The seed and the MPK which we’ve generated now is for the second wallet (wallet 2 of 2).
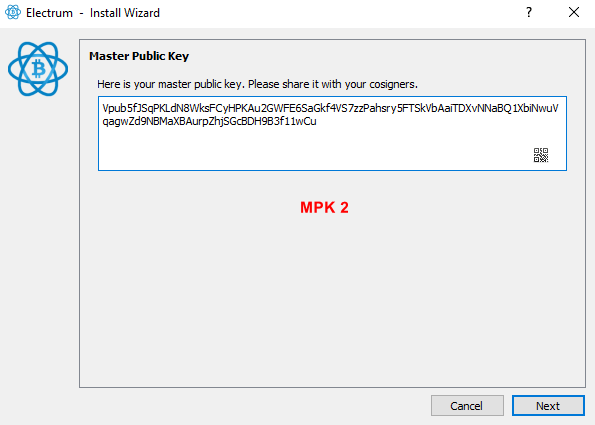
Note: Only for the purpose of this tutorial here we are revealing the seed and the MPK of both the wallets. For testnet the MPK starts with vpub whereas in mainnet it starts with xpub or ypub or zpub. You can transfer the MPK to another computer using USB stick. If the other wallet is your friend or business partner then share it in an encrypted message. As we said only the the MPK should be shared with your cosigners if you are creating Multi Sig Wallet with someone else.
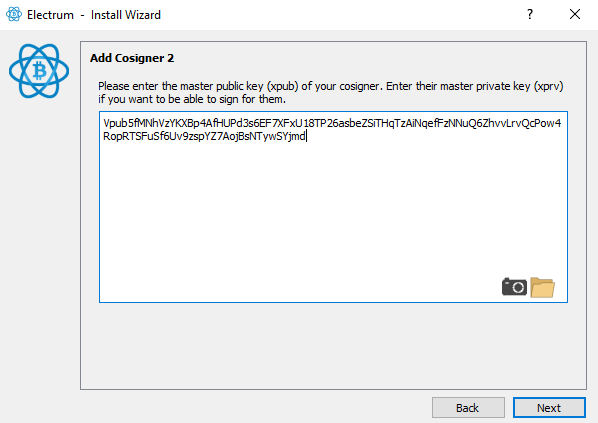
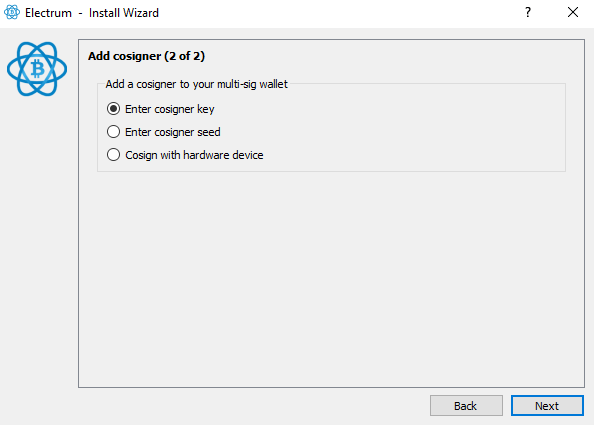
Now since we already have the MPK of wallet 1 let’s complete the second wallet. Click next and choose enter cosigner key.
On the next screen enter the cosigner information of wallet 1 and click next.
Lastly you’ll be asked to choose the wallet password. This is optional but recommended. Adding a password encrypts the wallet on your computer. Without a password someone with the wallet file can see your balances, transactions and addresses. But do not worry, they will not be able to spend coins. It only affects your privacy so it is safe to use a wallet password.
That’s it. Wallet 2 of 2 is created. Let’s now complete wallet 1 of 2.
Wallet 1 of 2
Since we haven’t completed the setup of the first wallet yet we need to start over again. Go to your main machine or the first PC where you were creating your first wallet. Open Electrum, Click File >> New / Restore and name it is as multisig-wallet1. Next choose multi-signature wallet and on the next screen choose 2 of 2 in slider.
Now since we already have the seed of wallet 1 choose and continue with “I already have a seed”.
On the next screen enter the seed of wallet 1 which is btw SegWit. Click next and the wallet will display the MPK again.
You have written down this information already. Just verify it and proceed to enter the 2nd wallets cosigner key.
Once done, click next then choose a password and complete with the creation of wallet 1.
Now you have both the wallets ready. To ensure you have a proper 2 of 2 multi signature wallet compare the receiving address of both the wallets. If the receiving address matches on both the wallets then you are all set.
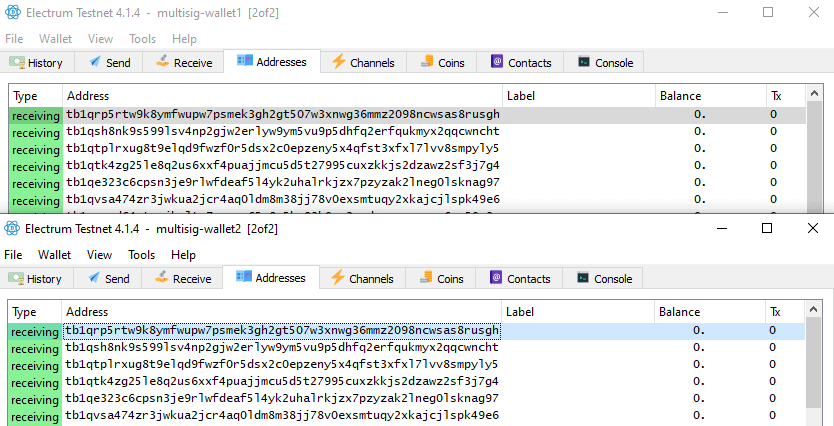
Anyone can now send coins to your multisig addresses. But to spend from it you need to sign using both the wallet. Only then it becomes spendable.
Now before we show you how to receive and spend coins here let’s understand how multisig backups and wallet restoration works.
Electrum multisig backup and restore
In a regular wallet you just backup your mnemonic seed phrase. That is all your need. To restore your wallet create a new wallet, select restore using seed and enter your backup seed phrase. Your wallet will be completely restored.
But in case of multisig wallet your seed word alone is not enough. So what is the backup and recovery process?
To be able to restore a Electrum Multisig wallet in future you need to have a backup of seed word and the master pub key of all your cosigners.
You need to write down both the seed words as well as your co-signers MPKs. Likewise your cosigners should also have a backup of their seed words, your MPK and all other cosigners MPK. So we strongly recommend you to write down the co-signers MPKs along with your seed and wallet details.
For example let’s assume its a 2 of 2 multisig wallet where you control both the wallets. This is how the setup looks.
- PC1 (Wallet 1 of 2): Seed 1, MPK 1, Cosigner key 2
- PC2 (Wallet 2 of 2): Seed 2, MPK 2, Cosigner key 1
To recreate this wallet all you need is the backup of seed 1 and seed 2. This is if the multisig setup is controlled only by you.
To restore just create a new wallet in electrum, choose multi signature and make sure to choose the same setup as before. 2 of 2 and continue with I already have a seed. Entering your Seed 1 brings up the MPK 1 and entering Seed 2 will generate MPK 2. So you don’t need to have a backup of MPKs if you control both the wallets.
Anyways having a backup of MPK 1 and MPK 2 is beneficial. Additionally you should also note down the wallet details such as the number of cosigners used, threshold used and the chosen derivation path.
Also remember to store both the seed word backups in a different physical location and never on your computer.
But if you create a multisig wallet together with someone else then you should never show them your seed. With just the seed they can recreate your wallet. So be careful and only share them your MPK. You should also receive their MPK.
Have a backup of your seed, your MPK as well as your cosigners MPK (xpubs). Likewise it is very important that your cosigner should also have a backup of their seed word, their MPK + the remaining participant’s xpub. It is absolutely crucial that each cosigner’s backup should include the extended public keys (xpubs in short) of all other participants.
In a 2 of 2 wallet if any one loses access or the backup the funds in the wallet will be locked forever. You can no longer recover or spend funds from it. So tell the other participant to keep the backup safely.
Hope you understood the things needed to backup multisig wallet. Now before you send funds and start using the wallet simulate it as being lost and try to restore the multisig wallet using the backup information you have.
If you are able to recover the wallet completely then you are good to go.
Now let’s see how to receive Bitcoin and how to spend coins from your multisig wallet?
Receiving
All of your multisig wallets will have the same set of receiving addresses so anyone can share the address to a third party and start receiving Bitcoin.
Now since this is a testnet multisig wallet go to receive tab in your electrum wallet and copy any one of the receiving address. Then use Bitcoin testnet faucets listed here https://coinguides.org/bitcoin-testnet-core-wallet-electrum/ and receive free test Bitcoins to your multisig wallet. Even in testnet you need to wait for the Bitcoin confirmation.
Once received the coins should reflect in your multisig electrum wallet.
Now its time to learn how to spend coins from the multisig wallet.
Spending from electrum multisig
To spend coins from a 2 of 2 multisig wallet two cosigners / participants need to sign a transaction collaboratively. If it is a 2 of 3 wallet then any 2 out of 3 participants are enough to sign a transaction.
Any participant can sign the first transaction. Once they sign it the transaction status will be updated to “partially signed (1/2)” if it is a 2 of 2 wallet. If it is a 2 of 3 wallet then the status will be updated to “partially signed (1/3)”. The coins will not be transferred until enough signatures of the multisig wallet has been met.
Let’s see how it works.
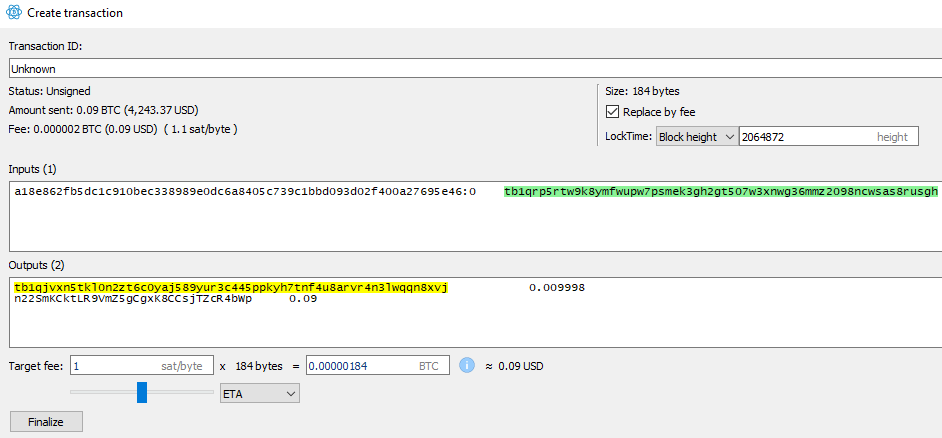
Go to send tab, enter the recipient Bitcoin address and input the amount to send. Verify it and click pay.

On the next screen verify the inputs, outputs, receiving address, change address, the fees used and click finalize.
Again on the next screen verify the transaction details and finally click sign.
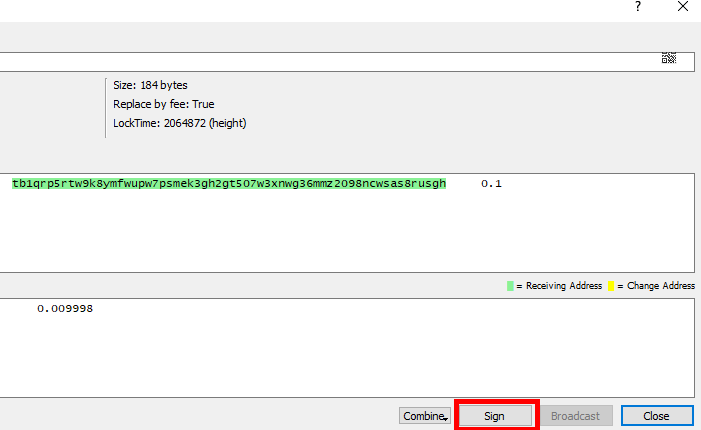
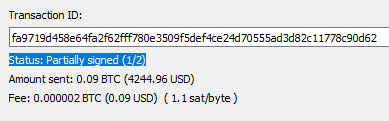
Now the transaction status will change to Status: Partially signed (1/2). We now have a Partially Signed Bitcoin Transaction, or PSBT! Do not close the transaction window yet.
Now the other person has to sign this transaction only then the transaction will get broadcasted and the coins will get transferred.
To accomplish this you need to send this partially signed transaction to your second wallet or to your cosigner.
Export multisig transaction
There are multiple ways to export the transaction.
On the same transaction window towards the left side you’ll see export option. Drop down export and you’ll find multiple options to export the transaction.

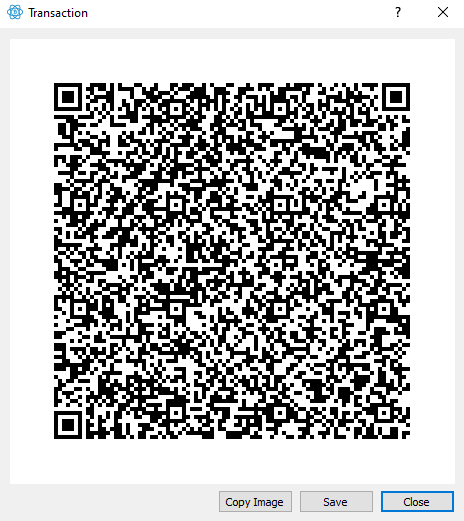
For example you can copy and send the QR code image to your cosigner.
You can export to file (ex as: multisig-wallet1-fa9719d4.psbt) and transfer the file on a USB stick to other computer. Or you can send the transaction file to other participant in an encrypted message.
Or you can also directly send the raw transaction scrypt which looks something like this:
cHNidP8BAIACAAAAAUZeaScKQC/Qk9C7wTnHBYRq3OCJiTPsC5Ec3LUvho6hAAAAAAD9////AnhBDwAAAAAAIgAgkw06Lt981CXrDydlQ5ScHHFa0CGxL+XNNeH6Ng6zj9xAVIkAAAAAABl2qRTg9lgZR/hWwGy6xJhxgu4DYaEyFIis6IEfAAABAP02AwIAAAAFTGVnVVTboRDE01SQRnH092urPj5Obq1f32pqmwLPCSYAAAAAakcwRAIgSDdz2HQ1l7PEXy+9AJ3CoveIdDcI32ABz5R26xC7YHsCIGE+Yma6TRJqEDdj+j4bSqTtvKTgeH+dNvQv4HoSNvWxASEDK1yq12syO5NjnStd9YPfCWqr4TBpx+tIRsIAgnf/o0n9////2u/6hO4/lgivyP82FMF6RRMMhTrpuhB4tWrmYy2U0ygAAAAAakcwRAIgWfbcGIzF1cfWoecGesQwLFUC0BPKSjDTHZXNyD+x4EQCICZoXVD0zj5GJzyc+FT1js/AtsrKo5HuAAfFsjmb+2gVASEDK1yq12syO5NjnStd9YPfCWqr4TBpx+tIRsIAgnf/o0n9////7DWtMhmmNyQykK/ogiYBv8CS3sXWO+lyFyeQpLmeNacAAAAAakcwRAIgXBtc17GZH5yUp3ZIePWifOSV/ENj4TrAX5EVFJLULPcCIEah9APQtXVvVbnmniNwuiPA9R4tLTlXiw5HWA7lD5NmASEDK1yq12syO5NjnStd9YPfCWqr4TBpx+tIRsIAgnf/o0n9////zQ3w+ZTjJjHlXBxvvWPulLjAeI9kP7I5y2L1VhTHGawAAAAAakcwRAIgSbv9ZTJJPHsWtuHEmiRv+PfQWJZjjMatJdyQ+/HTDscCIHnDYCaf5mO92WGetSaVqsg3dzSI6ljM62aUjlFlbfFAASEDK1yq12syO5NjnStd9YPfCWqr4TBpx+tIRsIAgnf/o0n9////Q10wAQy3tjh4eTE6GiqFwJTAyvAcMHf3sEVHou9AhNUAAAAAakcwRAIgMY1sEPVwHm2PCrTy69ubiomc5mv5WGpOtNjwdbGD0tACIF/KNc7tbjWxmNDZY6E8rCFhaEr5oJPaoFzOKkHrck3NASEDK1yq12syO5NjnStd9YPfCWqr4TBpx+tIRsIAgnf/o0n9////AoCWmAAAAAAAIgAgGGg1uLY5NpdwLvBhvNooupC6P86JpuRHW9iU8p54dDtY948CAAAAABl2qRS4jHL/g8rUKeZO6qn6TLY8Mn59uYis54EfACICAioo0cVnoSuhxZljvF5cJklgBFbjKMCVzjJ6jCzMna+uRzBEAiAL3WuK35wQ1E6ZTlek0N5JNBVVwW14hrmFVGX3ddRQsAIgWblwfG3htIyFIEEUaxoaEev1cAccwQB3lDQckWS0k/YBAQVHUiECKijRxWehK6HFmWO8XlwmSWAEVuMowJXOMnqMLMydr64hAjhULNo+ECZAuJlb3RjEYo6QRby0YaDI1ZIiD33qYmM8Uq4iBgIqKNHFZ6ErocWZY7xeXCZJYARW4yjAlc4yeowszJ2vrhAfPIeXAQAAgAAAAAAAAAAAIgYCOFQs2j4QJkC4mVvdGMRijpBFvLRhoMjVkiIPfepiYzwQGF3Y5AEAAIAAAAAAAAAAAAABAUdSIQKDq0DVd834A60sWuDdbwI/G0xnvQ/P8eCRapi3Fmhn0SEDsKWuqpDPiJf5AOWtMLPxIyNLOyFidXVHLnl+RWr3+VlSriICAoOrQNV3zfgDrSxa4N1vAj8bTGe9D8/x4JFqmLcWaGfREB88h5cBAACAAQAAAAAAAAAiAgOwpa6qkM+Il/kA5a0ws/EjI0s7IWJ1dUcueX5Favf5WRAYXdjkAQAAgAEAAAAAAAAAAAA=
Once the other side receives the transaction details they need to load it into their wallet and sign it. Here is how it is done.
Load partially signed Txn into multisig 2
Open multisig-wallet2 >> drop down tools menu >> select load transaction and choose the import method.
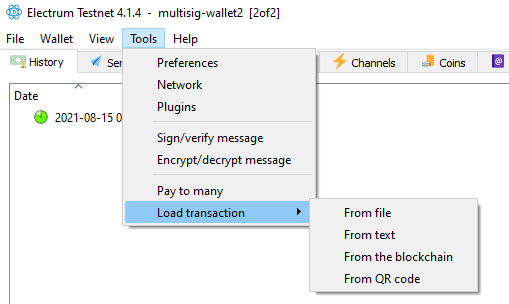
Next click load transaction which will show the transaction details created by multisig 1.
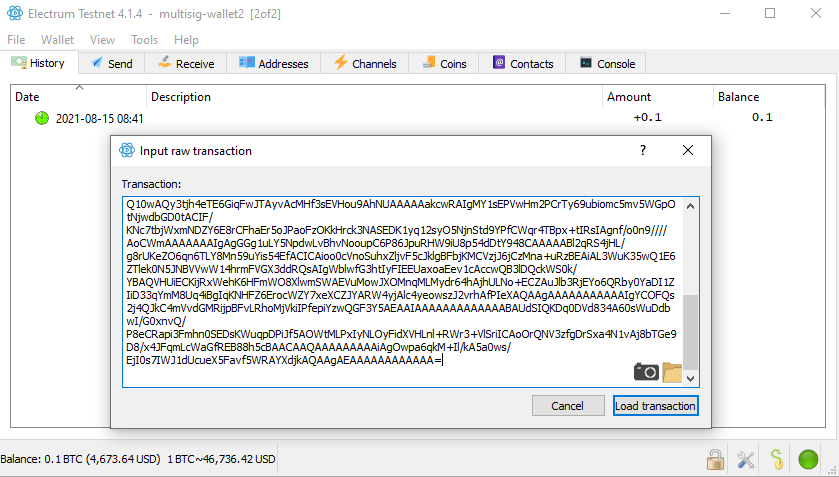
Verify all the information again and click sign which will change the status to signed.
Once enough signatures are met the broadcast button will become available. Click broadcast to send the signed transaction.
You’ll receive payment sent message! That’s it! The transaction will reflect on both the multisig wallets.
Familiarize multisig on testnet. Then move on to mainnet. Also make sure you can actually sign and broadcast transaction from your multisig wallets before you transfer large amounts of funds into your wallet!
That’s all there is to creating and using multisig wallets using electrum. Hope it helps. If you got any questions then please let us know in the comments section below.
In the next guide we’ll demonstrate on how to protect your Bitcoin with multisig using hardware wallets such as Coldcard, Ledger, Trezor and Bitbox02.

Hi,
I have created a 2of4 multisig wallet (one for the online and one for the offline PC).
I found a tutorial in German in c’t computer magazine.
But probably wrong, since the addresses are not equal in both wallets.
I have transferred some BTC to one of the addresses and wanted to send this money back.
But the online wallet didn’t ask me to sign the transaction but in the history I can see
that the money is on send (?) since two days.
Does it only take some time? The amount is there and two lines are recorded
(the fee and the money sent).
And under “outgoing payments” is the transaction with status = “Paid”.
Is the transaction in this case signed automatically?
Is the online wallet not considered a real multisig wallet?
The “wallet information” looks correct:
wallet type: 2of4
script type: p2sh
And any of the 4 MPKs are listed too…
I had expected to have to transfer the transaction to the offline wallet and sign it there too and then back to the online PC and send it to the recipient address.
===========
With your tutorial on the other hand it was a successful story!
This is (for me) the only tutorial which led me to a successfully building a multisig 2of2 wallet.
Only the point with spending BTC hasn’t been covered enough in my opinion.
How is it in general? Need I to be asked to sign the transactions or are they signed under the hood, automatically?
And I must copy the once signed Transaction before I copy it to the offline PC for the second signature (which I do manually)?
Any transaction needs two signatures in order to be ready to be sent out, correct?
OK, this was my first question.
The second one is:
How do I build a 2of4 multisig wallet on an (only one) offline pc?
I need it in order to securely leave the Bitcoins to my children.
Especially when the point comes to enter the MPKs of the cosigners (four in total).
Which MPK comes into which wallet and how to do that?
In case of just two wallets it’s actually quite easy. Just cancel the first wallet until I have the MPK of the second one,
which is being completed with the two MPKs.
But what is with the third and fourth wallet? Does every wallet need then the three MPKs from the other wallets,
so any wallet the own MPK and the ones of the other three cosigners?
Thanks
Yes, 2 of 2 multisig wallet requires two signatures. Sign transaction on your offline PC, then copy the signed transaction to your online PC manually. Sign it there and broadcast the transaction.
For 2 of 4 multisig wallet only two signatures required. To send a transaction you can sign it from any two wallet. But to restore the complete 2 of 4 multisig wallet setup you need the seed and MPK of all 4 wallets.
Since you are doing it for your own family you can use same seed word with 4 different passphrase to setup 4 separate wallets or you can use 4 different mnemonic seed for all 4 wallets. Make sure to backup the seed words, passphrase and MPKs. You’ll need all this to restore the same 2 of 4 setup.
Before you transfer large amounts test it by sending a fraction of Bitcoin. Next delete the wallet and try restoring the same setup. If its successful then backup everything and write down all the process in your own style for future reference. Just in case if you forget how all of it works. You can now safely continue using your multisig wallet.
Hi,
The question is, whether I could sign a transaction on the offline PC where I actually don’t have any balance? I didn’t try that yet.
I do therefore first sign the transaction on the online PC, where I received the BTC, then I export the transaction to an USB stick and then I sign the loaded transaction on the offline PC.
Then back again to the online PC and I broadcast the transaction.
Now I managed to build a 2of3 multisig wallet on the raspi.
I need to try it also, to use one seed for 4 multisig wallets.
With passphrase you mean the wallet password?
Of course I need to document everything for later, so I know exactly what I did.
Thanks a lot again…
Thanks for the answer!
I didn’t forget you, I just need to try it out first and then I’ll contact you;-)
This is a very valuable information for me:-)
Thanks again
Julio Jannis
Ah, one more question:
How to use one seed for a multisig wallet, say 2of4? Use the first time “add a new seed” and then for the rest
“I have already a seed” and paste the first seed into the field?
Passphrase is not wallet password. Its a seed extension.
First create a new seed and backup the seed. You can use the same seed for all 4 wallets. Same seed, but 4 different passphrase. The passphrase can be a single word or any custom phrase.
On electrum proceed with I already have a seed, enter your seed. Now choose options and check “extend this seed with custom words”. Click Ok. On next screen you’ll be asked to enter your seed extension. Enter your custom phrase and proceed with the multisig setup.
The passphrase that you enter should be different for all 4 setups. When you want to restore the multisig setup you need the 24 word mnemonic seed as well as all the 4 custom passphrase.
Please I want to know how I can follow this whole process, especially how to send bitcoin on a multi signature wallet using an Android device.
Hello, congratulations and thanks for the detailed article which helped me a lot in setting up multisig 2 out of 2. I set up one wallet on my PC and one on my phone. I don’t know if this is ok from a security point of view.
I have questions that I could not find an answer to:
1. Is it a problem that both devices are online and is it possible to sign transactions offline with one? And how is this done?
2. I read that you can send funds with only one signature despite setting 2 out of 2. Is this true and doesn’t everything make sense if possible?
3. Can I secure this multisig I have set up with ledger nano and do the transactions only depend on the ledger signature?
Thank you very much and all the best!
1. It’s generally recommended to keep at least one of the devices used for multisig offline. To sign transactions offline, you would typically generate the transaction on the online device and transfer it securely (e.g., via QR code or USB) to the offline device for signing. The signed transaction can then be transferred back to the online device for broadcasting to the network.
2. Depending on the specific implementation of your multisig wallet, it is indeed possible to send funds with only one signature, even if you have set it up as 2 out of 2. This flexibility allows for scenarios where one device may be unavailable or lost. However, it’s important to understand the implications of this setup. With only one signature required, if one of your devices is compromised, the attacker could potentially access and spend your funds. Ideally, you should strive to have both signatures whenever possible to maintain the security benefits of multisig.
3. Ledger Nano devices generally support multisig setups. YOu can connect Ledger with Electrum for multisig functionality. You can use your Ledger Nano as one of the signatories, which adds an additional layer of security to your multisig setup. Transactions would require both the Ledger Nano’s signature and the signature from the other device / wallet.
Remember, it’s crucial to thoroughly research and understand the specific implementation and security practices of your chosen wallet and multisig setup to ensure you’re using them correctly and securely.
Thanks for the reply!
Can I only use my phone offline when I do the transaction or does it have to be a device that never connects to the internet? And does it matter which device will be offline, does it have to be the first wallet created or does it not matter? Because my computer always is online and I would like to use my phone but it is the second wallet.
I wish all the best!