Just bought some Ethereum or your favorite DeFi token and wondering where to store them? Storing your coins and tokens on the exchange is not a good idea. You should move them to a wallet where you hold your private keys.
If you are holding large amounts of Eth or ERC20 Tokens then you should move them to hardware wallets like Ledger or Trezor. They offer the most secure storage solution. However if you are looking for a wallet to store small amounts for your everyday transactional needs then you use should consider installing MetaMask wallet. A very handy Ethereum wallet that is available as a browser extension.
 MetaMask is a free, open source browser extension that provides the simplest and the most secure way to connect and interact with the Ethereum blockchain.
Here we’ll explain how to setup and use MetaMask wallet. It’ll cover how to install Metamask on your browser? How to create and secure your account? How to backup and restore? Also how to receive, send and manage Eth, ERC20 or any DeFi tokens.
This is the complete beginners guide to MetaMask.
Now before we get in to the guide let’s first look at what is MetaMask and what are the features of this wallet. You can use the anchor links on the left to jump to specific section of the guide.
What is MetaMask?
MetaMask is an Ethereum based wallet and a tool that connects you to the Ethereum blockchain. It allows you to visit the distributed web of tomorrow safely and securely right from your browser. You can install this plugin on Google Chrome, Firefox and is also compatible with Brave browser.
Basically this tool functions as a bridge between your browser and the Ethereum network. It enables your browser to interact with Ethereum network and it makes web applications easy to connect with the Ethereum blockchain. All that without having to run a full Ethereum node.
MetaMask allows you to store and manage Ethereum and ERC20 tokens. It is a key that connects you to new types of application (DApps, DeFi) and is a wallet that keeps your data safe and sound.
MetaMask wallet features
The mission statement of MetaMask is to make Ethereum as easy to use for as many people as possible. This tool offers the most secure and convenient way to store, transfer Eth and interact with applications build on Ethereum.
It has so many features compared to other Ethereum wallets.
1. User friendly interface:
MetaMask is the most beginner friendly wallet available for Ethereum. The interface is plain and simple. Anyone with little knowledge of cryptocurrencies can setup and start using the wallet right away.
2. Multilingual support:
MetaMask is one of the few wallets that supports multiple languages. You can find almost all international / national languages which makes it easy to accessible for users across the world.
3. Currency conversion:
In addition to multi language support this wallet also has the option to choose currency conversion. You can choose your national currency and the wallet will display your assets value in your selected fiat currency.
4. HD wallet:
MetaMask is a HD (Hierarchically deterministic) wallet. You can create multiple accounts (ETH address) without having to worry about backing up every single key pairs. All your accounts are tied to a single seed phrase.
This seed word is secured by setting up an additional password. We’ll show you how it is done later in this guide.
5. Build in exchange:
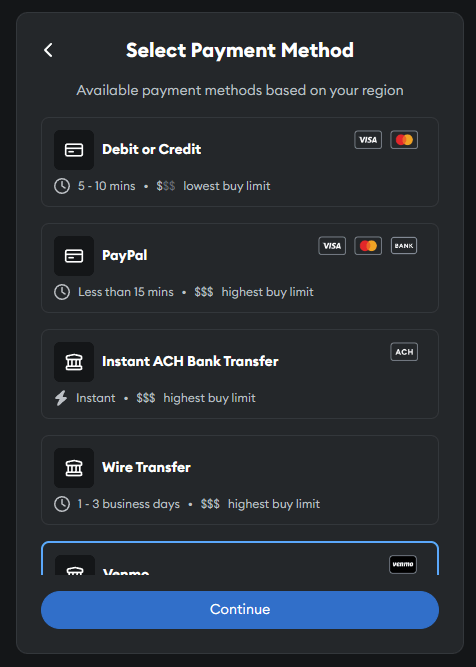
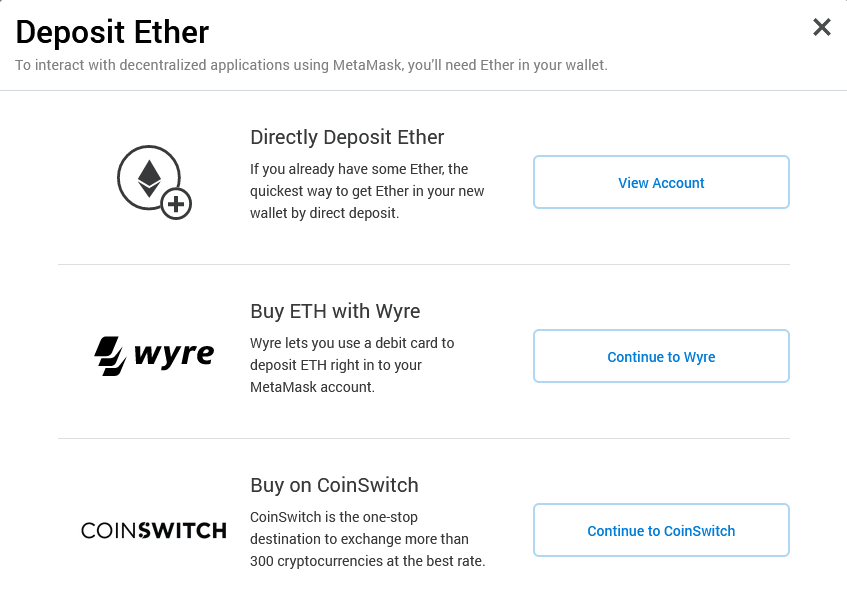
To interact with decentralized applications using MetaMask, you’ll need Ether in your wallet. If you don’t own any Ether then you can buy ETH directly from the wallet’s build in exchange. Previously they had an option to buy Ethereum from Coinbase and ShapeShift which has been removed. Currently the wallet only gives you the option to buy ETH with Wyre or CoinSwitch.
Update 2024: Using Metamask you can now buy ETH & tokens using credit, debit card, bank transfer, your PayPal and Venmo accounts. It offers convenient payment methods based on your region.
6. Custom fees (advanced gas controls):
Rather than allowing the wallet to choose the transaction fees you have the option to set custom gas price (GWEI) and limit.
7. Add & manage 100s of ERC20 tokens from one place:
MetaMask is not only an Ethereum wallet. It supports all ERC 20 tokens and you can add the latest trending DeFi tokens to your wallet.
Moreover it is cross browser compatible, plus it is available for Android and IOS. So you can manage your tokens from anywhere.
8. Private key control:
Unlike web and other third party wallets, MetaMask is a self hosted wallet where you can safely store your ETH and ERC20 tokens. It gives you full control over your private keys.
9. Open source and active development community:
MetaMask code is available online and is free to access. Since it is an open source wallet anybody can audit and review the software.
Alright! But since it is a browser extension is it safe to store my Ethereum and ERC 20 tokens on this wallet?
Is MetaMask safe?
MetaMask is an important part of the Ethereum community and is trusted by millions of users worldwide.
It has strong security features like encrypting seed phrase using additional password. Also it has strong community of developers updating the wallet and so far MetaMask hasn’t suffered any hacks or attacks.
However do note that MetaMask is a hot wallet which is connected online 24 / 7. This is generally considered less secure than cold storage.
MetaMask is safer than exchange and web wallets. But it is not as save as hardware wallets. As we said if you are looking to store large value then use hardware wallets. MetaMask is only recommended for storing small amounts of tokens that you use to transact every day.
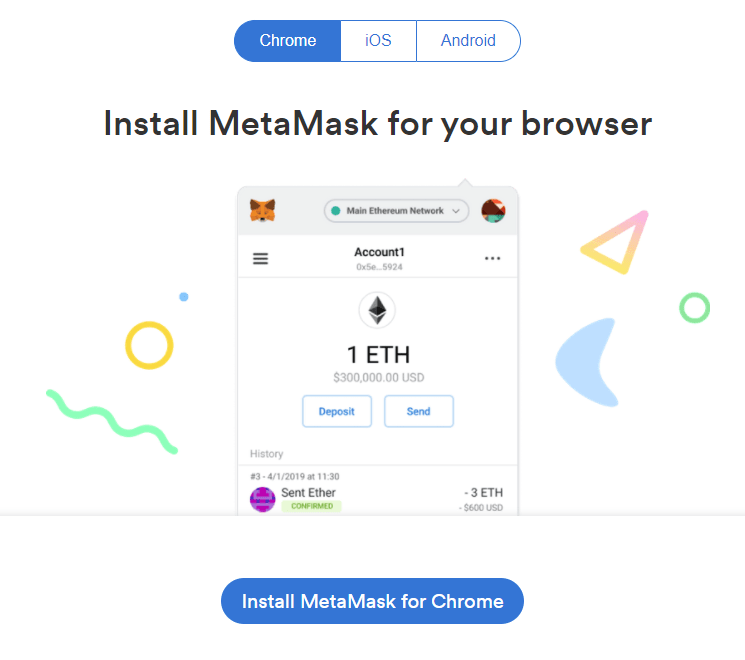
Installing MetaMask browser wallet
To start using MetaMask you need to first install the extension to your browser. MetaMask wallet is available for Google Chrome, Mozilla Firefox as well as Brave browser. In this tutorial we’ll be using Chrome. But the process is same for all browsers.
1. Go to metamask.io/download (Official website) page and install MetaMask extension for your browser.
Direct Links:
- Chrome & Brave Browser: https://chrome.google.com/webstore/detail/metamask/nkbihfbeogaeaoehlefnkodbefgpgknn
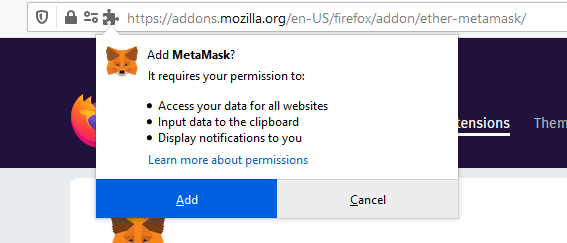
- Firefox: https://addons.mozilla.org/en-US/firefox/addon/ether-metamask/
Note: Rather than using direct links it is recommended that you install MetaMask from official website. Beware of fake extensions and phishing websites.
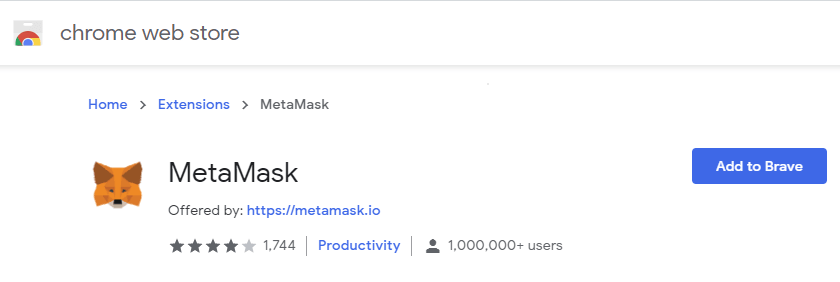
2. Click on Add to Chrome, Firefox or whichever browser you are on and then allow permission.
3. Upon adding the extension you’ll see the MetaMask icon at the top right corner of your browser. Also it will redirect you to a page where it will display the welcome message.
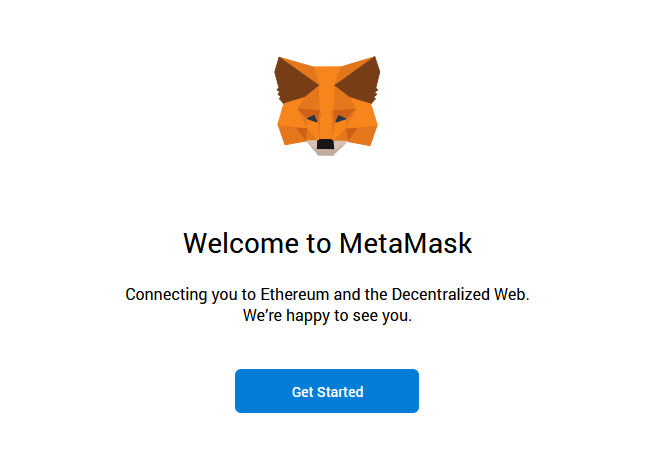
It means you’ve successfully installed MetaMask.
Great! Let’s now create an account / wallet
MetaMask wallet setup
1. Click on the MetaMask Fox icon at the top right corner of your browser and then click Get started.
![]()
2. Now you have two options to setup the wallet. You can create a new wallet or you can import wallet from seed which will cover later in this guide.
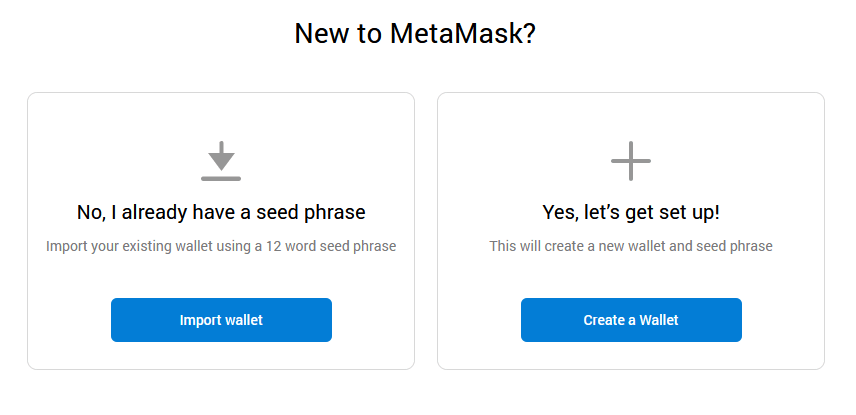
Since you are setting up a new wallet click on “Create a Wallet” which will create a new wallet and a seed phrase.
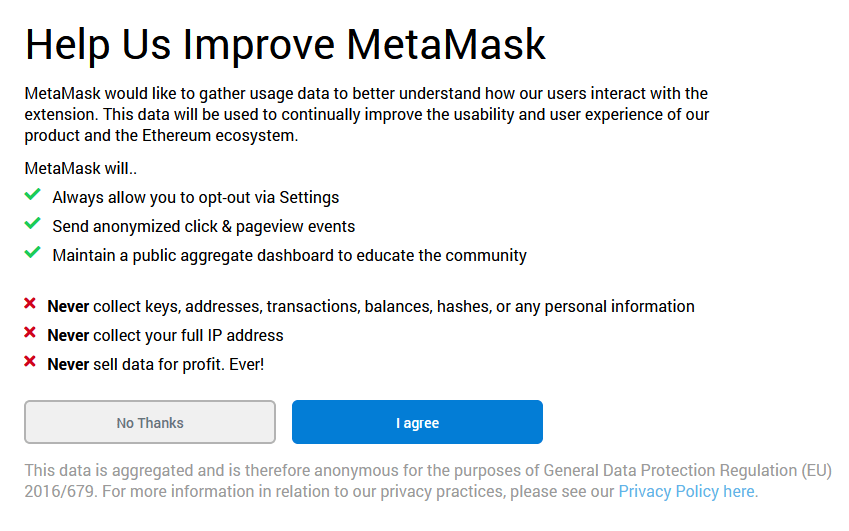
3. On the next screen read and agree to the privacy policy or proceed with no thanks.
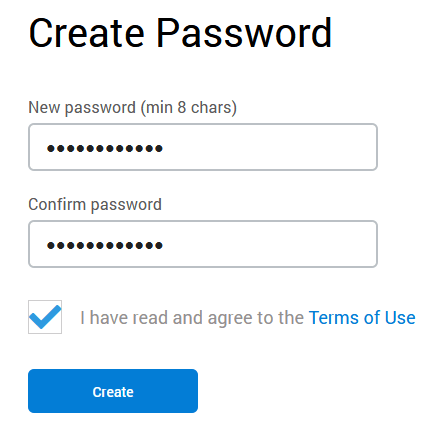
4. Now you’ll be asked to setup a password for your wallet. Set a strong password, confirm it, read and agree to the terms of use and then finally click create.
5. On the next screen you’ll be provided with the secret backup phrase along with some security tips. Read the instructions carefully. Remember to backup this seed phrase and never reveal it to anyone.

Tip: Write it in a piece of paper and store it in a secure location. Additionally you can also save them on password managers like Keepass.
Note: No matter what happens to your Metamask wallet. Whether your computer crashes, your hardware fails, or let’s say you forgot your wallet password. All you need is this secret backup phrase to restore your account completely. So backup this information safely and make sure they are in right order.
Once you’ve safely stored the secret backup phrase click on next.
6. Now you’ll be asked to confirm the secret backup phrase.
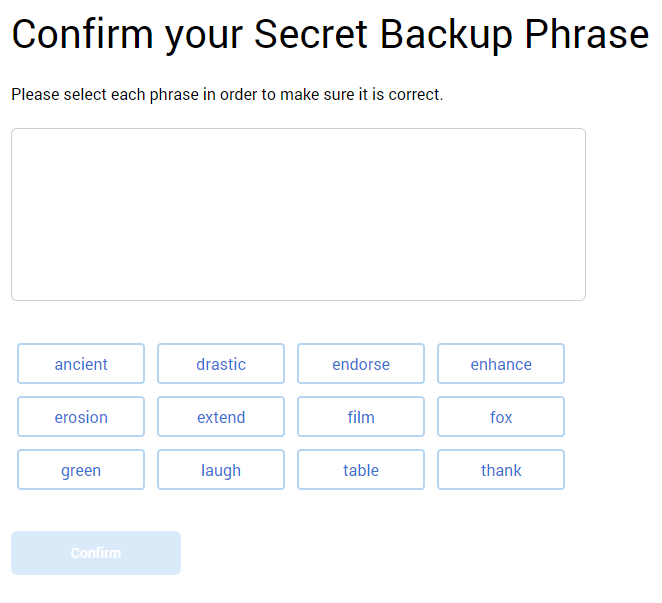
Chose them in order and only if the sequence is correct you’ll be provided with the option to continue.
Once you’ve solved the seed phrase puzzle click on confirm to complete the wallet setup.
Finally you’ll be given additional tips on securing your seed-phrase. Read them and click All Done which will take you to the wallet interface.
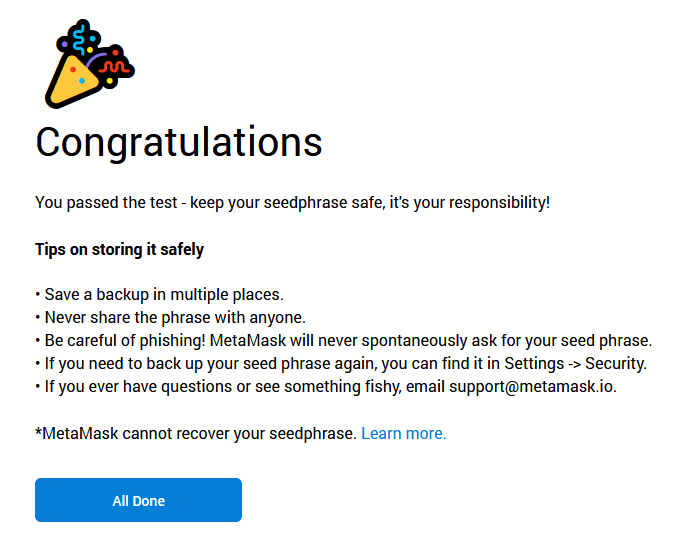
Congratulations! You’ve successfully created MetaMask wallet.
How to use MetaMask?
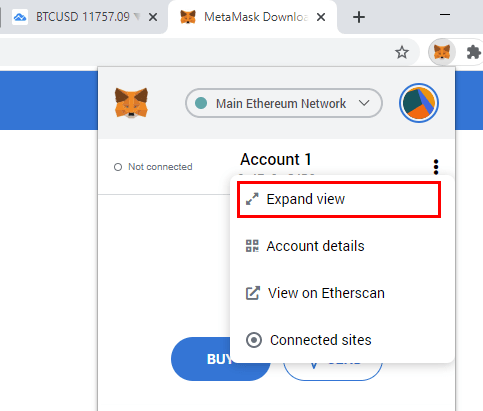
You can manage your wallet from the extension itself. But for better view let’s first make Metamask full screen.
Click on the fox icon at the upper right corner which will drop down the wallet. Now next to your account you’ll see three dots. Click on the account settings and select expand view to view Metamask on full screen. It will open the Web UI.
Now the wallet should look clean and pretty straight forward.
Now before you deposit Ethereum or any ERC 20 tokens to your MetaMask wallet on the main network try the test network first. It will help you understand how MetaMask works. You can safely experiment with Ethereum blockchain by buying and sending test Ether.
Select Networks
To start experimenting with the wallet without having to use the real money choose any of the test networks.
At the top right of your wallet you’ll see a drop down menu with Main Ethereum Network (Ethereum Mainnet) selected. This is the default network that you need to use to sign transaction and interact with the Ethereum blockchain.
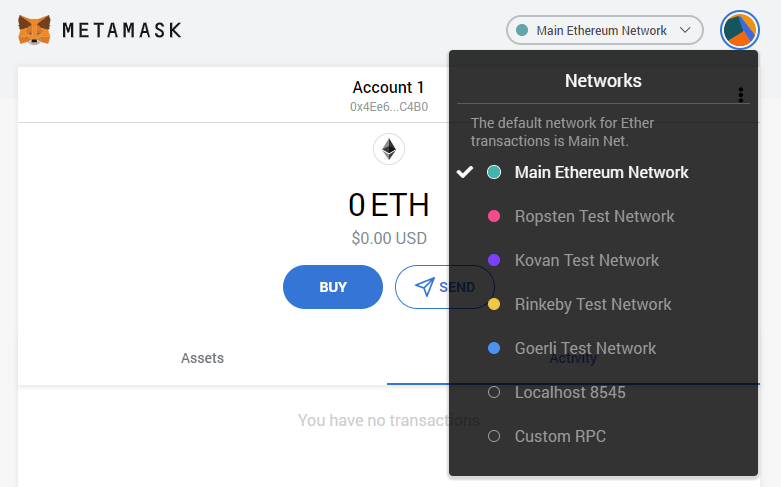
For now select any testnet such as Ropsten test network, Kovan test network, Rinkeby test network or Goerli test network. Currently you only have Sepolia test network. Once you’ve fully understood MetaMask you can then switch back to Main Ethereum Network.
Tip: Switching between networks does not change your Ethereum address.
Getting test Ether from faucet
Once you’ve chosen test network click on Buy from the home screen. You’ll now see the option to get test Ether from the faucet.
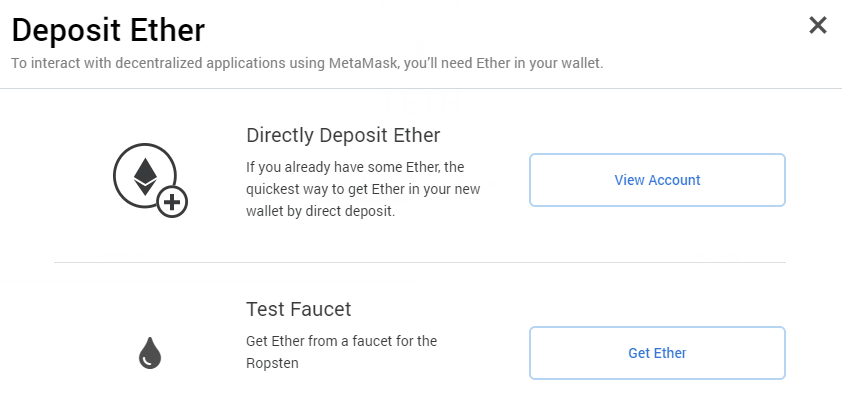
Click on get Ether which will take you to the MetaMask Ether faucet. Now request 1 ether from faucet which will connect with your MetaMask wallet.
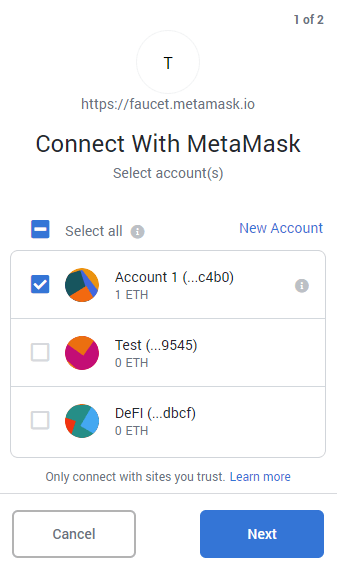
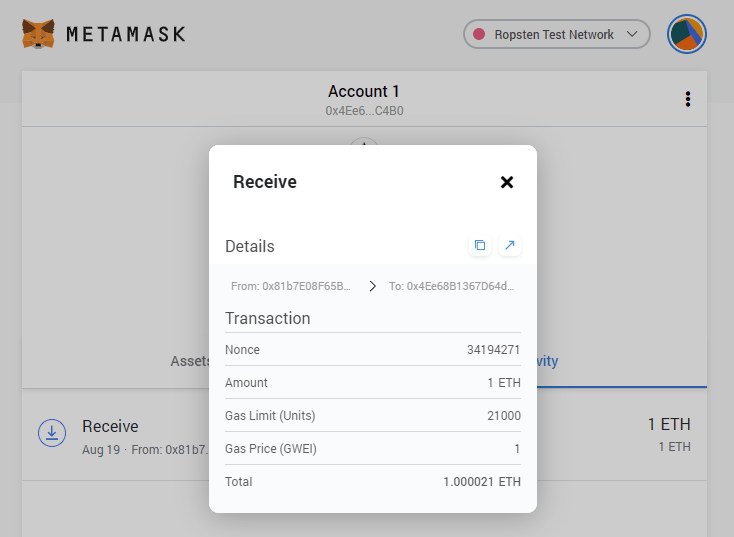
Choose your account, click next and connect. Once this transaction gets confirmed the ETH will show up in your MetaMask wallet.
Once the ETH is received it will show up in your assets tab. On the activity tab you can view the complete transaction details.
Note: The same procedure applies when you are buying Eth on the mainnet. Instead of faucet you’ll be buying it from the exchange. If you already have some ETH and would like to transfer it to your wallet then just deposit Ether directly to your ETH address.
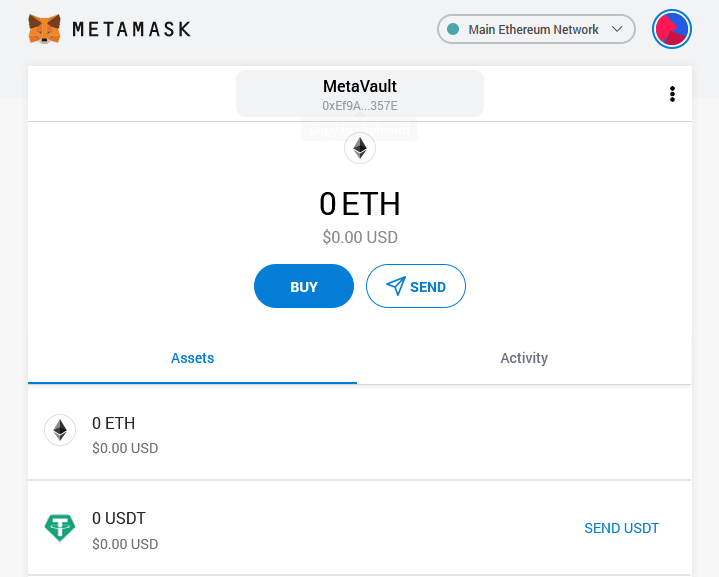
Account information – Ethereum public address
The moment you complete the wallet setup a new unique Ethereum address will be automatically generated for you.
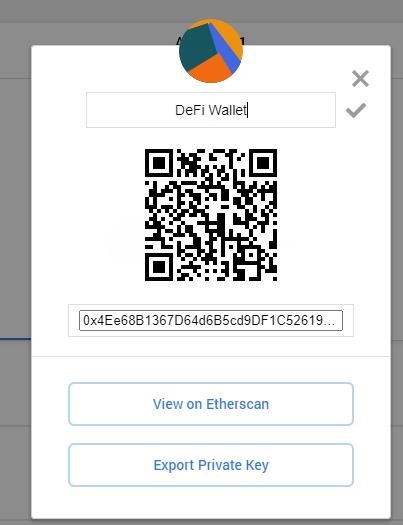
On the home screen at the top center you’ll see your ETH address. It looks something like this (0x4Ee6…C4B0). Just click on it to copy the address to clipboard.
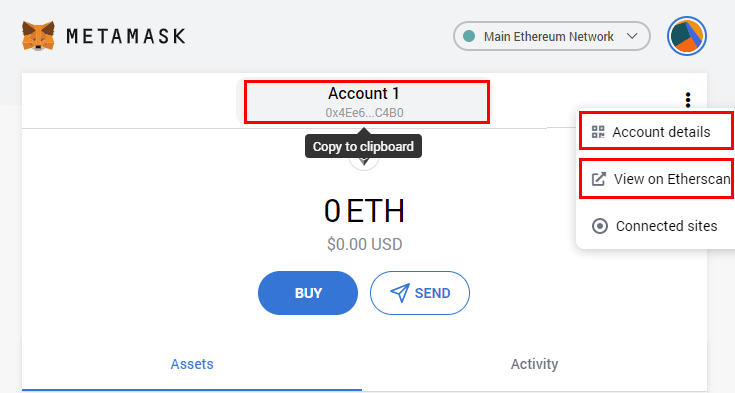
If you need the QR code of your address then click on account details. Additionally you also have the option to view the address on Etherscan block explorer.
This is the public key where you need to send your ETH or ERC20 tokens. You can share this public address to anyone to receive Eth.
Okay, but what if you want to generate a new Ethereum address?
Creating new address
On MetaMask every account represents a unique Ethereum address and you can create as many accounts you want.
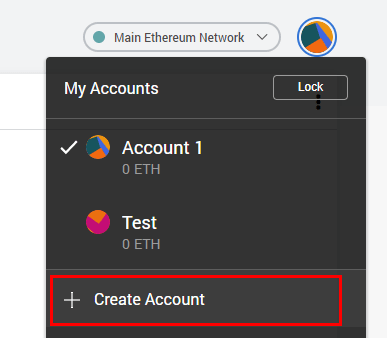
To generate a new ETH address drop down the accounts menu and click add account. Now enter the account name and click create to generate a new ETH address.
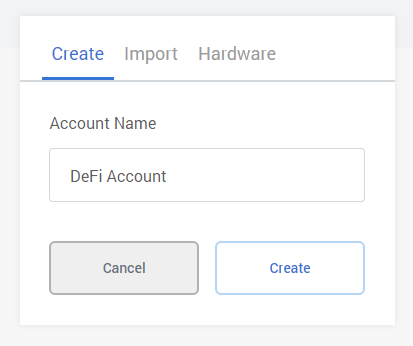
You can switch between accounts anytime and all the accounts you create in MetaMask will be associated with your seedphrase which you backed up during the initial setup process.
Importing private key to MetaMask
In addition to creating a new account you can also import private key to MetaMask. Just enter the private key and click import to import your ETH account. It is as simple as that. However we do not recommend importing private keys to MetaMask.
Note: Imported accounts on MetaMask are referenced as loose accounts. It means they are not associated with your MetaMask account’s seedphrase.
In future when you import wallet using your seedphrase you won’t see the imported accounts. Only the accounts generated from the wallet will appear. This is why instead of importing private key send ETH or tokens directly to your ETH address which you created using MetaMask wallet.
Exporting private key
Again this is only recommended for advanced users. In addition to import you also have the option to export private key of an Eth account. To do so click on account settings >> account details and select export private key.
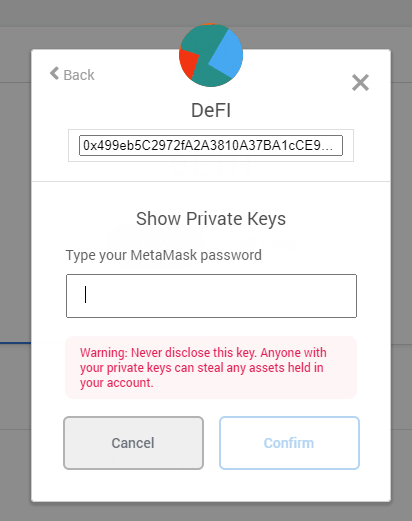
You’ll be asked to enter your MetaMask password (not the seed word). Enter the password to reveal the private keys.
Note: Just like your wallet seedphrase you should never disclose your private keys to anyone. Doing so will compromise your account funds.
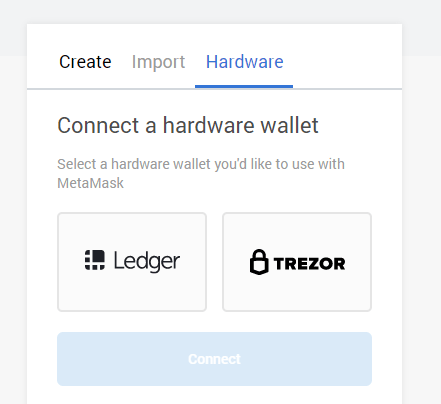
In addition to create and import you can also connect your hardware wallet like Ledger or Trezor.
Alright! Lets now see how to add tokens to MetaMask wallet
Adding Tokens to MetaMask wallet
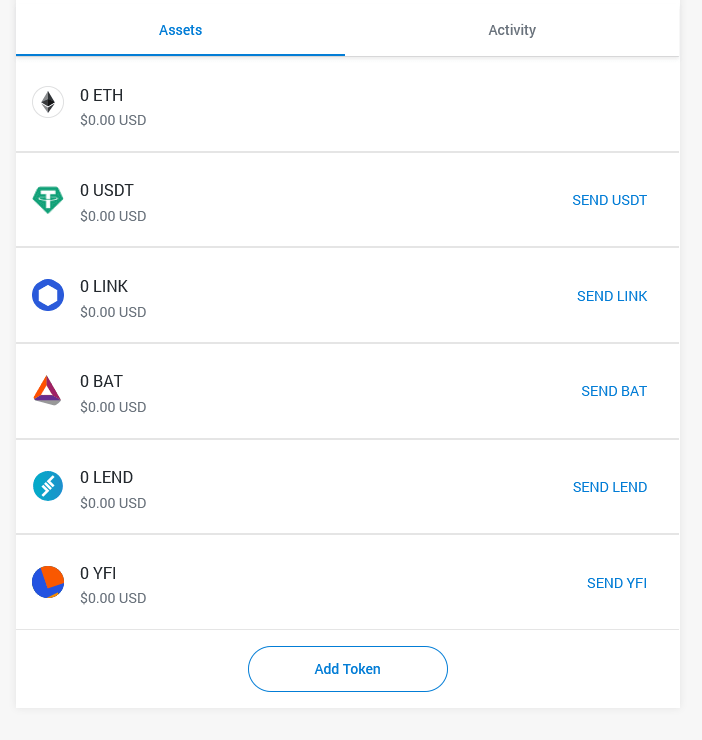
By default your MetaMask wallet only displays your ETH account. But, that’s not it. You can add and manage all the tokens (erc20, 721, and more) that operates on the Ethereum blockchain.
For example you can manage the following tokens using MetaMask:
USDT, Chain Link, USD coin, Aave, Maker, Synthetix Network, Basic Attention Token, DAI, YFI, FTX, AMPL, MATIC (now Polygon), etc. There are more than 100s of Ethereum based tokens that you can manage using your MetaMask wallet. In addition to ERC 20, it also supports Binance Smart Chain (BEP 20), Arbitrum One and Polygon tokens. Its compatible with all EVM chains. You just need to connect Metamask to the respective blockchain.
To send tokens from exchange to your MetaMask wallet all you need is your ETH address. Copy your Ethereum address from MetaMask wallet, paste it in recipient address field on the exchange and transfer your tokens. To start with just transfer a tiny amount.
Once the transaction gets confirmed on the network the tokens will show up in your wallet. But first ensure the token is added to your MetaMask wallet.

To add a token just click Add Token on the home screen of your MetaMask wallet. Now search the token name, select and then add it to your wallet. It’s simple.
You can add as many tokens you want and it will display all of the token assets on the main screen.
Can’t find a Token on MetaMask?
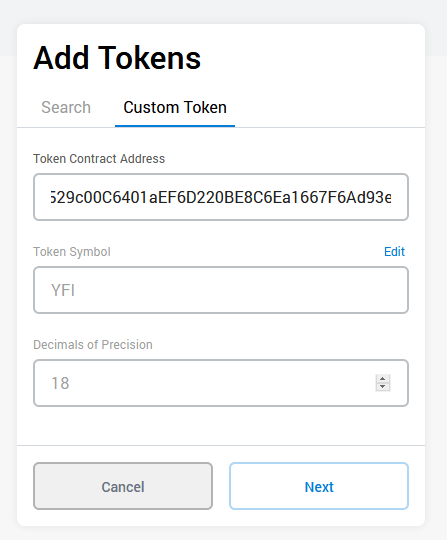
Adding custom tokens
Sometimes the token which you are looking for may not show up in search results. Do not worry. You can still add them to your wallet.
All you need is the tokens smart contract address.

1. Go to Etherscan and search for the Token name.
2. Choose the Token and it will display the token contract address.
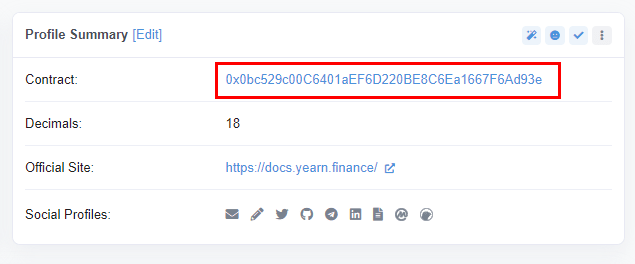
Example: Yearn.finance: Contract: 0x0bc529c00C6401aEF6D220BE8C6Ea1667F6Ad93e
3. Copy the address and enter the contract address in custom token section. This way you can add your desired tokens.
Note: Custom tokens can only be added on the Main Ethereum Network.
Now that you’ve understood most of the features of MetaMask go ahead and switch your wallet to main network.
Alright! Let’s now see how to backup and secure your MetaMask wallet.
How to backup MetaMask?
As we said in the beginning, to backup MetaMask all you need is your wallet seedphrase. The 12 word secret backup phrase which we told you to write down.
You can still backup that information if you failed during the wallet setup process.
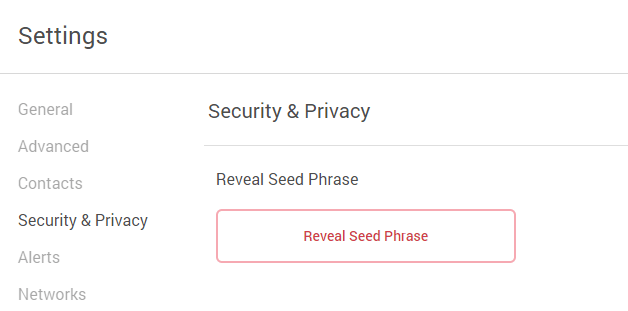
- At the top right drop down your account and go to settings.
- Navigate to security and privacy and click Reveal Seed Phrase.
- Now enter your wallet password to view your private seed phrase.
Write it down in a piece of paper and keep it safely. If you lose this you’ll lose all your coins and tokens.
In future if something goes wrong you’ll need this seedphrase to restore your wallet.
How to restore MetaMask wallet using seedphrase?
You MetaMask wallet can manage only seed word at a time. If you’d like to import a new seed word then either you have to delete your existing wallet or you can install MetaMask on another browser.
Follow the steps below to restore account using seedphrase
- Go to Metamask.io/download and add the extension to your browser.
- Click get started and choose import wallet.
- Now enter the secret twelve word phrase, set a password for your wallet and click import.
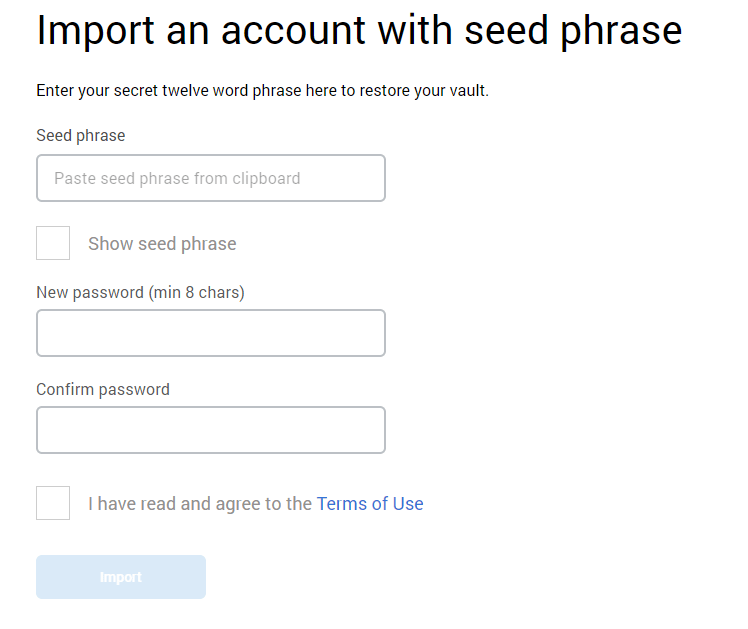
It will restore your wallet successfully!
MetaMask accounts missing after restore from seed
When you restore your wallet from seed only the first account will be displayed.
All other newly added accounts won’t be visible. Do not worry. To see your missing accounts just click on create account again and again. It will recreate the same account addresses which you used previously. The accounts will be restored in the order they were created.
Great! We are almost done. Lets now see the additional settings and we’ll finally cover how to manage ETH and Tokens on MetaMask.
Other Settings:
-
Rename account
If you’ve created several accounts (Ethereum address) then you may wish to give an unique name to them for your convenience.
By default MetaMask displays account names as “account 1”, “account 2”, “account 3” etc.
To rename an account go to account details and click on the pencil icon. Now enter a new name for your account and save changes.
-
Lock your wallet
When you are not using MetaMask it is better to lock your wallet. To lock, drop down your account and click lock.
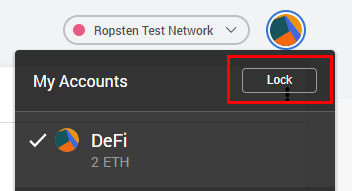
Now to unlock and use your wallet again you have to enter your password.
-
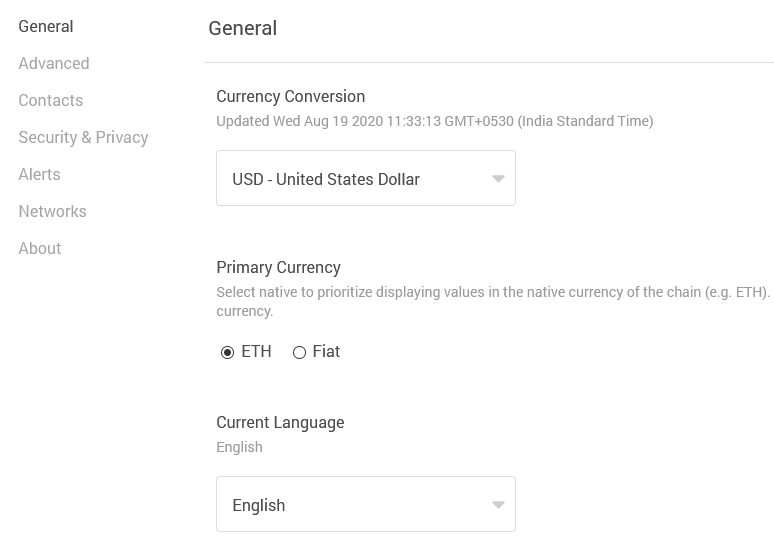
Changing language and currency conversion
Open your wallet settings and navigate to general tab to change the language and currency information.
In addition to this there are some other advanced settings like gas controls, transaction time, hex data and transaction nonce etc. You can also set auto lock timer in minutes to auto lock your wallet. Play around with the settings and you’ll come to understand what these are.
Managing ( Send / Receive) Eth / ERC20 Tokens on MetaMask
So far you’ve learned how to setup wallet, create account and secure your wallet. You’ve learned how to backup and restore your wallet. You know where to find your ETH address and how to deposit ETH. Also you know how to add and manage tokens.
Now let’s see how to send your ETH and tokens from your wallet.
1. Open MetaMask, choose your account and select Ethereum or the Token that you wish to send from the assets tab.
2. Now click send and enter the recipient address. Make sure it is a valid ETH address. You can also transfer between your accounts for a small fee.
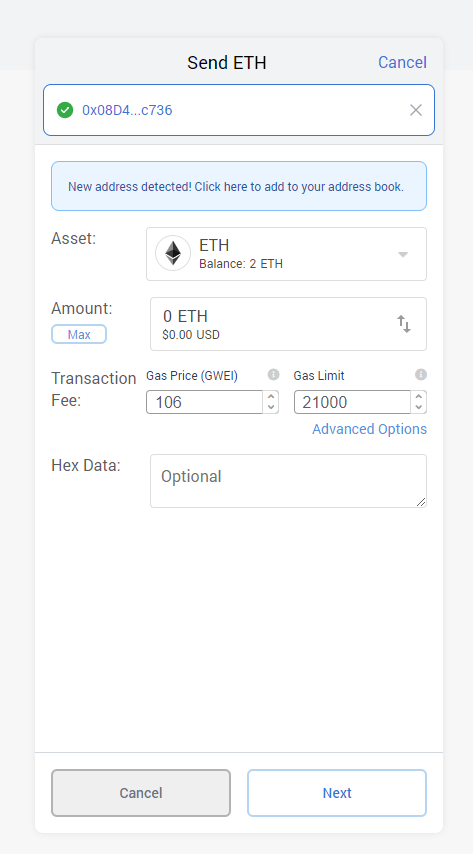
When you enter an external address you’ll see this message stating “New address detected! Click here to add to your address book“. If it is your exchange address or something which you’ll be transferring to and from regularly then you can add them to your address book.
3. Now in Assets tab you again have the option to choose asset.
4. Choose what you want to send and enter the amount to send.
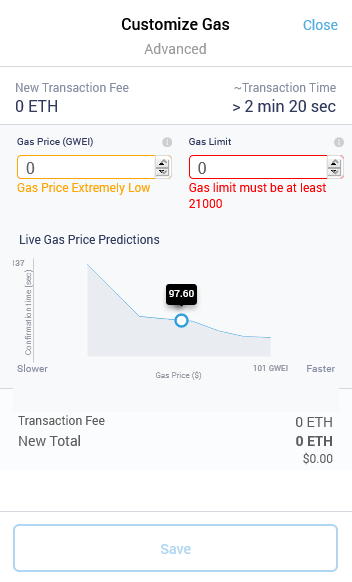
5. Next you’ll see the field for Gas Price (GWEI) and Gas Limit.
- Gas price specifies the amount of Ether you are willing to pay for each unit of gas.
- Gas limit is the maximum amount of units of gas you are willing to spend.
Similar to Bitcoin, this is the incentives that you pay to the stakers to add your transaction to the blockchain. If you are unfamiliar with the concept of GAS then we recommend you to leave it to default.
Depending on the network traffic the gas price and gas limit changes.
6. Once you’ve entered all the information click next. On the next screen verify the transaction again and click confirm to sign the transaction.
Now your transaction will show up in the activity page. Once confirmed your ETH or the token which you sent will be successfully transferred out. You can view the full transaction details on Etherscan.
MetaMask FAQ
For more questions and answers check their official FAQ section.
That’s All! If you’ve made it all the way here, then well done! Congratulations and welcome to the distributed web of Tomorrow!
If you found this guide helpful then please do share it. Also do follow us on Twitter and Facebook to get the latest updates. For more guides specific to Metamask check this page: https://coinguides.org/tag/metamask/.