To avoid paying high Ethereum Gas Fees; Large number of DeFi users are migrating to EVM compatible blockchains and Layer-2 side chains. To interact with alternate blockchains like BSC and Matic (Polygon) all you need is a Ethereum compatible wallet.
There are many Ethereum wallets that allows you to switch between networks but the best one is MetaMask. MetaMask is a safe and flexible browser wallet that allows you to switch between various blockchain networks including Ethereum, Binance Smart Chain and Polygon network (Matic).
Previously we’ve made a tutorial explaining how to connect your MetaMask wallet to Binance Smart Chain. Likewise here in this guide let’s see how to setup MetaMask for Polygon (previously Matic network). We’ll show you how to configure and connect MetaMask to Matic mainnet. We’ll show you how to setup and use Polygon web wallet. Also we’ll show you how to transfer assets from Ethereum Mainnet (L1) to Matic Mainnet (L2).
Once you’ve done this you can start using DeFi on the Matic network with zero gas fee and at high speed. Now before we see how to connect your wallet to Polygon chain here is a quick introduction to Matic (Polygon).
Polygon
Polygon (formerly known as Matic Network) is a layer 2 scaling solution that is created to help bring mass adoption to the Ethereum platform. Polygon network mainly focuses on improving the functionality of the ETH blockchain by drastically increasing the Ethereum’s network scalability and overall transaction speed. It is the Swiss army knife of Ethereum scaling.
Matic provides developers the tools to create scalable decentralized applications that prioritizes user experience (UX), performance and security. It is a layer 2 scaling solution for Ethereum with atomic swaps, payment / lending solutions, improved DApps and DEX performance.
At its core Matic is committed to provide less expensive and faster transactions on the Ethereum blockchain. To achieve this it uses its own Proof of Stake (PoS) commit chain and a more viable L2 scaling solution (Plasma). This not only help scale the Ethereum network. But it also solves issues like network congestion and many other inefficiencies that are faced by Ethereum and other Proof of Work blockchains.
Matic (Polygon) features
Polygon is a framework for building and connecting Ethereum compatible blockchain networks. The most notable features of Matic protocol are ETH compatibility, scalability and modularity.
With slight change in settings almost every Ethereum wallet can be configured to use the Polygon network. Just like how you can connect your wallet to BSC, Matic support can also be easily added.
Zero gas fee and high speed transactions – You know that to borrow / lend on services like Compound and Aave it might take up to tens to hundreds of dollars in gas fees on the Ethereum main network. The same loan can be accomplished on Polygon network in just a few seconds with costing close to zero gas fee.
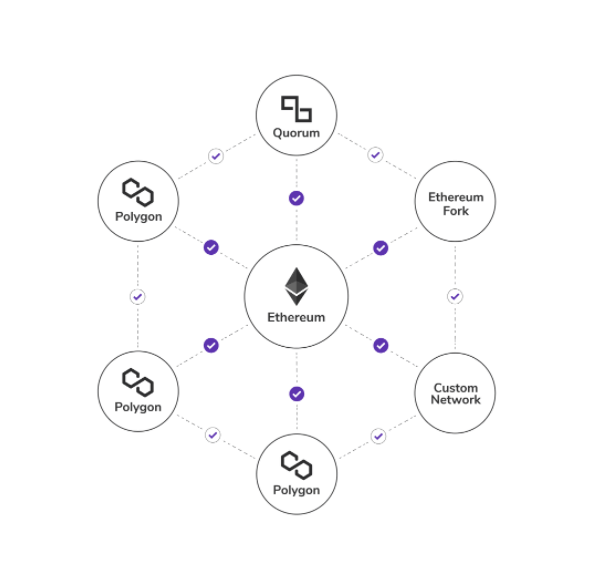
It is simply an aggregating scalable solution supporting a multi-chain Ethereum ecosystem.
Other than solving the network efficiency the team behind Polygon is trying to solve much more complex issues that could hinder the mainstream adoption of blockchain technology.
You can learn more about Polygon here:
https://www.gemini.com/cryptopedia/polygon-crypto-matic-network-dapps-erc20-token
Projects on Polygon
Due to limitations on Ethereum; many blockchain developers started building their projects on Polygon as it offers flexibility and has scalability at its core.
Alternative blockchains and Layer-2 solutions such as Binance Smart Chain and Polygon have DApps running on them similar to the services on the Ethereum network such as Uniswap and Sushiswap. The main advantage is that they benefit from faster transaction times and near zero gas fees without sacrificing on the security.
Several projects such as EasyFi, Polymarket, Aavegotchi have already taken advantage of Polygon. Also more and more solid projects like Aave, Curve, Sushi and 1inch started allowing its users to be able to trade on the Matic network.
To know more about the projects that already use Polygon architecture check out https://awesomepolygon.com
Now to interact with Matic blockchain all you need to do is add Matic (Polygon network) to Metamask and have it switch from Ethereum to Matic.
Here is how to setup custom Polygon (Matic) Mainnet RPC for MetaMask.
Setting up MetaMask for Polygon (Matic Network)
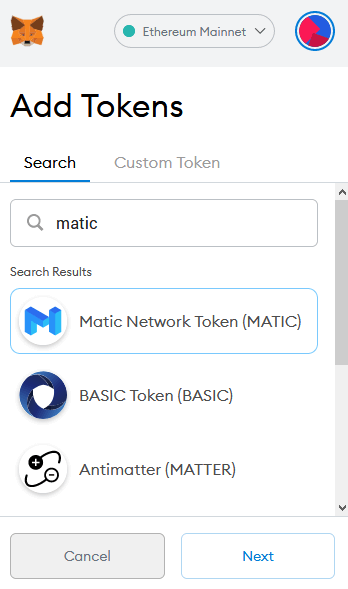
Note: The project name Matic was rebranded as Polygon in early 2021. Despite the project name change the network and the token name still remains the same. Matic (MATIC) is the name of the token and in wallet it will be shown as Matic Network Token (MATIC). Do not confuse them.
- Ethereum block explorer: https://etherscan.io/
- Matic token contract details: https://etherscan.io/token/0x7d1afa7b718fb893db30a3abc0cfc608aacfebb0
- Matic block explorer: https://explorer-mainnet.maticvigil.com/
Alright! Now let’s configure Metamask for Matic network.
Connect MetaMask to Polygon / Matic RPC / Mapping Mainnet
Configuring Matic on Metamask is simple and straight forward. Once you’ve configured you can switch between layer 1 (Ethereum) and layer 2 (Matic) anytime by changing the network.
We hope that you have your Metamask wallet ready. If you are new then learn how to setup and use MetaMask wallet.
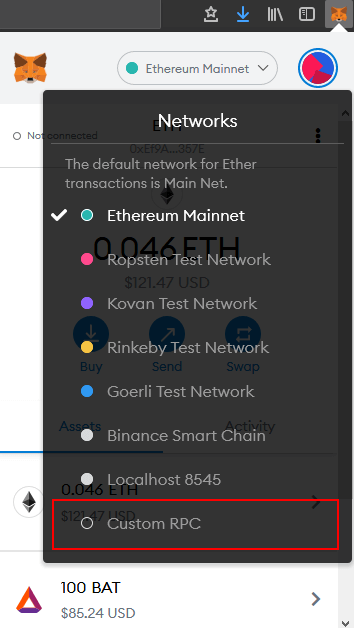
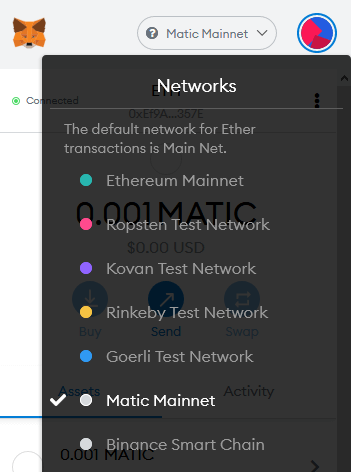
Once your wallet is ready drop down Ethereum mainnet and choose custom RPC as shown in the image below. For more convenience use the expand view option.
Now input the network details as follows:
- Network Name: Matic Mainnet
- New RPC URL: https://rpc-mainnet.maticvigil.com/
- Chain ID: 137
- Currency Symbol (Optional): MATIC
- Block Explorer: https://explorer-mainnet.maticvigil.com/
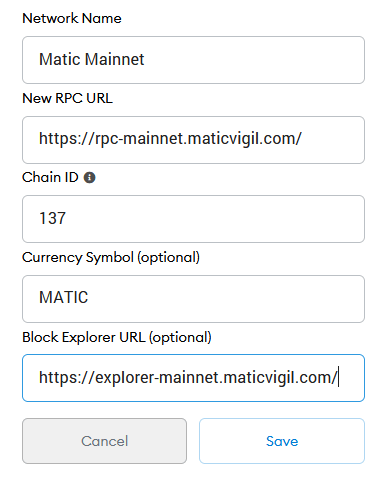
Make sure you do not miss any of the above fields even though if it says optional. Once entered click save and your Metamask will automatically switch to Matic Mainnet.
You are now connected to the Matic mainnet with your Metamask Wallet.
Additionally if you want to learn the network without risking your real money then you can also add Matic Testnet.
Connect MetaMask to Matic Testnet (Optional)
To add Matic’s Mumbai-Testnet input the following details in custom RPC filed.
- Network Name: Matic Testnet
- URL: https://rpc-mumbai.maticvigil.com/
- Chain ID: 80001
- Symbol: MATIC
- Explorer: https://explorer-mumbai.maticvigil.com/
Click Save. That’s it.
You can easily switch back and forth between Ethereum Mainnet, Matic Mainnet and Testnet using the network select option at the top of the application.
Alright! You’ve configured MetaMask for Matic Mainnet as well as Matic Testnet. Now what?
Get MATIC tokens on Binance (10% rebate) or FTX. But before transferring it to your wallet do note that you cannot transfer funds from Binance to Matic network directly. Binance only supports BSC (BEP20) and Ethereum network currently. FTX and other exchanges only support transfer of funds to Ethereum network. Keep this in mind and do not mess up transferring tokens to the wrong network.
Currently to get your funds to Matic network you’ll have to send it to your ETH address in Ethereum network and then swap it to the Matic network.
Matic (Polygon) is a separate blockchain from Ethereum so you need the bridge between the two to transfer assets from one network to another. Its like basically swapping from one blockchain to another blockchain. Once you have moved funds to Matic blockchain you can interact with L2 DApps running on the Matic blockchain.
To bridge between two networks and to swap assets we’ll be using the official Matic web wallet.
Setting up Matic Wallet
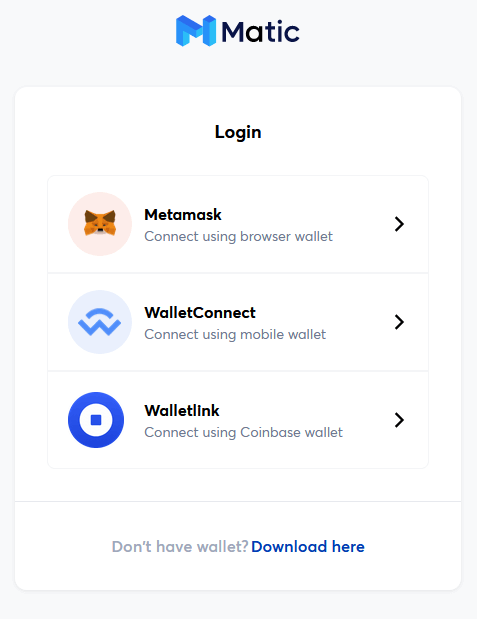
Visit https://wallet.matic.network/login/ and you’ll find three ways to login. Metamask, Wallet Connect and Wallet Link (Coinbase). Since we have the Metamask wallet ready select connect using browser wallet and choose your account that you wish to connect.
Make sure your wallet is connected to the Ethereum mainnet and make sure to select the right account that have funds in it. Once you’ve chosen the account click next and then connect.
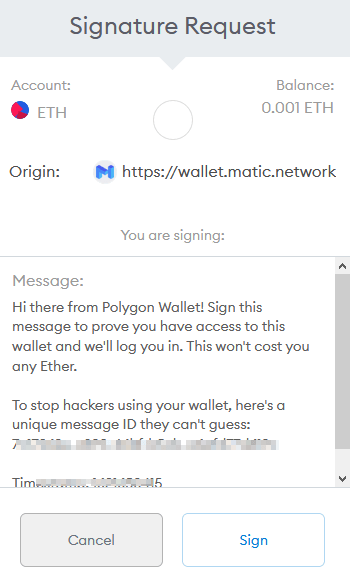
Finally click sign to login to Polygon wallet.
After signing in wallet.matic.network will take you to Matic wallet v2 interface, Matic mainnet dashboard.
Once connected transferring your tokens from Ethereum to Matic Mainnet is quick and easy.
Transferring assets from Ethereum Mainnet to Matic Mainnet
Matic wallet is a dedicated wallet and a bridge that connects Ethereum and Polygon blockchain. It simplifies the transfer of assets between the two networks.
Polygon wallet uses PoS bridge to swap assets from Ethereum to Matic network. Its only going to take a few minutes to move your assets to the Matic network including Fungible tokens (ETH, USDT, DAI etc) as well as NFT (Non Fungible Tokens) (ERC-1155 and ERC-721). To swap tokens you only need to pay a transaction fee on the Ethereum network.
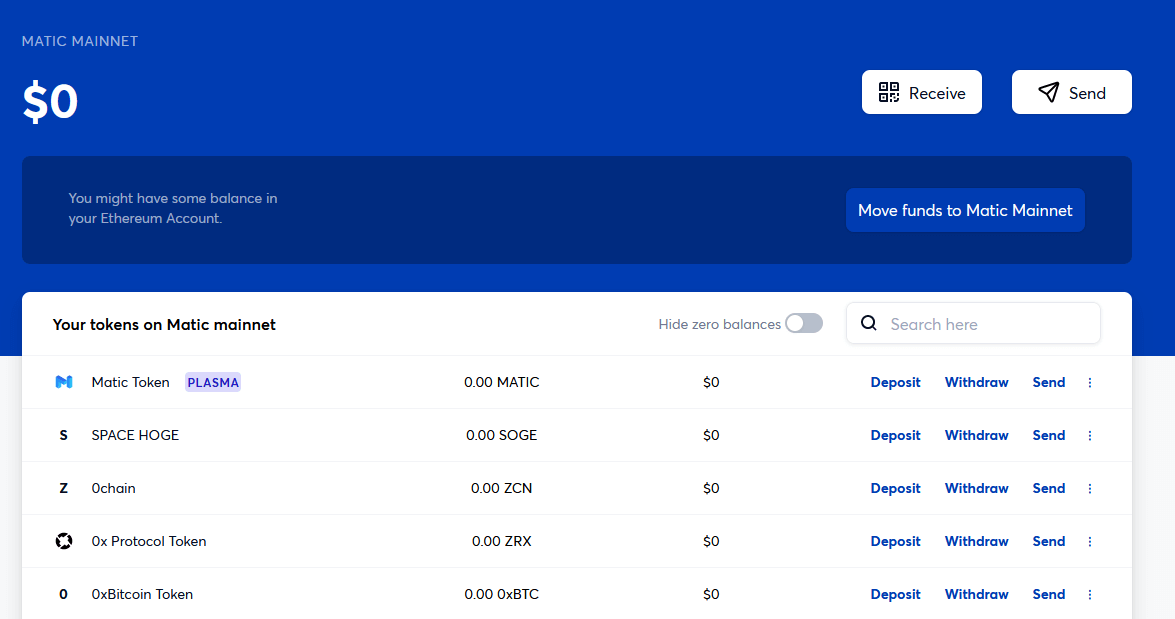
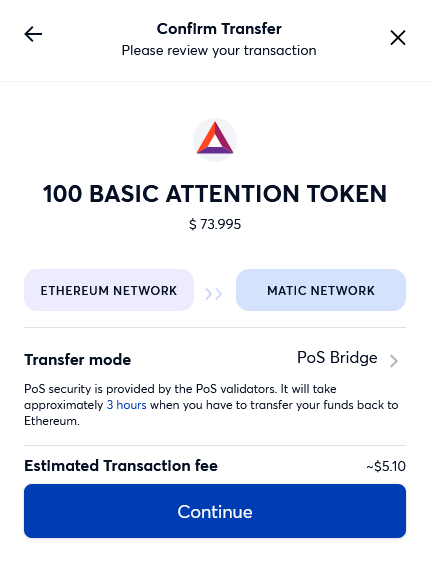
On your Matic web wallet click Move funds to Matic Mainnet which will open the swap interface.
Previously there use to two transfer mode options namely Plasma and PoS bridge. Now the Plasma has been removed and the PoS Bridge is by default the chosen transfer mode.
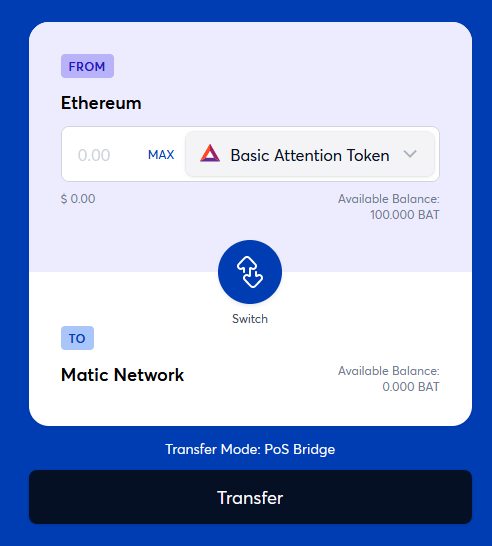
Select the token and the amount on the Ethereum mainnet that you wish to transfer to the Matic Network. Then click transfer.
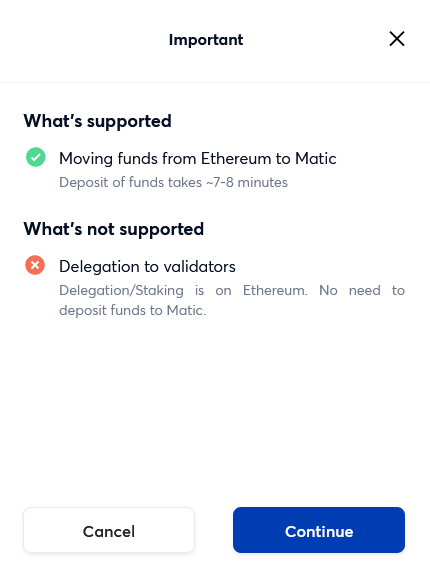
You’ll now see the important message screen mentioning what’s supported and what’s not supported. You are moving funds from Ethereum to Matic and deposit of funds takes ~7-8 minutes. Read it and click continue.
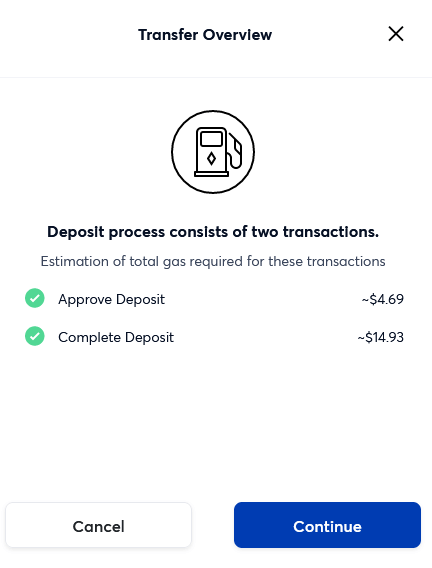
Now you’ll get the transfer overview window which shows the total gas fee required for your transaction. Since the transfer is happening on ETH network the gas fees could be high. Not to worry. Once you’ve transferred your asset to Matic wallet (Polygon network) you should be able to enjoy fast and cheap transfer of assets.
Click continue to confirm deposit and again click confirm to confirm your transfer.
It will now open your MetaMask wallet. Review the fees again and click continue on wallet to “Allow https://wallet.matic.network to spend your tokens”
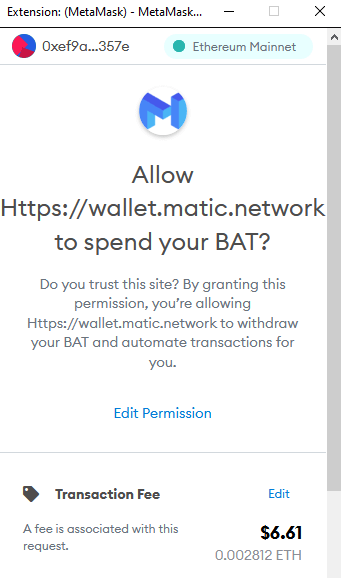
You basically need to sign two transactions on the Ethereum Mainnet. The first one is the approval for your token to be traded on the Polygon bridge and the second one is for the deposit (transfer of assets to Matic).
Now wait for the transfer to complete. Your transaction might take few minutes depending on the network traffic and demand. Meanwhile you can track your progress on Etherscan.
Once the transaction is successful you’ll see the transfer completed successfully screen.

That’s it! You’ve moved your funds from Ethereum mainnet to Matic mainnet and the tokens will shortly reflect in your Polygon wallet.
Once the swap is successful switch your MetaMask wallet network back to Matic mainnet to find your tokens that you’ve swapped.
You can now start interacting with QuickSwap (similar to Uniswap on Ethereum) and other DApps running on the Polygon network.
So to wrap up you’ve learned how to setup Matic wallet? How to connect Metamask to Matic network and how to fund your Matic wallet?
Now before we conclude here is quick overview of deposits, withdrawal and trading on Matic (Polygon network).
Depositing, Withdrawing and Sending Tokens on Matic (Polygon)
As we said you cannot transfer funds from exchange to Matic network directly. You can only transfer assets from Ethereum to Matic network using some bridge interface.
Likewise you cannot withdraw tokens from Matic to exchange directly. You can send tokens within the Matic network but to send it out to an exchange you need to again swap the Matic mainnet tokens to Ethereum mainnet. For this you’ll need to use the same bridge interface that you used for depositing funds.
So to deposit funds you need to transfer funds from ETH network to Matic network. To withdraw funds you need to transfer funds from Matic network to ETH network.
In both the cases, your transactions is signed on the Ethereum Mainnet. Hence you’ll need ETH to cover the gas fees.
To deposit funds onto the Matic network and to withdraw it out of the Matic network you’ll need ETH to cover the fees.
Whereas smart contract execution and transfer of tokens between two Matic address happens on the Matic mainnet. For this you need to connect to Matic network to sign transaction and you’ll need to own fractions of MATIC to transact on Polygon or to trade on Quick Swap exchange.
The transaction on Matic network takes less than 3 seconds and it costs as low as 0.00002 MATIC (less than $0.00001 USD).
It can seem daunting at first when you are beginning to use L2 DeFi. As you progress you’ll adopt and get use to it. Also we know that you are setting up MetaMask on Layer 2 to avoid gas fees. But you are still dealing with huge fees especially when depositing and withdrawing in and out of Matic network.
This is the most crucial part and in a separate article we’ll explain how to fund your Matic wallet and avoid paying huge gas fees.
Do subscribe to our blog feeds for more such guides.