This is a simple guide to listing a token on Uniswap.
One of the important aspect of a cryptocurrency is: whether it is a coin or a token; they can be bought, sold and exchanged for other cryptocurrencies. But to do this back then you have to rely on centralized exchanges.
The problem is you cannot trade them until an exchange decides to list them. And the worst part is that the waiting period can be long and the exchange listing costs are too high depending on how popular the particular exchange is.
Thanks to DeFi (Decentralized Finance) and all the DEX’s (Decentralized Exchanges) that are available today. Now anybody can list a token independently and make it available for others to trade. No exchange listing fees, no waiting period and no dealing with unnecessary hassles.
But still we cannot list coins using this method. In future we’ll get there. Currently only tokens can be added on a DEX like Uniswap; particularly ERC-20 tokens (Ethereum based tokens). Know the difference between a coin and a token.
In this beginners guide we’ll demonstrate on how to add a token on Uniswap decentralized exchange. Whether it can be your own custom ERC20 token which you wish to sell it to your investors. Or it can be your favorite token which is not available for trade anywhere yet.
Before we see how to add tokens let us quickly understand what Uniswap is and how a token listing works?
What is Uniswap?
Uniswap is simply a decentralized exchange. Not a regular DEX where you have order books queued with buy orders and sell orders. But rather an automated market maker exchange (AMM). It serves as trustless and a highly decentralized financial infrastructure. Also it is a highly secure, fully audited protocol that is completely permission-less and censorship resistant.
It is a decentralized liquidity protocol on top of Ethereum that allows you to trade and list ERC 20 token. There are no limitations. Any ERC20 tokens can be listed and traded on Uniswap. It does so by utilizing the power of smart contracts.
How token listing works?
The Uniswap protocol is powered by a marketplace of trading pairs. Each trading pair is managed and secured by a unique smart contract which is deployed on the Ethereum network. Anybody, including you can create a trading pair and become a liquidity provider by putting reserves into the trading pair’s pool.
Once a pair is deployed users can start swapping and provide liquidity. All that without having to create an account or verifying KYC.
Being an automated market maker protocol; Uniswap does not rely on order books as we said before. Instead it uses an algorithm that determines the price. We’ll explain the algorithm and all of its technical in a separate guide. For now this is all you need to know.
Uniswap provides a simple interface for users to swap between ETH and any ERC20 tokens. It is best used when you want to exchange tokens quickly and at the current market price.
Now that you’ve learned what Uniswap is and how it works let’s see how to list tokens on this exchange.
Requirements to list an ERC20 token:
Let us say you started a DeFi project that has its own ERC20 token and you want to list it on Uniswap. Here is what you’ll need.
- You’ll need a web 3 wallet to connect with Uniswap. You can connect wallets such as MetaMask, Wallet connect, Coinbase Wallet, Fortmatic and Portis. The most popular one from this list is MetaMask browser extension (https://metamask.io). We hope you have your wallet ready.
If you are new and not sure how to setup or use then here is a beginners guide to MetaMask.
- The contract address of the ERC20 token which you wish to add on Uniswap. We hope the token is already deployed to the Ethereum mainnet and is available in your MetaMask wallet as well.
You can retrieve the token contract address from either Etherscan.io or Coin gecko.
Also learn how to add custom tokens to MetaMask.
- ETH to cover the gas fees and the liquidity that you wish to provide to the trading pair. Whether you wish to swap, add liquidity or simply list tokens you’ll need Ethereum in your wallet to pay the network fees. Learn why you need ETH for ERC20 tokens?
How to add a token on Uniswap
The first step is to unlock your wallet, connect to Uniswap and check whether the token is already available or not.
1. To do so first go to https://app.uniswap.org/

2. At the top right corner you’ll see an option that says “Connect to a wallet”. Click on it, choose MetaMask or the wallet of your choice, unlock it and click connect.
3. Once connected go to https://app.uniswap.org/#/swap. Now click “select a token” and search for the token.
Since it is a custom token you will not find it in the Uniswap default list. You’ll have to search for the token using its address.
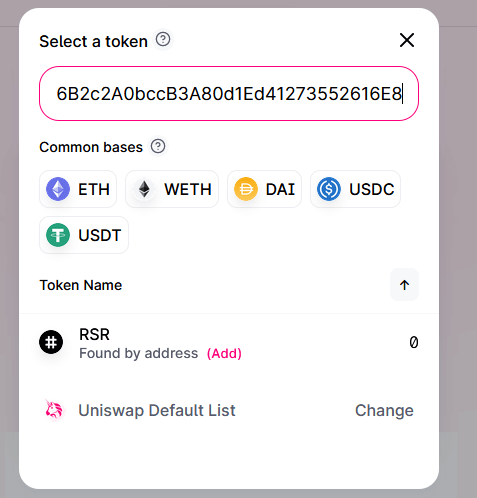
Note: Anyone can create and name any ERC20 token on Ethereum, including creating fake version of existing tokens. Also tokens that claim to represent projects that do not have a token.
Uniswap does not verify the authenticity of the token. It simply fetches token information from the token address that you provide. Before you interact with an ERC20 token do your research and make sure the token contract address is correct. Also before swapping or providing liquidity be sure to check the token analytics on Uniswap.info.
Here is how you can find the token contract address?
Go to Etherscan.io or Coingecko and search for the token that you wish to add to Uniswap. Copy the contract address and paste it in Uniswap search bar. The token will now show up.
4. Now if the token which you are looking to list is already been added by someone then you’ll get an option to swap. In which case you don’t have to add it again.
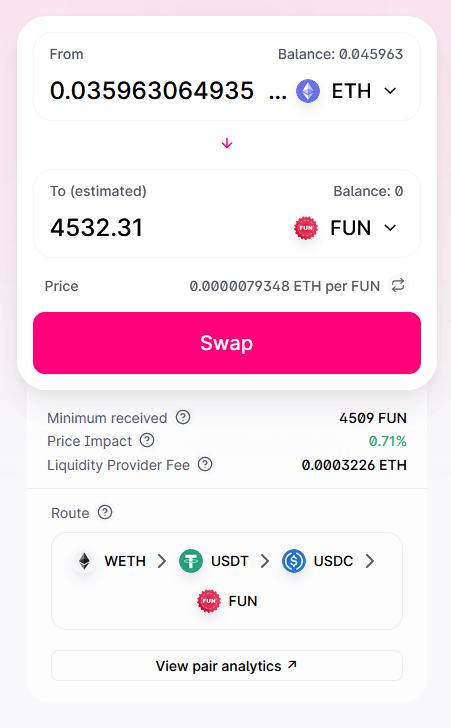
Other than that if you see an option such as “Insufficient liquidity for this Trade”. Then it means the token has been not listed yet or nobody have provided enough liquidity for this pair.
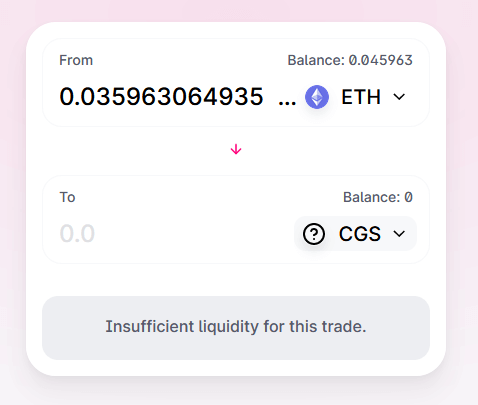
You’ll be the first liquidity provider and here is how to deploy your token in minutes.
Guidelines to listing an ERC-20 (Ethereum) Token on Uniswap
Go to https://app.uniswap.org/#/pool and click on create a pair where you’ll see the following message.

“You are the first liquidity provider. The ratio of tokens you add will set the price of this pool. Once you are happy with the rate click supply to review.”
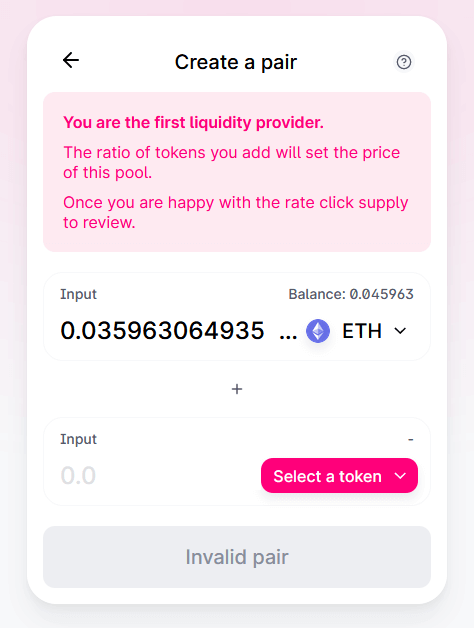
On Uniswap to list a token you need to provide liquidity. You cannot provide liquidity for just that token. You’ll also have to choose the complementary token to provide liquidity. It can be ETH or an equivalent amount of any ERC20 token. That is the pair can be either ETH and an ERC 20 token or it can be two ERC 20 tokens.
Since you are the first to list the token its value is completely arbitrary. The ratio that you supply determines the token price. For example if you supply 1 ETH and 1 Token then it means the token price is initially set to 1 ETH. If you supply 0.1 ETH and 1000 of XYZ tokens then the price of XYZ is set to 10000 per ETH or 0.0001 ETH per XYZ.
Create a Pair and Add liquidity
At the bottom of the liquidity provider screen you’ll find the initial prices and pool share.

- Once the ratio is set you’ll need to approve tokens for Uniswap to automate transactions for you. Click approve (token name) button and confirm the transaction in your wallet.
Note: Any transaction that you initiate on Uniswap is going to cost a small amount of ETH as gas fees.
- Once approved click create pool and supply to confirm the token listing. MetaMask will ask for confirmation and now again it will cost you some ETH for fees.
After this you’ll see a message that says “Transaction submitted – View on Etherscan”.
That’s it! You’ve created a pair and provided liquidity.
Congrats! You also just added a token to Uniswap.
Token Listed – Start swapping
Once the token is listed successfully users can start swapping between this pair. Let the community know about the listing so that they will trade and provide liquidity if the pair is worthwhile. The larger the liquidity pool gets the lower the slippage will be for those who trade.
To start swapping go to “swap” section on Uniswap exchange. You’ll still have to search for the token using the contract address. It will not show up in the token list on the front-end by default. Once the pair gets popular and it has enough liquidity you can submit a request for getting your token listed.
More info on token listing here: https://uniswap.org/docs/v1/frontend-integration/token-listing/
Also by providing liquidity you are earning 0.3% of all trades on the pair proportional to your share of the pool.
As a Liquidity Provider we hope you understand what impermanent loss is. Also as we said at the beginning anyone or any project can list Ethereum based tokens on Uniswap. Do your research and be mindful before providing liquidity or swapping a token on Uniswap.
Make use of uniswap.info website that has information on all Uniswap pairs LP (Liquidity Pools).
That’s all!
We hope you’ve learned how to add custom ERC-20 tokens to Uniswap exchange. You can now get any favorite small cap tokens to Uniswap.

A small amount? Its over 300$.
Well, to create a token you must invest.
There’s no free lunch, otherwise people would just create a bunch of shitcoins and become rich adding liquidity for scam.
Nice information but have a couple questions.
1. The initial LP, is this the min to set the price, like in example
2. Assume we post 1000 of my token=1 eth, can I then send the rest of the token allocation. Asking since I can’t imagine that when SHIB, for example was listed they had the funds to support the entire allocation?
Cheers