When GPU mining is about to become obsolete on algorithms like Equihash (Equihash ASIC); CryptoNight is still being the savior of CPU mining. The only worthwhile algorithm that can be mined using CPU is CryptoNight and its variant. This PoW algorithm that is used on Monero, Bytecoin, Electroneum, etc provides egalitarian terms for all miners. That is even users with old computer hardware can start mining (anyone with a desktop or laptop that has atleast 2GHz+ processor and 2GB of RAM) and earn a decent reward. Let’s hope it stays like this in the future so users of all kind can participate in Cryptocurrency mining.
Two of the most popular mining software’s available to mine CryptoNight algorithm are xmr stak and XMRig. Both supports mining using CPU, NVIDIA and AMD GPUs. In the past we’ve made a beginners guide on XMR STAK. From that guide what we came to know is that most users finding difficulty in configuring the miner. Especially with all these algorithm changes which took place recently they can’t get right with the algorithm for any given coin. So we decided to make a beginners guide on XMRig which is easy to setup and a much more flexible miner compared to other alternatives.
Here in this post we’ll show you how to setup, configure and use XMRig CryptoNight miner for CPU, NVIDIA and AMD GPUs. This guide is only for Windows users. For Linux we’ll make a separate guide soon.
XMRig Supported Algorithms:
From Monero to recently released Loki Coin; XMRig has added support to all the new CryptoNight algorithms. It supports Cryptonight, Cryptonight V7, Cryptonight Lite and Cryptonight Heavy. Below is the table of algorithm names and variants that XMRig supports.
| Long name | Short name | Base algorithm | Variant | Notes |
|---|---|---|---|---|
cryptonight |
cn |
cryptonight |
-1 |
Autodetect works only for Monero. |
cryptonight/0 |
cn/0 |
cryptonight |
0 |
Original/old CryptoNight. |
cryptonight/1 |
cn/1 |
cryptonight |
1 |
Also known as monero7 and CryptoNightV7. |
cryptonight/xtl |
cn/xtl |
cryptonight |
xtl |
Stellite (XTL) variant. |
cryptonight-lite |
cn-lite |
cryptonight-lite |
-1 |
Autodetect works only for Aeon. |
cryptonight-lite/0 |
cn-lite/0 |
cryptonight-lite |
0 |
Original/old CryptoNight-Lite. |
cryptonight-lite/1 |
cn-lite/1 |
cryptonight-lite |
1 |
Also known as aeon7 |
cryptonight-lite/ipbc |
cn-lite/ipbc |
cryptonight-lite |
ipbc |
IPBC variant |
cryptonight-heavy |
cn-heavy |
cryptonight-heavy |
0 |
Loki, Sumokoin and Haven Protocol |
XMRig CryptoNight Miner
XMRig is an optimized and high performing miner for Monero and CryptoNote coins with official support for Windows. It is an open source software so you can either download the binaries and use the miner or you can compile your own from its source. Both the binaries and source can be found on the official GitHub repository. However remember that XMRig doesn’t support combined CPU and GPU mining just like XMR STAK. You have to download and run the miners separately for CPU, NVIDIA and AMD graphic cards.
CPU Version: https://github.com/xmrig/xmrig/releases
NVIDIA Version: https://github.com/xmrig/xmrig-nvidia/releases
AMD Version: https://github.com/xmrig/xmrig-amd/releases
General Instructions:
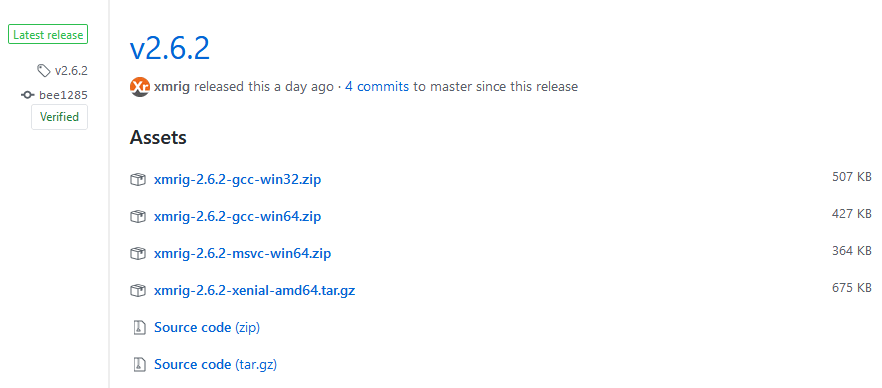
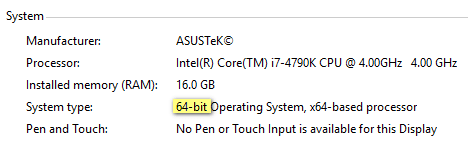
First thing is to head to the download page of the miner and download the latest version. XMRig is available for both 32 bit and 64 bit operating system so before you download make sure to choose the correct version. Check your system properties for this information.
XMRig GCC vs MSVC:
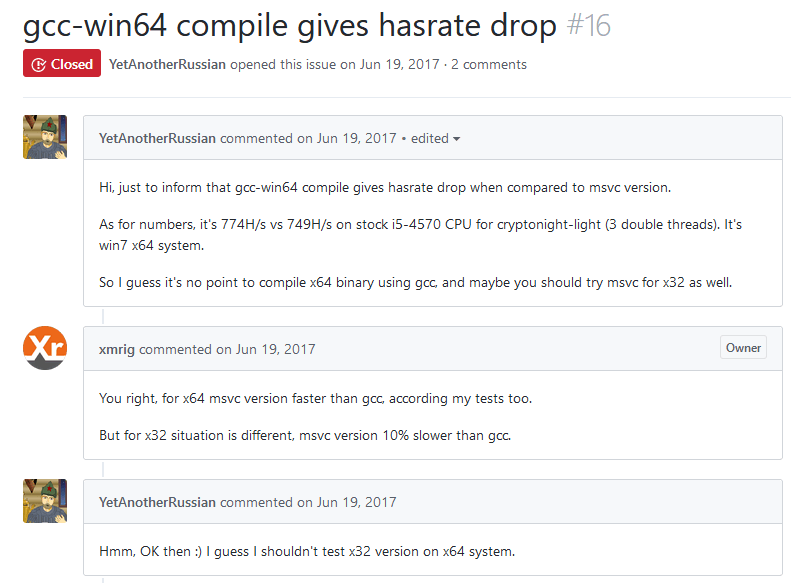
For NVIDIA and AMD download there won’t be any confusion but for CPU version you’ll find 2 different releases namely GCC and MSVC. What are they? GCC is GNU Compiler Collection and MSVC is Microsoft Visual C++ compiler. So which one to download? If you are using 64 bit Windows then download the MSVC version which is faster than GCC. But if you are using 32 bit system then download the GCC version which performs better than MSVC.
Now download the right miner and unzip the file. Upon doing this your Antivirus or Windows defender may flag the miner as Trojan. This happens with every other crypto currency mining software’s so it’s nothing to worry about. Just add exclusions and extract the miner on to your desktop. Additionally make sure to download the latest drivers for NVIDIA CUDA and AMD OpenCL. That’s it! Your setup is ready. Now let’s head to XMRig configuration.
How to configure and use XMRig? – Beginners Guide
You can mine any CryptoNote coins using XMRig. So get ready with the wallet address and the pool connection details. We are not going to get in to that part as it makes this guide go beyond its purpose. Also since there is a separate miner for CPU and GPU we’ll guide you with the instructions for all three miners individually .
In all three miner versions that is within the unzipped folder you should see this three files such as: config.json, start.cmd and xmrig.exe (xmrig-nvidia.exe and xmrig-amd.exe).

There are 2 ways in which you can configure and run XMRig. 1. By editing the settings in config.json file which gives you more control beyond the basic settings and 2. By creating a simple command line Windows batch file. We’ll explain and add examples for both.
CPU Version
In CPU version of your XMRig, right click the config.json file and click on edit (Notepad or Notepad++). This code below is what you’ll notice first and similar settings is what can also be found on NVIDIA and AMD miner. For better understanding we’ve highlighted each section.
{
 "algo": "cryptonight",          // cryptonight (default) or cryptonight-lite
 "av": 0,                       // algorithm variation, 0 auto select
 "background": false,          // true to run the miner in the background
 "colors": true,              // false to disable colored output
 "cpu-affinity": null,       // set process affinity to CPU core(s), mask "0x3" for cores 0 and 1
 "cpu-priority": null,      // set process priority (0 idle, 2 normal to 5 highest)
 "donate-level": 5,        // donate level, minimum 1%
 "log-file": null,        // log all output to a file, example: "c:/some/path/xmrig.log"
 "max-cpu-usage": 75,    // maximum CPU usage for automatic mode, usually limiting factor is CPU cache not this option.
 "print-time": 60,      // print hashrate report every N seconds
 "retries": 5,         // number of times to retry before switch to backup server
 "retry-pause": 5,    // time to pause between retries
 "safe": false,      // true to safe adjust threads and av settings for current CPU
 "threads": null,   // number of miner threads
 "pools": [
 {
 "url": "failover.xmrig.com:443",      // URL of mining server
 "user": "YOUR_WALLET",               // username for mining server
 "pass": "x",                        // password for mining server
 "keepalive": true,                 // send keepalived for prevent timeout (need pool support)
 "nicehash": false,                // enable nicehash/xmrig-proxy support
 "variant": -1                    // algorithm PoW variant
 }
 ],
 "api": {
 "port": 0,               // port for the miner API
 "access-token": null,   // access token for API
 "worker-id": null      // custom worker-id for API
 }
}
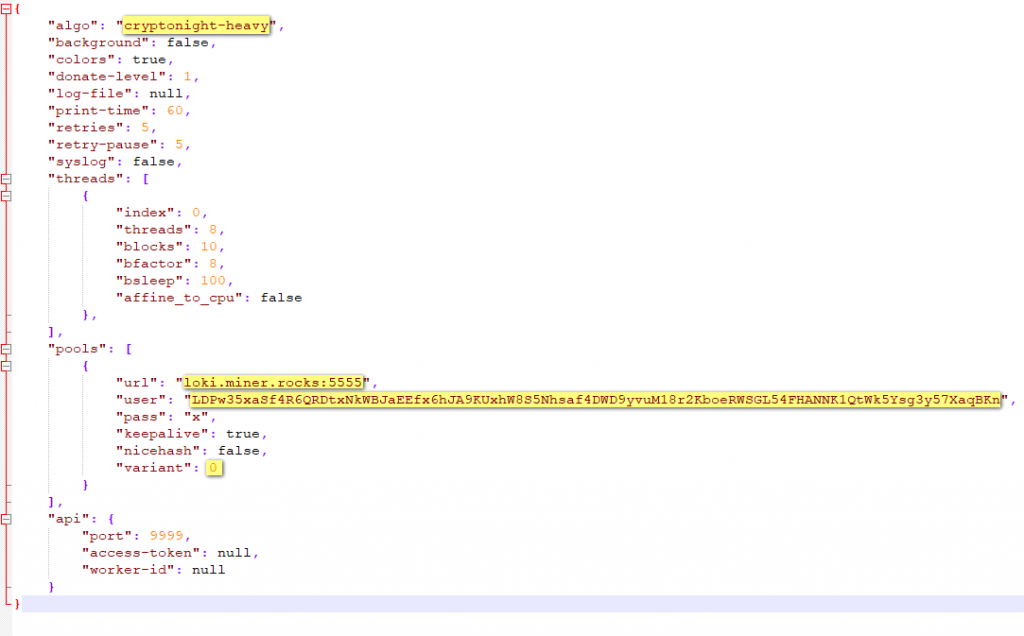
- The first Red highlight is general settings where you need to choose the algorithm that you’d like to mine. Also here you can edit donation level which by default xmrig donates 5% to the developers. Additionally there are some other settings that can be configured to increase the mining efficiency.
- Next the blue highlight is pool section. This is most important as this is where you’ll need to configure the pool and wallet address. It determines where you are mining and to which wallet address you should get paid.
- Next; API which is not so important but still useful in checking mining hashrates, results and pool connection details. In this guide we are not going to get into this since we already explained it here.
Alright! Let’s see how to configure and start mining with XMRig. We hope you’ve chosen the wallet address and pool to mine. To illustrate we’ve chosen Monero as a currency and mine xmr as a pool. There are only 4 main settings which you need to edit to start mining. Rest all other settings are secondary.
1. Algorithm: -a, --algo=ALGO cryptonight (default) or cryptonight-lite or cryptonight-heavy
2. Algorithm PoW Variant: --variant -1 or 0 or 1
- -1 or missing field, the miner auto detects PoW from block version.
- 0 make miner forcibly use original / old CryptoNight algorithm.
- 1 make miner forcibly use new v7 algorithm (Monero / AEON v7 / Stellite).
3. Pool URL: -o, --url=URL Example: pool.minexmr.com:7777
4. Coin Wallet Address: -u, --user=USERNAME Usually wallet address. Example: LDPw35xaSf4R6QRDtxNkWBJaEEfx6hJA9KUxhW8S5Nhsaf4DWD9yvuM18r2KboeRWSGL54FHANNK1QtWk5Ysg3y57XaqBKn
For example: if you are mining Stellite then in algorithm field enter cryptonight and in variant field enter 1 which makes the miner to forcibly choose CryptoNight V7 Algorithm.
Another Example: If you are mining Loki (Loki mining guide coming soon) then in algorithm enter cryptonight-heavy and in variant enter -1.
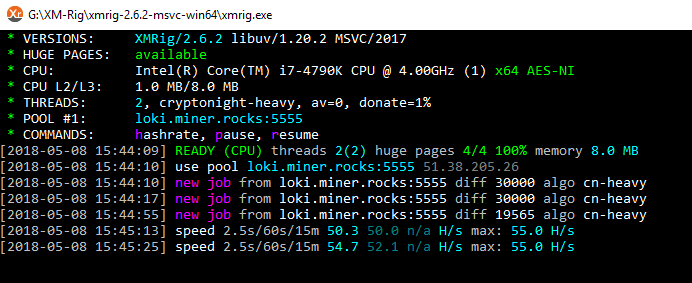
Don’t forget to input your pool URL and user details which is your wallet address. Once done save the config.json file and launch xmrig.exe. Now you should see the miner connecting to the pool and start submitting shares.
XMRig command line batch file for CPU:
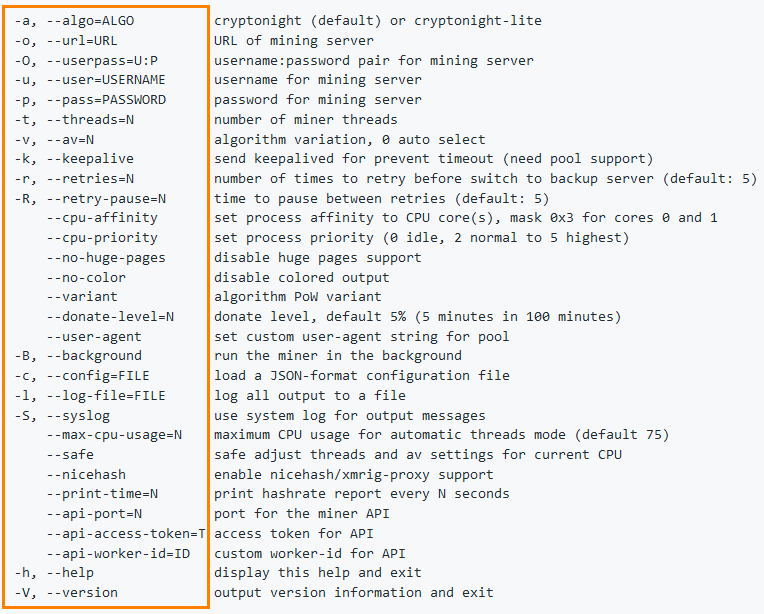
The above is one way to configure and run XMRig, the other method is simply by creating a command line Windows batch file. Within the XMRig folder create a new text document and save it as start.bat (name anything you wish). Make sure it is saved as .bat file. Once done edit the file and input the following code.
xmrig --help
pause
Then save the file and run start.bat. Now it will display all the command line arguments that you can use in your batch file. Use them appropriately to create your own batch file. Below we’ve made a sample CPU command line file which you can use as reference.
Example CPU batch file for XMRig:
xmrig.exe -a cryptonight-heavy --url=loki.miner.rocks:5555 -u LDPw35xaSf4R6QRDtxNkWBJaEEfx6hJA9KUxhW8S5Nhsaf4DWD9yvuM18r2KboeRWSGL54FHANNK1QtWk5Ysg3y57XaqBKn -R --variant=-1 --max-cpu-usage=75
pause
Once the batch file is ready save it and run it. You can create any number of batch files for any algorithms and coins and it will make your work simpler.
NVIDIA version:
There is not much explanation needed for NVIDIA and AMD version of XMRig. The configuration is same as CPU and you’ll find all settings except CPU usage level, CPU affinity and CPU priority. However there is additionally one setting which we’d like to point out and that is threads settings. If you are GPU mining using XMRig then editing this setting is essential in which by tweaking you can expect optimal mining performance. Below code applies to NVIDIA GPUs.
"threads": [
 {
 "index": 0,
 "threads": 12,
 "blocks": 39,
 "bfactor": 8,
 "bsleep": 100,
 "affine_to_cpu": false
 },
 ],
Once you start the miner you’ll see this following information being displayed: What is it?
GeForce GTX 1070 8GB @ 2300/2920 MHz 16x39 8x25 arch:52 SMX:13

It means 16 threads x 39 blocks and bfactor 8 x bsleep 25. Architecture 52 and multiprocessors SMX 13. These are nothing but GPU settings and in order to get the optimal performance out of your GPU you need to play around with this settings. For example your PC might lag while mining and in such instance try to reduce the value of number of threads and bfactor. We’ve explained this on XMR STAK guide, please refer to that. More information on threads can be found on XMRig wiki page.
Sample config file for NVIDIA: (only threads shown)
 "threads": [
 {
 "index": 0,
 "threads": 12,
 "blocks": 39,
 "bfactor": 8,
 "bsleep": 100,
 "affine_to_cpu": false
 },
 ],
 "pools": [
 {
 "url": "pool url",
 "user": "wallet address",
 "pass": "x",
 "keepalive": true,
 "nicehash": false,
 "variant": 1,
 }
If you are using XMRig in your mining rig then you can add this settings for each GPUs by adding comma. Where index is the number of GPU that is identified by your system.
Example:
 "threads": [
 {
 "index": 0,
 "threads": 12,
 "blocks": 39,
 "bfactor": 8,
 "bsleep": 100,
 "affine_to_cpu": false
 },
 {
 "index": 1,
 "threads": 12,
 "blocks": 39,
 "bfactor": 8,
 "bsleep": 100,
 "affine_to_cpu": false
 },
 {
 "index": 2,
 "threads": 12,
 "blocks": 39,
 "bfactor": 8,
 "bsleep": 100,
 "affine_to_cpu": false
 },
 {
 "index": 3,
 "threads": 12,
 "blocks": 39,
 "bfactor": 8,
 "bsleep": 100,
 "affine_to_cpu": false
 },
 ],
NVIDIA sample batch file config for XMRig:
All this sample batch file that’s shown here is just for your reference. Make sure to change it accordingly before you start mining.
@echo off
xmrig-nvidia.exe -a cryptonight-heavy --donate-level 1 -o loki-pool.com:5555 -u LDPw35xaSf4R6QRDtxNkWBJaEEfx6hJA9KUxhW8Sf4hsaf4DWD9yvuJaEEr2KboeRWSGL54FHANNK1QtWk5Ysy57XaqBKn -p w=Rig1 -k
pause
AMD Version
Similar to NVIDIA you can also tweak AMD graphic cards. The same syntax which you’ll use on XMR STAK can also be used on XMRig.
Example:
"threads": [
        {
            "index": 0,
            "intensity": 1600,
            "worksize": 8,
            "affine_to_cpu": false
        },
        {
            "index": 1,
            "intensity": 1600,
            "worksize": 8,
            "affine_to_cpu": false
        },
        {   "index": 2,
            "intensity": 1600,
            "worksize": 8,
            "affine_to_cpu": false
        },
],
AMD miner command line example:
--opencl-platform=0 --opencl-devices=0,1,2 --opencl-launch=1600x8,1600x8,1600x8
XMRig config generator and editor:
Recently XMRig has added config generator and editor (https://config.xmrig.com/) tool. If you don’t know how to config your miner then you can use this tool.
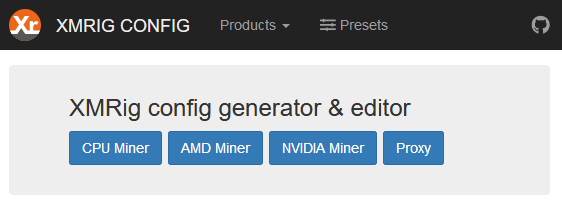 1: Choose the miner first and then proceed to choose the algorithm and miner version.
2: On next screen specify pool, your wallet address and worker details.
3: Then set number of threads to mine. If you don’t know what it is then leave this by default value and proceed to next step.
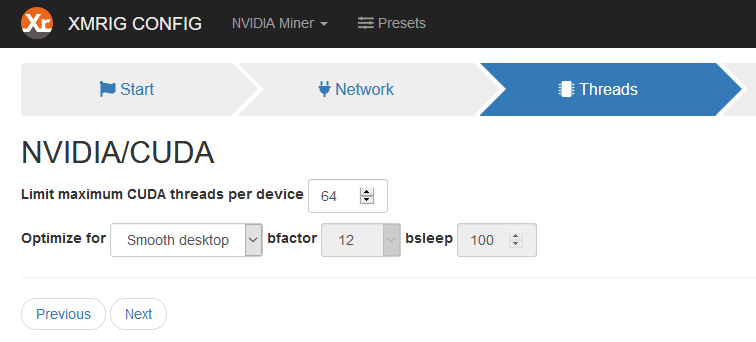
4. There is nothing much in Misc settings. You can edit the donation level here. Once done click on next and at the final page this tool will generate command line batch file and config.json file. You can download it to your XMRig folder and start mining right away.
Checking Hashrates in XMRig
You can check hashrate, results and health of your CPU and GPU using two methods. One from miner console window and the other by using API. By default XMRig prints your hashrate every 60 seconds which you can change in “print-time” settings.
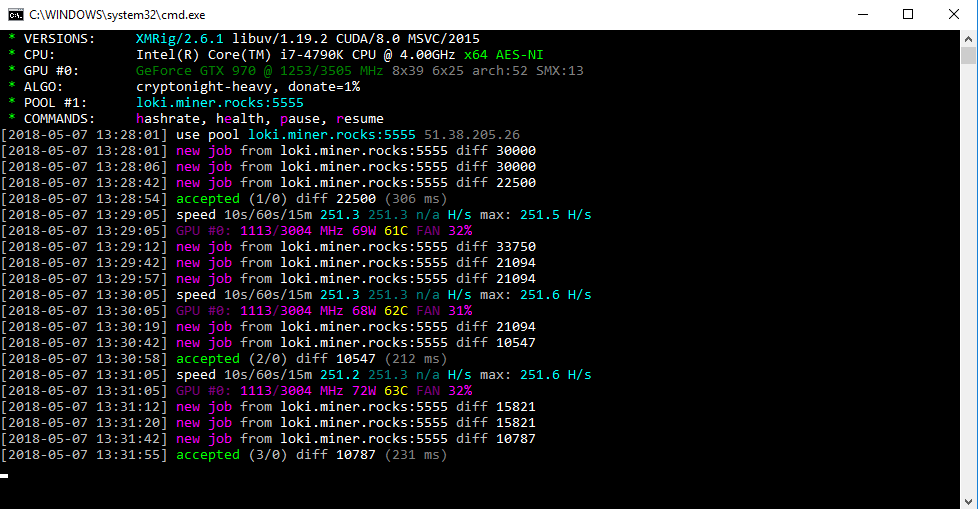
COMMANDS: hashrate, health, pause, resume
Also in miner hit “h” to display hashrate, hit “e” to display health of your GPU, then “p” to pause and “r” to resume mining. If the miner submits shares to the pool then it says “accepted“. If it says “rejected” then there is something wrong with your configuration. Do revise it.
Common errors , fixes and other instructions:
1. By default XMRig donates 5% of your mining power to developers. If you are generous then leave it, if not you can set a preferred donation amount by editing donate-level settings. Minimum is 1%.
2. Next XMRig by default sets your CPU processing power to 75% and that is to keep your CPU from overheating. If you know what you are doing and would like to get the maximum performance from CPU then you can edit the values of max-cpu-usage.
Note: If you are letting your CPU to mine then be sure to monitor the CPU temperatures.
3. Threads settings for CPU: We’ve explained this for GPU, but you can even set threads for CPU. For example if you are using powerful CPU like AMD Ryzen Threadripper you can go up to 32 threads.
"threads": 4,
If you are a beginner and don’t know what it is then change safe settings to true. By doing this XMRig auto sets to optimal settings.
4. Rejected: “low difficulty share” – It means you have chosen wrong pool port. Make sure to connect to the right port depending on your hardware.

5. Rejected: “Wrong algo, use monero7 miner” – It means either you’ve entered wrong algorithm or failed to edit the algorithm variant. Normally you’ll get rejected shares when you don’t choose the correct algorithm or variant for the coin. You’ll also get this when you overclock your GPU too much so please note that as well.
6. On Windows you’ll usually come up with this error. For example “problem with a missing DLL file (msvcp140.dll)”. You can fix such errors by installing Microsoft Visual C++ 2015 / x64.
7. Do you know that you can use both XMRig and XMR STAK at the same time? But when initiating both the miners either of those will show “HTTP daemon failed to start” error. To fix this change the HTTP port settings in one of the config files.
Conclusion:
Soon XMRig will develop into all in one miner for CPU and GPU just like xmr stak. But as of now you have to use the miners individually. Its well know that XMRig performs better on CPU and XMR STAK hashes well on GPU. What we suggest and most miners do is; use both miners simultaneously at the same time. It won’t affect any of your mining performance. Use XMRig for CPU and turn off CPU in XMR STAK and only mine using GPU. In overall you should see better performance.
We know this article has not tutored about static difficulty and other console logging capabilities because its not so important. Apart from that we hope this guide has covered everything about XMRig. If there is something incorrect or if we’ve missed something or if you are having issues using XMRig then please feel free to mention it in comments section. What’s next? Maybe a beginners guide on ccminer or any coin mining guide. To get all the updates follow us on Twitter.
Does XMRig pay directly to the miners Monero address? Or is there a payout at a certain time?
XMRig is a mining software and it doesn’t pay to your Monero address but the pool where you are mining does.
> I have installed XMRStak and XMRig on the same computer for testing in my OFFICE NETWORK .
> Both XMRstak and XMRigs are connected to nanopool (same pool address and same pool port).
> XMRstak starts mining immediately but when I switch to XMRig it fails with an error “connection reset by peer”.
> However, the same XMRig starts mining when I connect to my PRIVATE NETWORK.
Can anyone please help me with this issue???
I’m mining XMR with my CPU through XMR Rig and it’s disabling my GPU’s OPENCL and CUDA’s…. why is it doing that and how can i stop it please?
Did you set cuda/opencl to true on the config.json file? You also need to add some .dll files for cuda.
I have a rx 580 and overall when GPUs are enabled i’m only getting like 200 h/s – That seems very low and i’m better off mining a different coin.
How to setting for Mac OS X please?
I have a rate of 888 H/s, when aprox. they paid me some XRP?
Would like to try solo mining. I am a newbie. Running XMrig on ubuntu. Cannot find in searches – What file to change or add to? Help – Thank You. Can you advise???
For solo mining please refer to this guide: https://coinguides.org/solo-mining-guide/
An update to this guide would be great!
A lot has changed so an updated guide would be beneficial.