Using Optimistic Ethereum with MetaMask. Here in this beginners guide let’s discuss what is Optimism? Then we’ll show you how to connect metamask to Optimism. After setting up Metamask for Optimism we’ll also show you how to bridge ETH from L1 to L2 Optimism so you can start using the Optimistic Ethereum (OΞ) Layer 2 network.
Why Layer 2?
Layer 2 networks also known as L2 scaling solution for Ethereum are mainly developed to overcome the obstacles that greatly sustain the growth of the Ethereum and the Web3 ecosystem. Currently the biggest obstacle with Ethereum is the gas fees.
Are you a person who fed up using Uniswap, Synthetix, 1inch and other dapps on Ethereum due to its ridiculously high fees? Then you need to check out the Layer 2s. On Layer 2 network you can enjoy cheap & near-instant transactions.
Optimism L2 is similar to Polygon and Arbitrum. All these are layer 2 scaling solution for Ethereum. As they are EVM (Ethereum Virtual Machine) chains they support Ethereum’s decentralized applications. On all these networks you can send transactions, use DeFi and access Web3 similar to the Ethereum network except with two main advantages such as low transaction cost and faster transaction speeds.
This simply makes Ethereum dapps and DeFi more accessible and affordable to the common people. Also it makes Web3 more scalable.
Not only Ethereum dapps and protocols work on layer 2. But since they all are EVM chains you can add these network and use it with any Ethereum wallet that supports custom EVM. There are many wallets that support the layer 2 integration like Coinbase wallet, Trust wallet, TokenPocket, imToken wallet etc. But in our opinion Metamask is currently the best.
Metamask is your portal to Web3 which you can install and operate it from your browser. You can use it to basically interact with any EVM chains.
Previously we’ve made a guide on connecting metamask to Polygon L2 network. Also check out how to add Arbitrum to metamask and bridge ETH.
Similar to those guides here let’s see how to add Optimism to Metamask and interact with dapps deployed on the Optimistic Ethereum network. By using optimism L2 you can reduce transaction cost and speed up your Ethereum transactions. By making transactions cheap and fast anybody can now access the Web3 and start using the DeFi services. There are no barriers to entry.
Now before we see how to connect Metamask and use Optimism here is a little overview about Optimistic Ethereum for those you are just getting started with Optimism.
If you don’t want to read this then jump straight to the Optimism Metamask tutorial
What is Optimism? Optimistic Ethereum Layer 2 network
What Optimism is and what it does?
Optimism also known as Optimistic Ethereum network is a layer 2 scaling protocol for Ethereum developed by Optimism.
It is an Ethereum Roll up sidechain that uses “optimistic rollup” solution that is designed to enable instant transactions, support higher total transactions, lower gas costs and scale general smart contracts on Ethereum. Optimism does all this without compromising on security and decentralization.
Layer 2 scaling solutions in general to increase the transaction throughput and to reduce gas fees they move the transactions and computations away from the main network onto a second layer. Optimism also does the same.
Its goal is to support Ethereum by taking part of the transaction load from Ethereum main chain on to its side chain. After processing things on the side chain it then sends the funds back to the ETH main chain without having to put all the transaction data on it.
Think of optimistic rollups as a smart contract that (“rolls up”) bundles transaction data and moves it off chain for faster processing. By running computation off chain it greatly decreases the network fees and increases the Ethereum’s TPS (Transaction Per Second).
Optimism, like Ethereum Virtual Machine (EVM), it uses Optimistic Virtual Machine (OVM) which is a fully-featured, Ethereum-compatible execution environment. It is built for use in layer 2 systems and this EVM compatible rollup chain is designed to be simple, fast and secure. Allowing users to interact with Ethereum applications at low cost.
Also because Optimism works with EVM it allows developers to deploy Dapps and smart contracts on Optimism just like they do with Ethereum. Also developers can reuse existing Ethereum tools on Optimism with little to no change in code.
Ethereum DApps with high traffic can easily move over to Optimistic Ethereum side chain – A cheaper and faster solution that helps scale them to the next level. Optimism also supports NFTs and the functions of ERC-20 tokens. So with Optimistic Ethereum network you can enjoy the benefits of low fees, faster transactions + the security and the functionalities of ETH.
For more information on Optimistic Ethereum check out their official website: https://www.optimism.io/
Alright! Let’s now see how to use Optimism & bridge ETH to Layer 2.
Setting up Metamask for Optimistic Ethereum (OΞ – Optimism)
To use Optimism you need a wallet that supports the Optimistic Ethereum network. As we said you can use Coinbase, Trust wallet and there are few other alternatives. But here we’ll be using Metamask.
To use Optimistic Ethereum with MetaMask you need to add the Optimism network RPC to Metamask extension.
Firstly we hope you have your metamask extension ready. If you are new then check out this metamask beginners guide.
After successfully setting up the extension follow the steps below to add Optimistic Ethereum network to your Metamask.
1. Open your metamask extension by clicking on the fox icon at the top right corner of your browser. Then enter your password and unlock the wallet.
2. By default metamask is connected to the Ethereum mainnet. You can switch to other network that is available or add a new custom network.
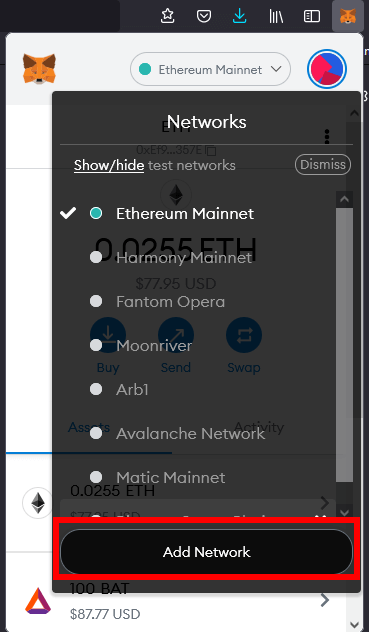
3. To add the Optimistic Ethereum network drop down Ethereum mainnet and it’ll show the list of available networks that you’ve added so far. To add Optimistic Ethereum network click on “add network” which will open a new tab.
Now enter the following network details accordingly.
- Network Name: Optimistic Ethereum
- New RPC URL: https://mainnet.optimism.io
- Chain ID: 10
- Currency Symbol: ETH
- Block Explorer URL: https://optimistic.etherscan.io
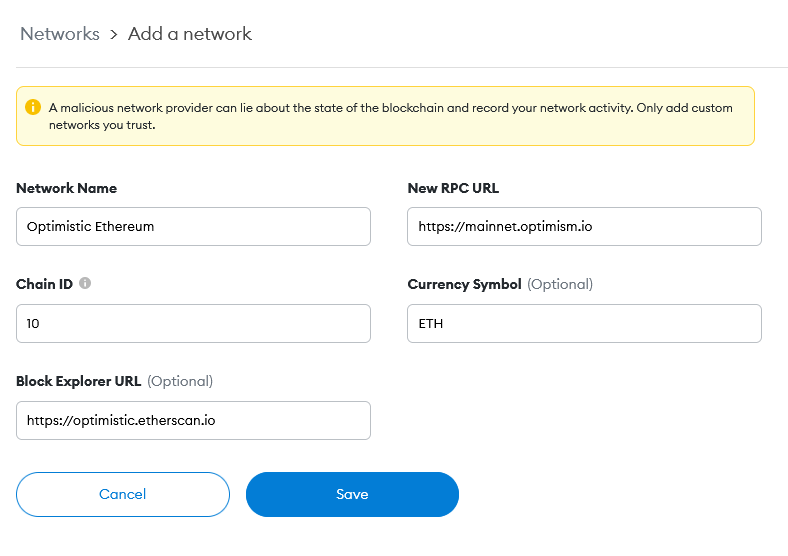
After entering the above details as shown in the image click save.
That’s it! You’ve successfully added Optimism and connected your Metamask to the Optimistic Ethereum network. Metamask will automatically connect you to the new network which you’ve just added. You can also manually switch between networks any time by click on the tab that says “Ethereum Mainnet” or “Optimistic Ethereum”.
This is manual way of adding Optimism’s information to MetaMask.
Alternatively, To add the OΞ network to your wallet you can also use services like Chainlist. Check out how to add any EVM network to Metamask. Visit Chainlist and search for Optimism. You’ll find three network options. You need to add the one with chain ID 10 and currency ETH.
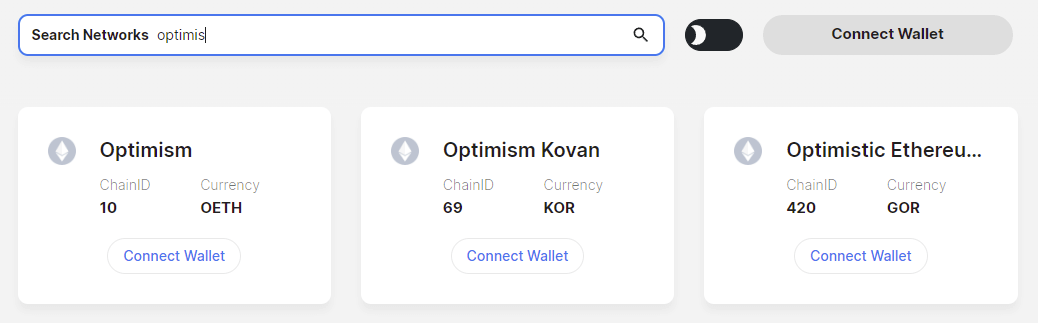
Click connect wallet and the service will auto populate the network details for you.
That’s it! You are now connected to the Optimistic Ethereum network with your Metamask Wallet!
Now to interact with Optimistic Ethereum network or to start storing Optimism tokens in your metamask, you’ll need ETH first. Why ETH?
Fees on Optimism
Like Polygon (MATIC), Optimism does not have its own take yet. In future they could be launching their own token. But currently Optimism uses ETH as its main currency. So to pay transaction fees on Optimism, to stake, to farm, to mint or for any operation on the Optimistic Ethereum network you’ll need ETH.
Note: Beware of fake Optimism tokens circulating. Always follow the official channels for up to date information.
There are few exchanges that support the Optimistic Ethereum chain directly. But most popular ones don’t have the support yet. So to send ETH to your Optimistic Ethereum address you’ll have to bridge ETH from L1 (Ethereum mainnet) to L2 (Optimistic Ethereum).
You can use the same address on your metamask for both L1 and L2 deposits. Same address but just two different networks. Sending funds to your metamask address via Ethereum mainnet will not show up on Optimistic Ethereum network. You’ll have to bridge your ETH from L1 to L2.
To bridge assets from ETH mainnet to Optimism you can use the official Optimistic Ethereum gateway.
How to bridge Ethereum to Optimism?
Since transactions on Optimism network requires ETH you need to send ETH from Ethereum across to Optimistic network.
You can transfer by bridging from the Ethereum mainnet. Not only ETH but you can get most of your crypto assets from L1 to L2 network via bridge.
Bridges are the most efficient way to transfer assets from one chain to another. You can transfer any assets from any EVM based chain to Optimism. Bridges simply makes use of smart contracts that when you transfer it locks funds on source chain and releases equal amount of tokens on the destination chain.
There are many cross chain bridges which you can use to transfer between chains. But to transfer value into the Optimistic Ethereum network we suggest you to use the Optimistic Ethereum Gateway – The official Optimism bridge.
Bridging assets from L1 to L2
First of all to send Ethereum to Optimistic Ethereum network via bridge you need to have ETH in your Ethereum mainnet wallet address. If you don’t have ETH then buy it from exchanges like Binance, Bybit, FTX or Coinbase and send it to your metamask address via Ethereum mainnet. Once you have deposited ETH in your metamask wallet you can transfer it across to Optimistic Ethereum via bridge.
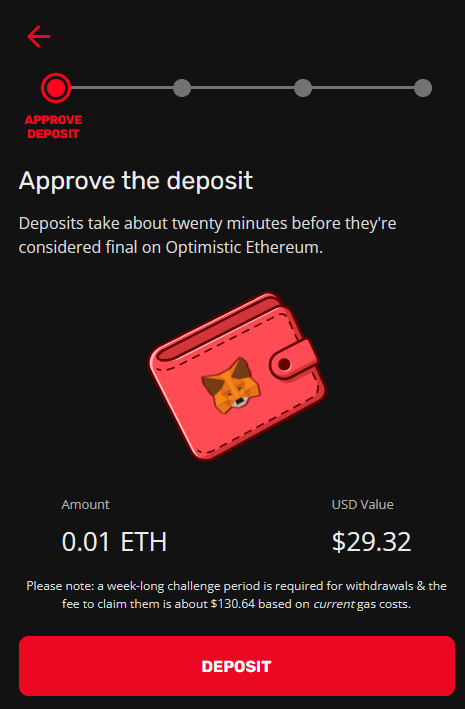
Note: Before using the bridge (Optimistic Gateway) please be informed that withdrawing funds back from Optimistic Ethereum to ETH mainnet will take one week and this is required for the safety of assets. This allows sufficient time to detect fraud on the Optimistic Ethereum chain. Also when using a new protocol do your own research and only conduct transaction at your own risk. Understand the DeFi security risks.
Alright! Let’s see how to send your assets to the Optimistic Ethereum bridge .
1. Open metamask and unlock your wallet. Make sure it is connected to the Ethereum mainnet and you have some ETH for transfer.
2. Next visit https://gateway.optimism.io/choose-wallet, click connect wallet at the top right corner and choose Metamask.
3. A pop up window will now open asking you to choose the account / address. Choose the one where you have ETH and click connect.
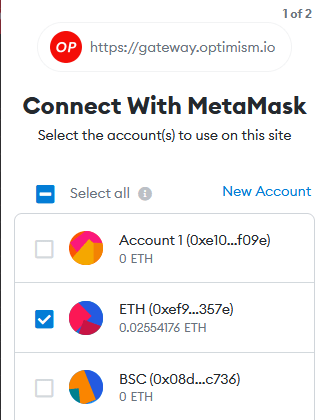

After successfully connecting you’ll see your wallet address at the top right corner of the Optimism gateway app. Also make sure you it is on mainnet when transferring funds from ETH to OΞ. However when withdrawing funds back from OΞ to ETH network you need to have Optimistic Ethereum network selected on Metamask.
4. Now under deposit tab enter the amount of ETH that you’d like to deposit from mainnet to Optimistic Ethereum and then click deposit.
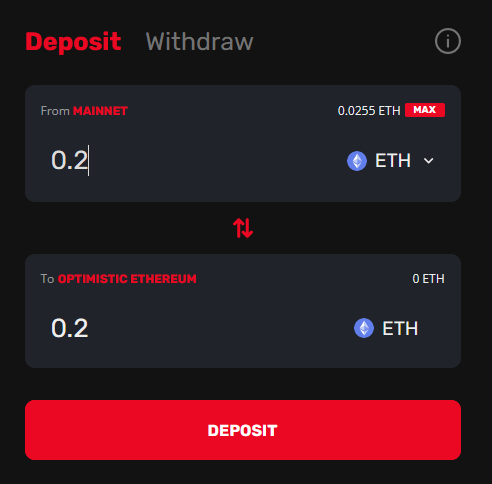
5. Then on the next screen follow the on screen instructions, verify the fee on metamask popup window and approve the deposit. Deposits take about twenty minutes before they’re considered final on Optimistic Ethereum.
After depositing you can monitor your transaction on Optimistic Ethereum’s Etherscan explorer: https://optimistic.etherscan.io/
Once the bridging is complete and the token transfer is finalized you should see ETH under same address but on Optimistic Ethereum network. Switch metamask to Optimistic Ethereum to see the funds on Optimism. Using the same method you can now bridge any ERC20 tokens to Optimistic Ethereum.
Note: When transferring ETH or any tokens from L1 to L2 you have to pay gas fee in ETH.
You might now wonder what’s the point of sending asset to Optimism if you still have to pay high gas fee for the conversion. Not only to Optimism but there will always be gas fee involved when swapping assets from ETH to other chains.
But the thing is most people doing this are considering long term. While the initial gas fees may be high you’ll actually save more as you use the L2 network more. You can benefit from better user experience, lower transaction fees, higher throughput, and also sometimes access to L2 dapps that are not available on the Mainnet. Also with Optimism you’ll benefit from potential airdrops.
Once you send ETH to Optimism you can use it there for paying transactions. Also you can now start using the DApps and use the ETH that you’ve bridged to trade (swap) on the decentralized protocol.
Supported DApps on Optimism
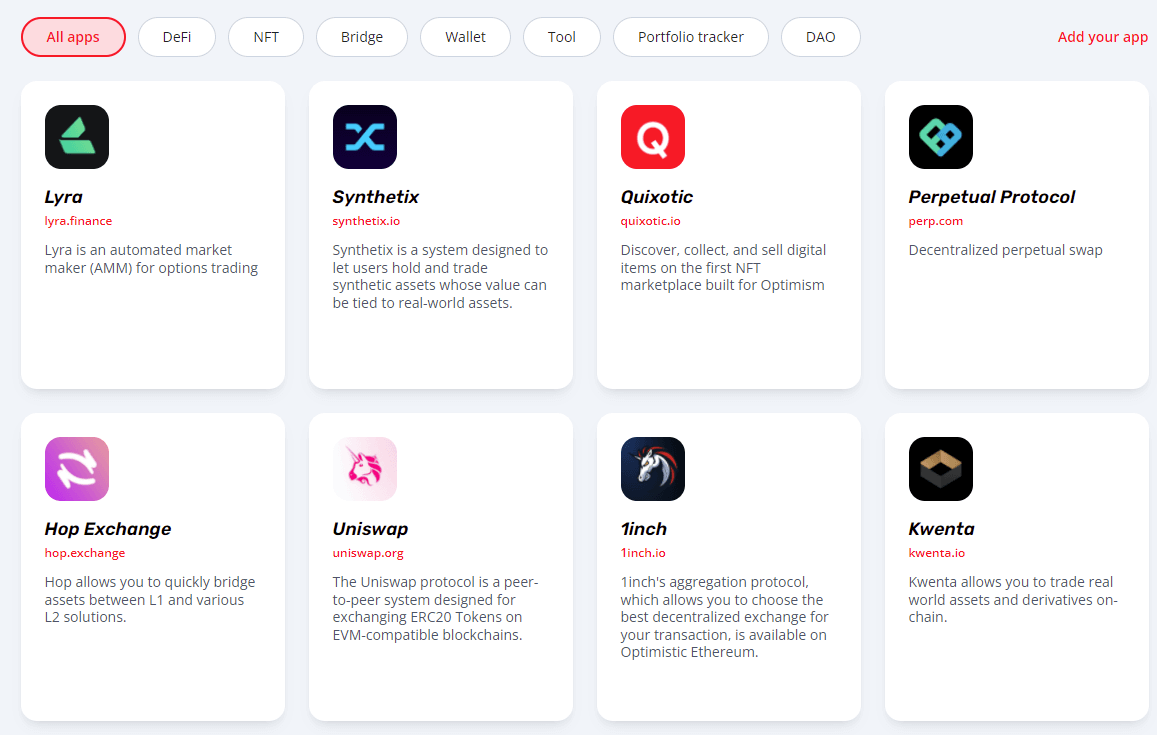
Optimism can almost support any Ethereum DApp. Only the developers need to implement it. Currently some of the popular Ethereum DApps that support Optimistic Ethereum are Uniswap, Synthetix and 1inch.
Here you can check out the overview of all apps in the Optimism ecosystem: https://www.optimism.io/apps/all. It includes DeFi protocols, NFT marketplaces, bridges, wallets, portfolio trackers and DAO.
You can now connect your metamask to decentralized apps and exchanges on OE to swap for new tokens or to stake and earn some passive income. For example here is how to use Uniswap on Optimism L2 – One of the popular protocol on Ethereum.
Uniswap – Optimistic Ethereum
First make sure your metamask is connected to Optimistic Ethereum and you have the necessary assets for swapping / trading.
Next head over to the Uniswap app: https://app.uniswap.org/ and select the Optimism network. Then click connect wallet and choose metamask.

Then select the assets that you’d like to swap and enter the amount. Approve the assets and allow the Uniswap Protocol to complete the trade. After clicking confirm swap you’ll see metamask prompt window to confirm. View all the transaction details and finalize the transaction. You can track your transaction at optimistic.etherscan.io.
If you have used Uniswap on ETH then you’ll realize how fast and economical the Optimistic Ethereum network is. The difference in fees when swapping on Uniswap using Mainnet, vs using Optimism is significantly greater.
That’s it!
We hope this article has covered everything regarding Optimism. You have added Optimism to Metamask. You’ve learned to send your assets to the Optimistic Ethereum via bridge. Also you can now swap and provide liquidity on the DEX connected to Optimistic Ethereum. Enjoy low fees and near-instant transactions.
Similar Guides:
Connecting metamask to other blockchains
- Metamask & Binance Smart Chain
- Fantom Metamask connection
- Connect Harmony One to Metamask
- Metamask connection to Polygon network
- Arbitrum & Metamask
Also read our Metamask security tips to protect your wallet accounts.