The following guide is about Trezor’s “Check Recovery Seed” feature or the dry-run recovery functionality which you can use to test your seed backup and ensure if your wallet recovery phrase is correct. This guide is similar to the mnemonic backup recovery check done on the Ledger device.
So when do you want to use the Trezor wallet mnemonic recovery check feature? First of all is your Trezor backed up?
Is Trezor backed up?
So you bought yourself a new Trezor device to secure your crypto assets. Congrats! When you first setup your device be it Trezor One or Trezor Model T; the hardware wallet will generate and provide you with the 24 word recovery phrase. The recovery phrase which is being displayed is crucial. You need to backup this information as it is the only way to gain access to your wallet in the future in case if your Trezor device goes missing or if it breaks.
When it comes to backup you only need to write down the given recovery phrase in a piece of paper. It is recommended that you do not store it digitally. Do not copy paste in a text file, never take screenshot using your smart phone and never upload it on cloud storage. All of this would simply render the purpose of having a hardware wallet irrelevant. So only physical backup; either write it in a piece of paper or use fireproof / waterproof crypto steel plates for embedding this information.
Most importantly remember to safely hide your backup somewhere that no one can access it. Remember that your 12 / 24 word wallet recovery phrase ensures that all of your assets are retrievable even when your Trezor device breaks down or is lost.
Wallet backup should be done when you are first setting up the wallet. Because that is the only time your device shows the recovery phrase. It tells you to backup the words shown in exact order and it also asks you to confirm that you’ve written the recovery phrase correctly. After you write it down hid it someplace safe and you’re done! You’ve successfully backed up your device.
Only after the backup you should start using the device.
When to check / test Trezor recovery seed?
So you’ve wrote down your 12 or the 24 word recovery seed and successfully backed up your device. But wait! Did you write down the recovery phrase correctly in exact order? The sequence of the words are important and you need to write it down correctly. If you are ever in doubt that you’ve messed up the sequence of the words then you can test your seed backup that is perform dry run recovery.
Even if you have backed up your seed and are 100% sure about its accuracy, don’t straight away use the wallet just yet. Test your recovery seed backup first and double-check its accuracy.
Do not take the risk and send funds to your new wallet yet. Only after confirming your backup is correct you should start using the wallet or else you need to start over with a new wallet / new recovery phrase.
Not only initially but is a always a good practice to periodically check your recovery phrase. Mainly if you are storing this information on a simple piece of paper then from time to time ensure if it is still accessible and readable. The paper which you’ve wrote down might have degraded and be aware that the ink does fade which makes it difficult for you to read the recovery phrase.
Also it is recommended that you before you upgrade Trezor firmware or wipe out the device you need to test your recovery seed and double check that your backup is correct.
Thankfully Trezor has recovery phrase check feature which allows you to check / test your recovery seed phrase backup.
Check Recovery Seed – Dry-Run Recovery
“Check Recovery Seed” or check backup is a Trezor feature which was initially called as the Dry-Run Recovery which provides an useful way to test your recovery seed backup. This was only available through the command line interface. Now with the latest Trezor firmware this feature has been added to the wallet interface.
Using this feature you can check / verify your recovery seed phrase and make sure you wrote it correctly and made no mistakes. You can perform the test without restoring or wiping out the device.
Trezor’s “Check Recovery Seed” or the “Dry-Run Recovery” feature is a pretty straightforward process.
Basically you are performing a simulated recovery to check the recovery seed of your Trezor device.
By starting the verification process you’re telling the device to run the recovery process. But instead of restoring the seed, the device just compares that seed that is already saved in its storage. The comparison result will be displayed on your wallet interface. If the seed word matches then the device will tell you that your backup is Okay. If not then you’ll get an error message.
So now let’s see how to use the Trezor wallet recovery check feature to check the recovery seed of your Trezor device. It’s always a good practice to test backup and ensure you have everything in place.
How to test Trezor backup? Check recovery seed
Things you’ll need:
- Trezor device ( Trezor One or Trezor T)
- Trezor Suite – (Make sure to always verify Trezor suite whether you are updating or installing it for the first time).
- Lastly to test your seed backup and to verify that your seed is correct you’ll need your recovery seed sheet with you.
The process is simple: Connect your Trezor device. Open Trezor suite and go to device settings. There you’ll find check backup option. Click check backup and follow the on screen instructions to complete the recovery check. By the end of the test the device will tell you the status of your recovery seed.
If you have the correct words written down in the right order you can be confident and proceed with the current wallet. Or else you’ll you need to generate a new one.
Step 1: Open Trezor Suite & Connect Your Trezor
The first step is to open Trezor suite. Then connect and unlock your Trezor device. After connecting click on the gear wheel icon at the top right corner to open settings menu. Then go to device settings.
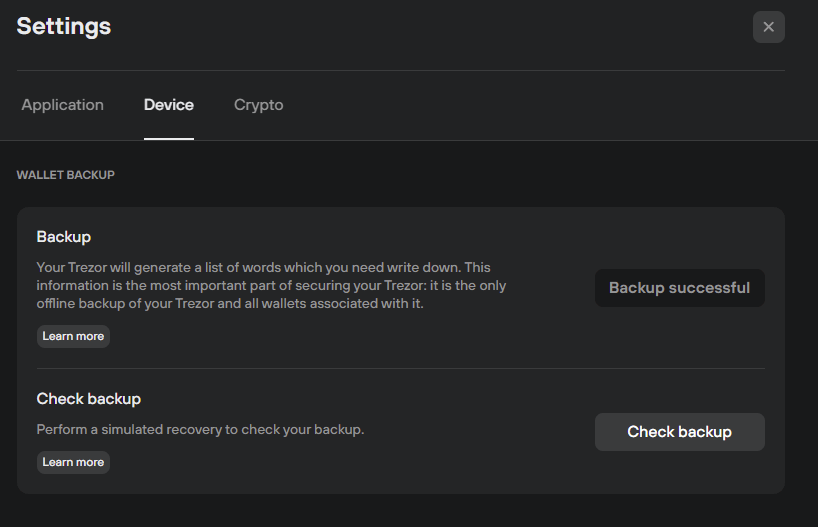
You’ll find check backup feature. Click check backup and start the simulated recovery check.
Step 2: Start the Recovery Check
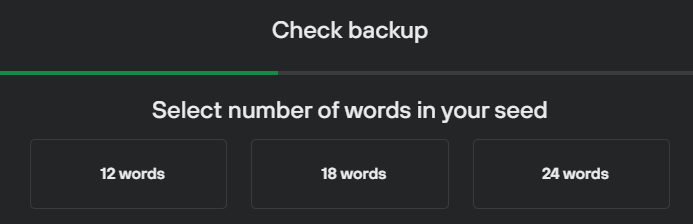
Depending on your setup your seed word may contain either 12, 18 or 24 words. First you need to select the number of words in your seed. Then you need to enter all the words in correct order. You’ll be asked to enter the words from your seed in the order displayed on your device. For additional security measure you may also be asked to type some of the words that are not part of your recovery seed.
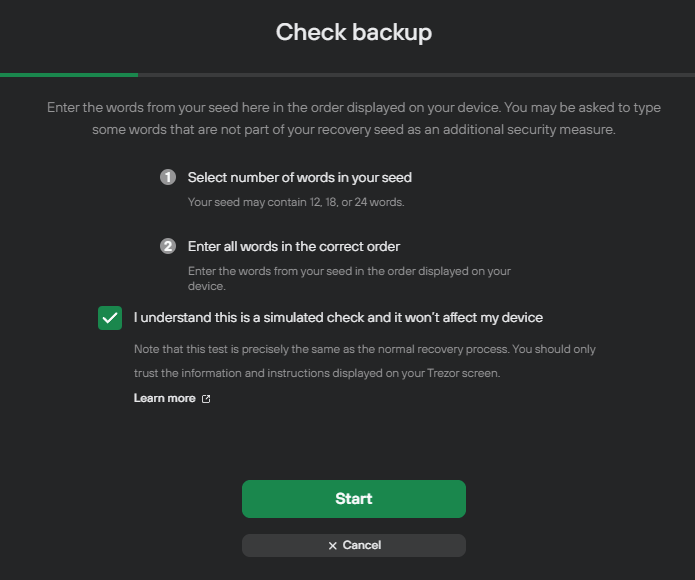
Note: This is just a simulated check and it won’t affect your device. This test is precisely the same as the normal recovery process. You should only trust the information and instructions displayed on your Trezor screen.
Click start to perform the simulated recovery check.
On the next screen select the number of words in your seed.
Now there are two types of recovery checks that you can choose from and this is only for Trezor One users. Trezor Model T users have only one option where they’ll straight away enter the seed words using the device’s touchscreen.
- Standard recovery: With standard recovery you’ll have to recovery seed words on your computer that is on the Trezor suite interface.
- Advanced recovery: You have to choose each word of your recovery seed using your Trezor device.
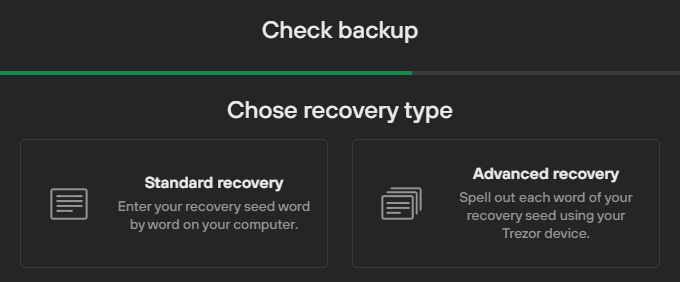
You can either choose the standard shuffled entry option on the computer, or the advanced recovery process. The choice is up to you.
Standard recovery
The standard recovery is safe. During the process the Trezor device will dictate the seed order. It’ll display the seed number like for example “Enter the 12th word”, then “ Enter the 22nd word” and so on.
The order is all jumbled and note that that you should never rely on the external interface that is the software interface. The order of the words to be entered is only dictated by your Trezor device and not by your browser or any third party software. Don’t fall victim by entering your seed into a phishing site / software and get scammed.
Most feel uneasy typing the recovery seed on their computer. So should you be worried typing your recovery phrase on Trezor suite interface using your computer keyboard? Can you trust Trezor on this? If your seed word is 24 word then you can proceed with standard recovery.
Let’s say your seed is 24 word and you proceed with the standard recovery. We hope no one is recording your screen. Let’s suppose your computer has a malware and someone has key-logged your seed word in scrambled order.
The 24 factorial is 6.204484017e+23 or 620448401733239439360000
It is impossible for humans to enter each and every combination, But may be possible for a machine but still realistically 24 words can’t be descrambled.
On the other hand 12 factorial is 479001600 which is neither possible for humans to manually descramble. But there are certain tools like BTC Recovery which can brute-force a 12 word BIP39 seed.
So if your recovery phrase is a shorter 12 word seed then we recommend the advanced recovery.
Advanced recovery
Unlike standard recovery the advanced recovery method uses Trezor screen input to load your recovery seed. You don’t have to type anything at all. This method guarantees you that the recovery seed is not revealed in any way making it safer to use. You can perform this operation even on a most untrustworthy, malware / key log infected computer and be completely safe. But still you might have to cover up any cameras that could record your Trezor screen and mouse movements.
For this reason we recommend the advanced recovery option.
Choose advanced recovery and here is how to run the Dry Run Recovery process and verify that your existing seed phrase backup is correct.
Choose advanced recovery and input your Trezor wallet PIN.
Now the letters are all displayed on your Trezor device. If it is model T you can use the device’s touch screen to navigate around. If Trezor one you have to spell each word of your recovery seed using the keypad shown on your Trezor suite interface, according to where the letters are shown on your Trezor screen.
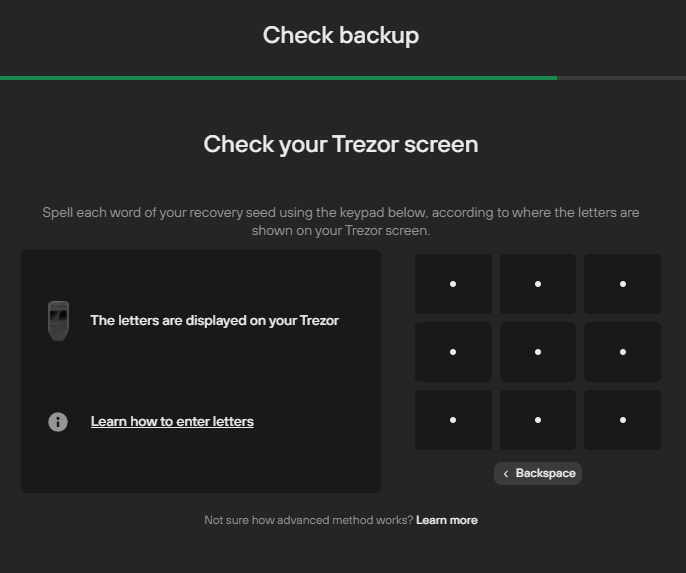
Start entering each word of your recovery phrase. Start by selecting the first few letters and Trezor will automatically pre-fill with suggestions. Choose your first word. Then complete the same process for all the 24 words.
Once you’re done choosing all the words your device will display the result.
Step 3: Seed Matches or Seed Errors
After completing the test if your wallet interface tells you your seed matches, then great. It means the seed is valid and matches the one in the device. You can rest easy knowing that your backup is secure.
But if the wallet displays an error here is what you need to do. Try the test one more time. If it fails again then you need to move your assets from that wallet ASAP.
Move all funds to an exchange or to a temporary BIP39 wallet. Then wipe your device and start with a fresh wallet. Setup a new wallet, backup your new seed phrase and move all your crypto assets back to your newly setup Trezor wallet.
Note: Sending crypto to and from your Trezor will cost you network fees depending on the type of crypto and the amount you hold.
This time make sure you write down the new recovery seed correctly. Again it’s worth running a dry-run recovery to make sure your new seed backup is correct before you send funds to it.
You can use the Trezor’s backup feature as many times you want to perform the backup verification. So don’t hesitate. Make sure that your paper copy of the recovery seed matches the seed Trezor has inside it.
That’s all!
Related topic: Learn how to setup passphrase on Trezor.
Note: If you are using passphrase protection then you won’t need passphrase to verify your recovery seed. However it is needed for accessing your funds.