Do you have most of your DeFi assets (Tokens and NFT’s) in your Metamask? If so then its time to secure them with a hardware wallet.
The most safest way to use Metamask is with a hardware wallet. Your crypto assets are only as safe as your keys. If you are using Metamask as a hot wallet then you are just one hack away from losing all your assets. This is why everyone in the industry recommends a hardware wallet which is a cold storage that stores the keys offline and keeps all your assets safe and secure.
Using Metamask with a hardware wallet enables you to have the convenience of hot wallet and the advanced feature set of MetaMask all while benefiting from security of the hardware device.
Metamask supports both Ledger and Trezor hardware wallets. Here in this tutorial we’ll show you how to connect your hardware wallet to Metamask. That is connecting and using Ledger Nano or a Trezor hardware wallet with MetaMask.
We hope you have your Metamask installed and ready. Also your hardware wallet configured. If you don’t have one then you can buy it from here.
Buy Ledger Nano S | Buy Ledger Nano X
Buy Trezor One | Buy Trezor Model T
Personally, after owning both the devices we prefer the Trezor model. Trezor integration with Metamask is much easier than the Ledger. Anyways both are more secure that will give you full control over your keys. So the choice is yours.
So anyways why do I need a hardware wallet when my Metamask seed phrase is safe and is password protected?
Why connect Metamask to hardware wallet?
Metamask is the most popular and arguably the most trusted wallet among the crypto users. It is a non-custodial wallet that allows you to store a variety of crypto assets. Also enables you to interact with multiple blockchains such as: Ethereum, Binance Smart Chain, Avalanche, Arbitrum, Polygon, Fantom and other DeFi EVM chains. It is basically a cross chain wallet and a browser based plugin which you can install it on your Firefox, Chrome and Brave browsers.
MetaMask offers you easy access to variety of blockchain based services. It was built to work with decentralized applications to enable certain functionalities on the web. Metamask greatly lower the barriers to entry for crypto users as it significantly improves the user experience when it comes to accessing blockchain based applications.
Whether you want to open Decentralized Applications (DApps) or interact with Decentralized Finance (DeFi) protocols; By using Metamask credentials and with just a single click connect button you can access a multitude of DeFi services.
After you sign in to the DeFi platform using your Metamask you can perform variety of DeFi activities such as start yield farming, lend your assets to earn interest, withdraw loans, buy / sell NFTs from NFT marketplaces, play blockchain based games (metaverse), sign up for airdrops and many others.
Now let’s come to the security point.
Metamask Security
Metamask is a hot wallet meaning it remains connected to the Internet. Anything that is connected to the Internet is not secure at all. They leave room for hackers and scammers to attack and steal your funds.
Even if your MetaMask is password protected it is not safe. In fact to gain access hackers don’t need your seed phrase or they don’t have to access your wallet directly. A hacker can rig your computer, remotely install a malware, attain the information, make alteration to the browser and just drain your wallet. Also not to mention the advanced phishing techniques which many beginners tend to fall for.
You can see for yourselves. There are many reports of users falling for scams, phishing links and getting their Metamask wallet wiped out clean.
https://x.com/michaelbatnick/status/1459281438172491778
Here is another user whose Metamask wallet got compromised and lost a huge chunk of ETH.
https://x.com/0xflim/status/1459673602874249216
Seriously, at all cost avoid clicking spam links on Discord and Twitter. Always download and add Metamask extension from the official website ( https://metamask.io/ ). There are many phishing websites that seem pretty legit and looks exactly like the Metamask website. Be cautious and stay safe. You don’t want to lose your precious ETH or NFT collections.
These attacks are very common and for these reasons it is highly recommended that you use Metamask with a hardware wallet. Even MetaMask recommends its user to get a hardware wallet for securing their crypto assets.
Not only you can protect your assets but you can also interact with your favorite DApps from within the security of your hardware wallet.
Benefits of hardware wallet connected to Metamask
You can now link both Ledger and Trezor device directly to Metamask. Once connected Metamask acts as an interface to your hardware wallet.
For Ledger device you got Ledger Live, for Trezor devices you got Trezor suite. Now think of MetaMask like an alternative software for your hardware device that is more advanced and powerful than the Ledger / Trezor apps.
For example most DApps and DeFi protocols can connect to Metamask but they don’t allow direct integration with Trezor or Ledger wallets. Connecting your hardware wallet to Metamask enables you to interact with such sites now.
Also the official software interface of Ledger and Trezor is very basic compared to the functionalities of Metamask. By linking your hardware wallet to Metamask you’ll get much more control and you should be able to perform variety of decentralized activities that which is not supported by the hardware wallet software.
Connecting your Trezor or Ledger wallet with Metamask allows you to perform the following things:
- Check your hardware wallet’s account balance (ETH, ERC20, BEP20, ARC20 and other tokens).
- Allows you to add custom tokens that are not supported by Ledger or Trezor yet. You can now manage such custom tokens right from your hardware wallet.
- You can sign transactions such as send ETH, tokens and NFT collectibles. Also you can deploy and manage smart contracts using your Ledger and Trezor device.
- Sign messages – You can login / sign up to certain DeFi apps directly with the help of Metamask.
- Allows you to connect and interact with any web3 DApps that are not supported by the Ledger or Trezor directly.
Basically anything that you can do with your MetaMask now you can do it from your Ledger and Trezor device with one huge benefit. You no longer have to rely on the Metamask security to keep your assets safe. Your private keys are now secured and protected by your hardware device and it will always stay in your hardware wallet.
This allows you to work with DApps more safely and securely than ever before.
So how does it work?
How Ledger / Trezor connect works with Metamask?
MetaMask allows you to connect with both Trezor and Ledger wallets.
You can link any of the device and after connecting your hardware device you are not creating any new wallet.
In fact a wallet address is a combination of public + private key. It doesn’t matter which software you use. So not only Metamask you can access the same ETH addresses of your hardware wallet using any compatible apps such as My Ether Wallet, MyCrypto or the hardware wallet software.
Your account and address remains the same as long as the seed word / passphrase combination of your hardware wallet is not changed.
On Metamask each account represents an address. Once the connection between hardware wallet and Metamask is initiated the devices sends the public key (only the public key) to Metamask. This creates and adds a new account to Metamask.
In a normal Metamask wallet that is in hot wallet environment your private keys are encrypted on your browsers local storage. Whenever you want to sign a transaction you just need to enter the password to decrypt the private key.
Whereas when Metamask connected to a hardware wallet everything works exactly the same. After importing your hardware wallet’s Ethereum account into Metamask extension; Metamask treats them just like any other normal Ethereum account. The only difference is that whenever you need to sign a transaction you need to connect your device.
Once your device is connected to USB; Metamask extension sends a request to sign that particular transaction. Verify the fees, transaction details and then authorize it on your device. The device will then send the signed transaction to Metamask which will finalize and broadcast your transaction to the network.
Signing of transaction happens entirely inside your hardware wallet. Also the private keys are never exposed and it will never leave your device under any circumstances.
Another cool thing is that you don’t need to keep your Ledger / Trezor device connected to Metamask all the time. Metamask saves your public key locally so that you can browse accounts, check ETH / token balances and able to do any read only interaction without having the device connected on USB. You only need to connect when you wish to sign a transaction.
Of course you can also disconnect your device and remove your accounts from Metamask and link it back again anytime. All you need to ensure is that your hardware wallet is using the same mnemonic seed / passphrase combination. Since your hardware wallets ETH accounts are deterministically derived from this you need to have a backup of this information.
Alright! Let’s get started. First we’ll see how to connect Trezor to Metamask. Then we’ll show you how to connect and use Ledger with Metamask. After connecting you should be able to view, receive and spend tokens to and from your Ledger and Trezor via Metamask.
How to connect Trezor to Metamask
Before connecting your device you first need the Metamask installed and ready. Make sure it is the latest version installed in your Firefox, Google Chrome or Brave browser.
Follow the Metamask beginners guide to complete the setup. You can backup the seed words generated by your Metamask which is optional as it only used to recover your Metamask accounts and not the Trezor accounts.
Next have your Trezor wallet ready. We are assuming that you already have your Trezor device configured. Make sure to backup the seed words generated by Trezor. Also the passphrase if you’ve set one. We’ll explain the recovery process later.
1. First plug in your Trezor device to your computer.
2. Next open Metamask extension and unlock your wallet. Click on the account options and choose expanded view for more convenient operation.
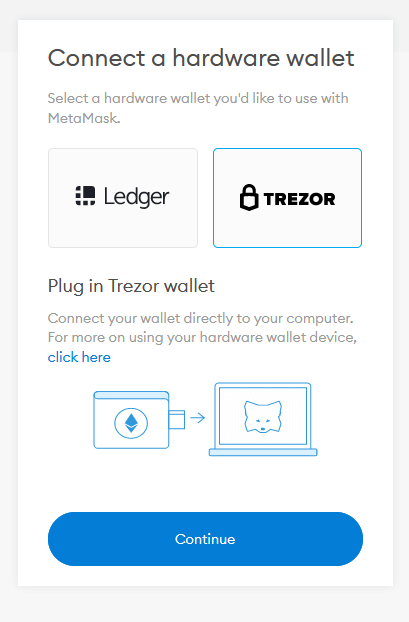
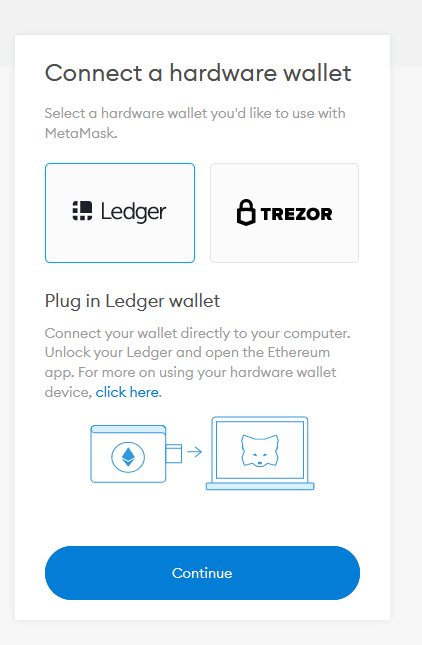
3. Now click on My accounts setting at the top right corner of your Metamask and then click “Connect Hardware Wallet”.
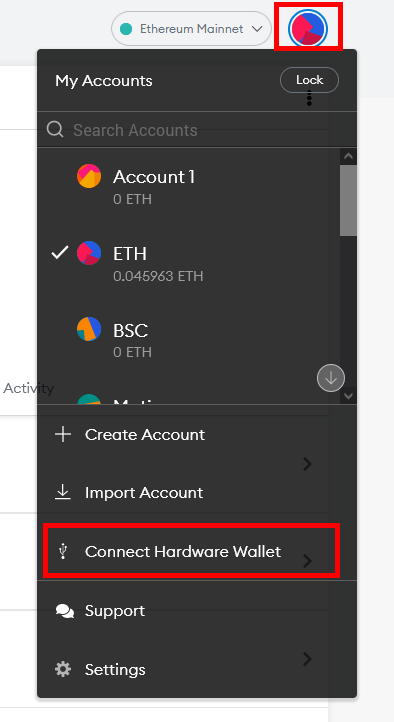
4. On the next screen you’ll see the option that is either Ledger or Trezor that you’d like to connect and use with Metamask. Select Trezor and click continue which will open the Trezor connect popup window.
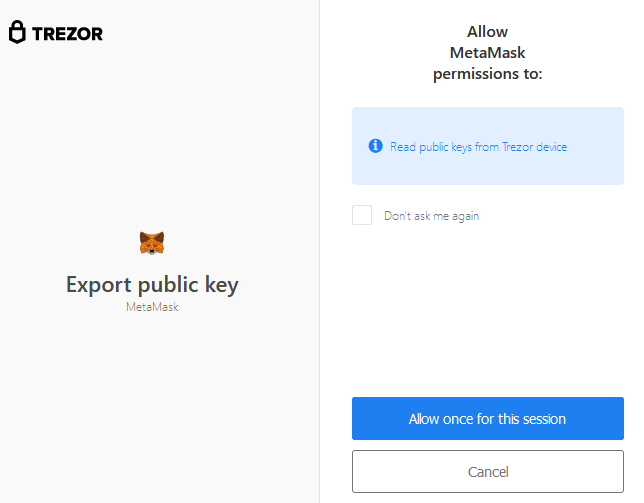
5. Trezor connect prompt will ask for your approval to export the public keys from your Trezor device. Click Allow once for this season to continue. This will allow browser permission to read public keys from your Trezor device.
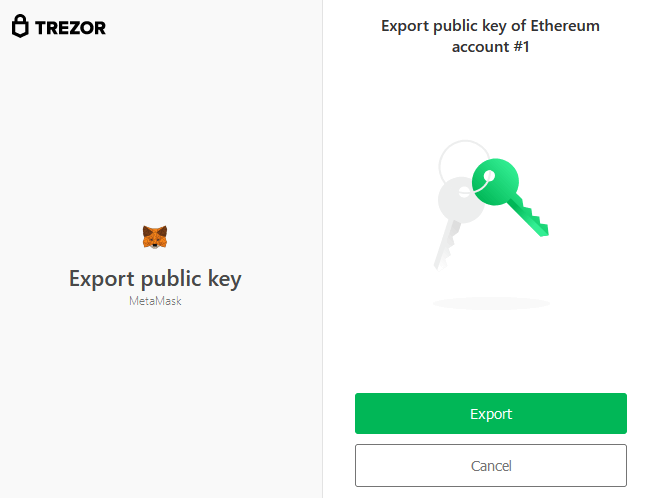
On the next screen again click “Export” to export the public key of Ethereum account #1.
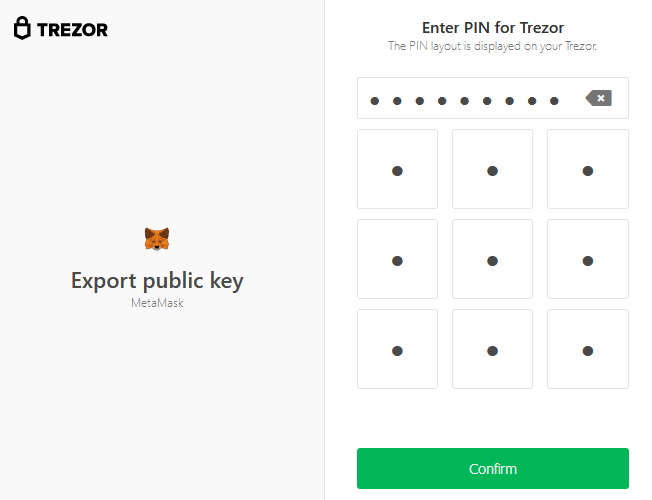
6. Next enter the PIN of your Trezor device and click confirm to continue.
7. On the next screen you’ll be provided with the option to enter your Trezor wallet passphrase. Leave this field blank if you want to access your default wallet. Click Enter to continue. Next follow the instructions on your Trezor screen. Confirm to access the hidden wallet.
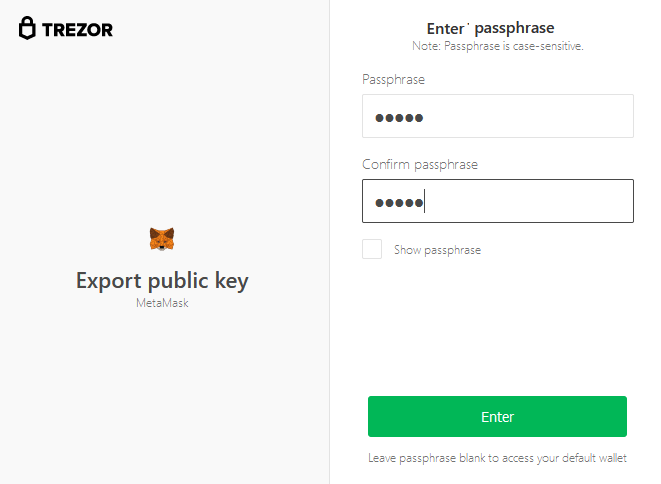
Note: Passphrases are case sensitive and you can use different passphrases to separate the wallets. If you are using passphrase then make sure you have the backup of both the seed words generated by Trezor and the passphrase set by you. The combination is very important to recover your wallet.
8. Once the wallet is connected and the public keys are exported Metamask will show you the list of Ethereum accounts from your Trezor device. It shows 5 address / accounts per page.
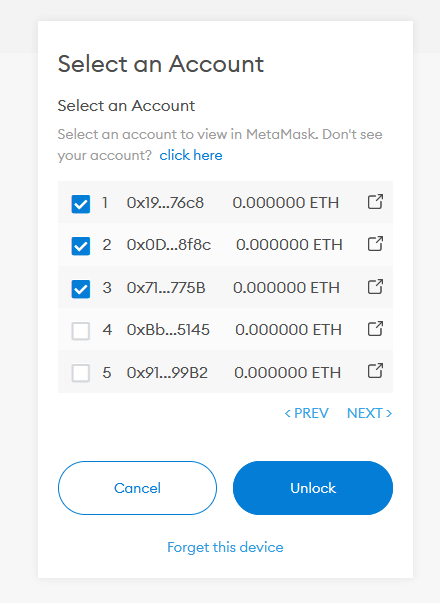
9. Select the account / address you want to use and click “Unlock”. Only the selected accounts will be made available on your Metamask interface. So only select the addresses that you wish to use. Select all if you wish to use them all.
That’s it! You’ve successfully linked your Trezor wallet with Metamask.
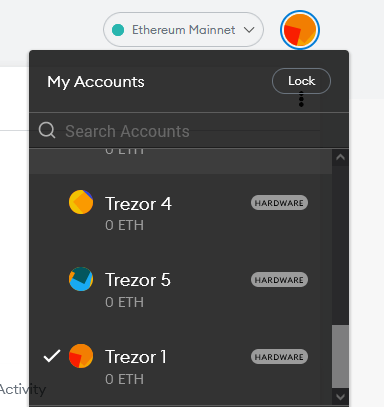
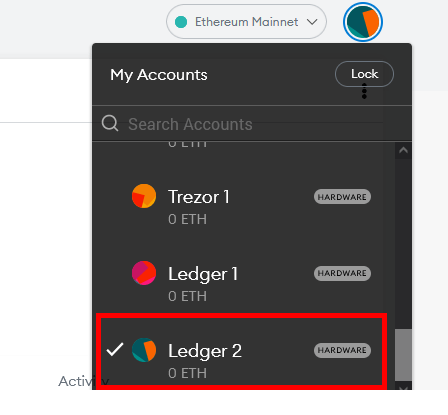
Now click on My accounts at the top right corner of your Metamask. The “Account 1” is the wallet address associated with your Metamask seed phrase and is stored on your PC. The ones named as Trezor and labeled with Hardware icon are your Trezor wallet accounts. The private keys of these addresses are safely held by your Trezor wallet.
How to connect and use MetaMask with Ledger
Connecting Ledger to Metamask requires some additional steps. It is not as simple and is not as straightforward as Trezor Metamask connection.
Before we start here is a little background on the Ledger Metamask integration. Back then users who were using Ledger with Metamask faced broken connectivity issues. Its after Chrome, Opera and Brave came up with their updates that broke the integration between Metamask and Ledger Nano hardware wallet. The web3 community who were using Ledger to secure their assets were hugely impacted by this.
To fix this Ledger came up with Ledger Live integration but that still left many users with a poor user experience.
You need to plug in your ledger device, open ledger live with Ethereum app selected, enable smart contract data or blinding setting on Ledger device settings. Then you have to to enable Ledger Live support on the MetaMask which you can do so by navigating to Settings > Advanced > Use Ledger Live. Only after all this you can connect your Ledger with MetaMask. That’s a lot of steps.
Few years back Ledger and Metamask made a partnership and came up with an update with improved support. Metamask and Ledger integration is smooth now and the previous approach of bridging to Ledger Live app is no longer needed. After that upgrade you won’t require Ledger Live open as all of the integration works entirely in the browser and the functionality is smoother than before.
For this to work all you have to do is update your Metamask extension to the latest version 10.5.0 (always download / update from official website: https://metamask.io/). Then update your Ledger firmware.
To update your Ledger Nano device firmware you need the Ledger Live app installed. Beware of phishing websites. Only download Ledger Live from the official website: https://www.ledger.com/ledger-live. For additional security verify the Ledger Live app.
Once both Metamask and Ledger Nano device is updated to the latest version you can utilize the smooth integration directly between your Ledger device and MetaMask.
Here is how you can use Ledger with MetaMask:
Metamask and Ledger integration
Connecting Ledger with MetaMask is now easy. Metamask and Ledger will work together seamlessly without the need of additional Ledger Live application. But you still need Ledger Live to install the ETH app which is needed for Metamask integration.
Open Ledger Live >> Go to Manager. Then enter your Ledger PIN and unlock the device. Then click “Allow Ledger Manager” on the device and install the ETH app.
If you already have the ETH app installed on your Ledger device then you can close Ledger live.
Now follow the steps to connect Ledger to Metamask.
1. Plug in your Ledger device in to your computer. The device should be plugged in via USB and not Bluetooth (if using Nano X).
2. Enter PIN and unlock the Ledger device.
3. After unlocking the device open the Ethereum app. Keep the ETH app opened. Only then you can connect it to Metamask. Once the Ethereum application is ready on your device you can proceed to the next step.
Before that open “Advanced Settings” on your metamask and ensure that the “Preferred Ledger Connection Type” is set to “WebHID”.
4. Now to import your Ledger Nano address in Metamask click the “Connect Hardware Wallet” options on Metamask just like we did for Trezor.
Drop down Account settings of your metamask at the top right corner and click “Connect Hardware Wallet”.
5. On the next screen choose Ledger and click continue.
You’ll see several popup screen flashing in front of you. Leave it for few seconds and it will automatically connect to your Ledger device.
Once the connection is initiated your Ledger Nano wallet address will populate on your metamask interface. It will automatically sort the addresses based on the balance on your Ledger. It is easy to identify your account if you already have Ethereum balance in any of the address.
Select the addresses from the list of address that you wish to import and then click unlock. Again you’ll see few pop up screens. Leave it for a few seconds and it will successfully import the selected Ledger accounts (their public keys) to MetaMask.
Drop down accounts menu and choose your Ledger address which will be labeled with hardware icon like you see in the image below. The private keys of Ledger accounts are safely held by your Ledger wallet.
That’s it! You’re good to go. You can now experience a smoother signing flow.
Signing and sending transactions
First of all in MetaMask; account and address are used interchangeably. You can only have one account connected and accessible at any given time.
The wallet accounts / address that you see in your Metamask is not only your ETH address. You can use it as your Binance Smart Chain address, Avalanche address, Arbitrum, Fantom, Polygon etc. It basically works with any EVM network. Before sending in the tokens from any specific chain make sure Metamask is connected to the right EVM network.
For example if you want to use the address for Binance Smart Chain then choose BSC network from Metamask. Then send tokens to the address via the BSC network. Always when you start try sending small amounts to see how it works.
Once you have the tokens in your wallet you can start accessing the DeFi platforms available on that particular chain. You can also use cross chain bridges to move tokens across blockchains.
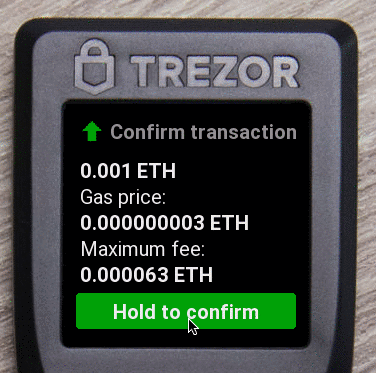
Now signing and sending transactions is same as you do with your Metamask address; except with the hardware accounts you need to confirm the transaction details on your device.
1. On Metamask; Click send and fill in the transaction details such as the address and the amount to send.
2. Gas Price (GWEI) and Gas limit will automatically fill in according to the chain. You can adjust it if you want. After entering all the details click next and then confirm.
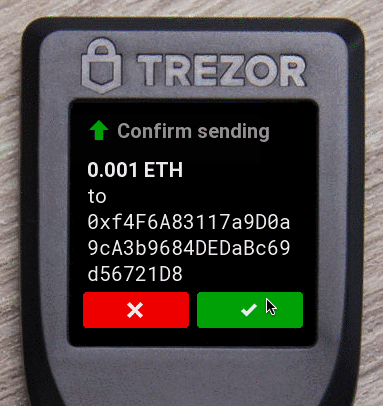
3. The transaction details will be shown on your Trezor and Ledger device. Mostly it will display the address, amount and the fees. Double check it before you send and click confirm on your device.
You’re Done! If the transfer is successful you can continue sending in large amounts to your Ledger account and Trezor address connected to Metamask.
Note: (Optional for Ledger users) Open settings menu on your Ledger Nano Eth app and turn on “Contract Data”. You can also enable “blind signing” on the device (only if needed and only if you know what you are doing).
That’s it!
By adding hardware wallet to Metamask you can now experience and work with every single DApp more securely. This feature increases confidence among the users. Also it greatly enhances the security of Ethereum and Ethereum based decentralized finance ecosystems.
However this level of security comes at a cost. Whenever you want to move funds, use DApps or any DeFi application you need to connect your device and go through all the extra process. The whole user experience is not as fluid as using metamask hot wallet directly.
Alright! We hope you’ve learned to successfully connect both Ledger and Trezor device to Metamask.
Now let’s see how backup and recovery works?
Ledger / Trezor and Metamask – Backup / recovery process
Here is how the backup / recovery process works when you are using hardware wallet with metamask.
After successfully connecting your hardware wallet (Ledger or Trezor); Metamask displays the address / accounts that is associated with your hardware wallet.
Such address will be labeled as “HARDWARE”. These addresses / accounts are generated by your hardware wallet and not Metamask.
On the other hand Metamask maintains its own set of accounts / address. Other than the address labeled as “HARDWARE” you’ll also find the address / accounts that were originally generated by your Metamask. Both the metamask and hardware accounts will be available side by side and of course you can use both the accounts separately. Anytime you can wish to move tokens and assets from Ledger / Trezor to Metamask accounts and vice versa.
However do note that the regular address that is those which are not labeled as hardware are not protected by your hardware device. Its a hot wallet address where your private keys are stored locally and so they are not secure.
To enjoy the security benefits and the features of hardware wallet you need to only use the addresses that are labeled as hardware and not your regular Metamask account / address.
So basically the seed words generated by Metamask isn’t important. All you need to backup is the seed word generated by your hardware wallet. If you are using additional passphrase then backup that as well. The combination is very important for recovery.
If you ever lose your Ledger or Trezor then here is how to recover / restore your accounts that you’ve added to Metamask. Buy a new device and import your hardware wallet recovery phrase. That’s it. You can then connect the device to metamask and gain access to all those accounts.
The seed words of the original Metamask account are also valid still. That is only if you have funds in your original metamask account. In which case you also need to backup the metamask seed words to be able to recover the funds in future.
Remember this if you are using a hardware wallet with Metamask. Do not confuse the addresses / accounts and the seed words to backup.
FAQ and troubleshoot
Are you facing trouble linking Trezor to Metamask? Are you not able to connect Metamask wallet to your Ledger device? Here are few things that you can try.
Try changing the USB cable and port. Try another browser. If Chrome is not working they try Firefox. Clear your browser cache. If you are using Brave then disable Brave Shields. Make sure all your softwares are up to date that is your browser and the metamask extension. Also ensure your device is running the latest firmware. Turn off VPN, Firewall or Antivirus settings and give it a try. Also if you have browser extensions such as Ad-block then try again by disabling them as that may cause connectivity issues.
If none of it works then do not worry. To access ETH you can consider using other compatible apps such as MEW (MyEtherWallet), MyCrypto, or the official software (Ledger Live / Trezor Suite).
Hope it helps. If you got any questions or if you are still facing trouble connecting your hardware wallet to metamask then do let us know in the comments below.
Final safety tip
We’ve been mentioning it on all our posts and we can’t stress this enough. Remember that your 24 word recovery seed phrase is the master key to all your assets. Keeping it as a secret is paramount. So never ever reveal this information to anyone, not even to your close circle.
Most beginners even those who own a hardware wallet tend to lose their assets mainly because of their carelessness. Do note that there are many phishing websites and tools that looks exactly like the original. Always download from the official site and verify the software before using them.
Scammers will go to all lengths to make you reveal your recovery seed phrase. Don’t fall for their scam and remember if anyone gets access to your seed words then not even a hardware wallet can save your assets.
Also do not keep an online copy no matter how secure you think it is. Only write down your secret phrase on the sheet or the metal plate that came along with your hardware wallet. Then put it in a safe or some place that is extremely safe.