With growing number of masternode coins you might be interested in setting up and running your own masternode. It can be either to earn a passive income or to test the environment or to understand how the whole system works. Actually most of the masternode coins are based on Dash or PIVX so the requirements and the overall setup process are almost same for every coin. To setup a masternode you’ll basically need the following elements:
- A certain amount of coins as a collateral.
- Wallet installed in your local machine (controller wallet).
- A remote VPS server with dedicated IP address (Most recommended: Vultr or Digital Ocean) and
- PuTTY – A terminal emulator that will be used to setup your VPS server.
Once you have all these requirements you are ready to setup and run your own masternodes. For each and every coins there are easy to follow, non technical step by step guides that explains how to setup masternodes. It includes all the necessary information such as deploying VPS server, creating swap file, configuring the server, compiling the daemon, configuring local wallet and starting your node. Also there are masternode installation scripts which will take care of the whole setup process such as: installing the dependencies, automatically compiling the daemon and configuring the system.
With such easy to follow tutorials you don’t even need to have a prior knowledge on Linux server or PuTTY commands to run a masternode. However this is not something that you set and forget. You may at any time encounter technical issues with your masternodes. There are scenarios in which your server would crash, your masternode will go missing after a network update / fork or it will even stop syncing. In such cases you may need to stop the daemon, restart the server and even need to modify the masternode config file.
To troubleshoot and fix any masternode related issues you need to first know how to interact with the server. Also you need to understand the basic commands that will help you to manage your masternodes. Here in this beginners guide we’ll share the list of useful Linux & Masternode commands. But before there here is a quick intro to PuTTY.
PuTTY – Accessing masternode server
We are assuming that you’ve already setup your masternode and have PuTTY installed (https://www.putty.org/) on your computer. PuTTY is nothing but an open source SSH client which is used to connect to a remote computer. There are many SSH clients available but PuTTY is the most widely used terminal emulator for Windows operating system. For Linux and Mac; users have a build in terminal.
Now to connect to your Linux VPS (masternode server) via SSH we need two things. 1. Your VPS IP address and 2. The login credentials of the server. If you are using Vultr then just click on the server name. You’ll get the IP address, username and password.
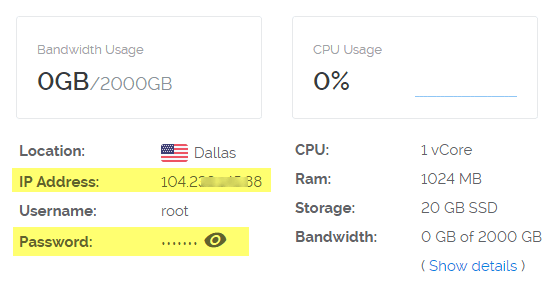
Copy the VPS IP address and enter it in PuTTY configuration window. Leave both the port and connection type as default which is 22 and SSH. Then click on open which will open the terminal window.
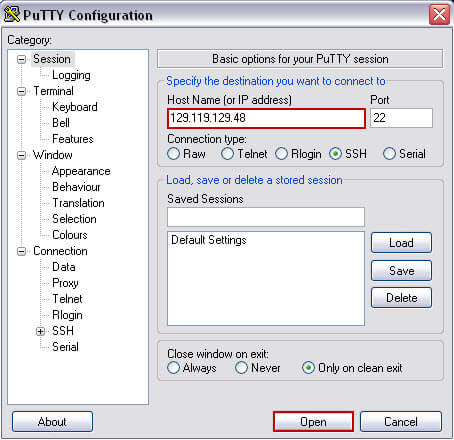
Now in terminal window type in your server username (root), password (for security reasons nothing will be shown in password field) and then hit enter. That’s it. You are now logged in to your server.
Once you are logged in you’ll land in the home directory and you’ll see something like this:
root@your-vps-info: ~#
(or)
username@your-vps-info: ~# (if not a root user)
Now from here on you can use the following list of SSH commands accordingly to perform any basic actions.
Common SSH commands
The following list should give you a basic understanding on how to navigate through the server, creating folders, deleting / editing files, checking server resources and etc. It is more than enough to manage your masternode server. Also since you’ve already setup masternodes we will not cover the following: installing the dependencies, creating swap file, compiling daemon or installing sentinel for which we’ll make a separate tutorial.
Listing directories and contents – “ls” command
The “ls” command is one of the most basic command which is used to list files and directories.
- Command:
ls - Usage:
ls [option] [file]
| Command | Description |
|---|---|
| ls -l | Lists files in a more convenient manner |
| ls -al | Lists all files and folders including hidden |
| ls -is | List files by file size |
| ls -lat | List files based on last modified time |
Basic navigation – “cd” command
Once you have figured out the list of files in your server you may wish to navigate. To navigate the file system you can use the “cd” command which stands for “change directory”.
- Command:
cd - Usage:
cd [folder-name] - Exampe: cd / sample-folder
| Command | Description |
|---|---|
| cd / | Go to the root directory |
| cd . | Remain in the same directory |
| cd .. | Move up one directory |
| cd – | Go back to previous directory |
| cd ~ | Go to the home folder |
Print working directory – “pwd”
In Windows you have file explorer in which you can easily figure out the exact folder you are in. In Linux to display your current location you can use “pwd” command which means “print working directory”.
- Command:
pwd - Result: /root/.dashcore/chainstate
Locating files and folders
Navigating through each directory and looking for a specific file can be time consuming. If you know a file name (dash.conf) and if you wish to find out its location then you can use “locate” command. This command is the easiest way to find the location of a file or folder on Linux systems.
- Example:
locate dash.conf - Result: /root/.dash/dash.conf
Similar to “locate” you also have “find” command which you can use to list files based on file name.
- Example:
find / -type f -name "mncache.dat"
Creating files and folders – “mkdir” | “touch”
At times you may wish to create a new folder or a file. To do so you can use the following commands. The command “mkdir” is used to create a new folder (directory) and the command “touch” is used to create a new file.
- Exampe:
mkdir new-folder - Example:
touch pivx.conf
Copying files and folders – “cp” command
If you wish to copy a file from one location to another then you can use “cp” command.
- Command:
cp - Usage:
cp [file-name] [source directory] - Example:
cp masternode.conf /root - For more usage information type
cp --help
Moving files and folders – “mv” command
Similar to copying files you can also move files using “mv” command.
- Command:
mv - Usage:
mv [file-name] [source-directory] - Example:
mv sample.txt /root/.dash
Using text editors
After you create a file (for example: phore.conf) the file will be empty. To edit a file you’ll first need a text editor for which you can install nano.
Installation: sudo apt-get install nano
After the installation type nano filename in the console window to edit any files.
Checking server resources – RAM, disk & CPU usage
Is your masternode crashing often? Then the first thing that you need to make sure is to check whether if your server is running out of resources. The following commands should come in handy.
| Command | Description |
|---|---|
| free -m | Shows your server total, used & free memory including swap information |
| df -h | Displays the total, used & available disk space of your server |
| top | Displays a lots of information on the current status of your server |
| netstat | Displays your server’s current network connection |
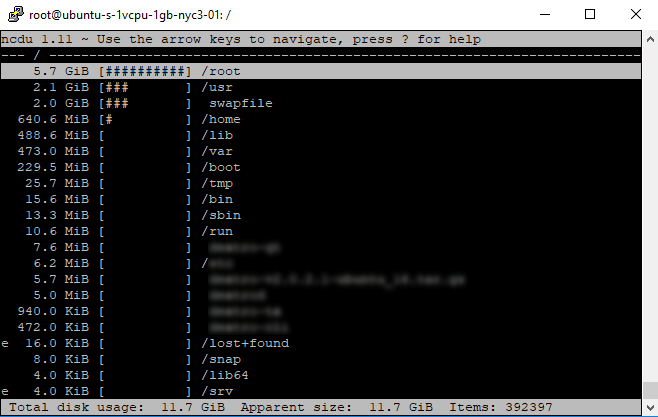
Optional: To get more detailed reports on disk usage you can install Ncdu which is a disk utility for Unix systems.
- Installation:
sudo apt-get install ncdu - Command:
sudo ncdu /
Optional: To monitor bandwidth you can install vnStat which is a network utility for the Linux operating systems.
- Installation:
sudo apt-get install vnstat - Command:
vnstat
Other useful commands
| Command | Description | Usage |
|---|---|---|
| zip | Use it to compress folders | zip foldername.zip [target-location] |
| unzip | Use it to decompress files with .zip | unzip compressed-folder.zip [target-location] |
| rm | Delete a file from the server | rm sample.txt |
| rm * | Delete all files from the directory | |
| rmdir | Use it to delete a folder or a directory | rmdir foldername |
| chmod | Changing permissions of files and folders | chmod 775 foldername |
| du -h | Calculate total space of a directory or a file | du -h filename |
| head | Displays first 10 lines in a file | head dash.conf |
| tail | Displays last 10 lines in a file | tail dash.conf |
| exit | Logout of the terminal window | |
| clear | Clears the terminal screen completely | |
| history | Shows the list of last used commands | “history 10” – will show last 10 commands |
| wget | Used to download files from the internet | wget https://github.com/dashpay/dash/releases/download/v0.12.3.3/dashcore-0.12.3.3-x86_64-linux-gnu.tar.gz |
| apt-get update | Updates the OS with updated software packages and security patches. |
Masternode commands
The above SSH commands will help you to manage your VPS. But to manage your masternodes you need to learn the masternode commands. The following commands should come in handy and is applicable for most of the masternode coins.
Note: Replace coinname-cli with the name of the masternode coin. For example “Dash-cli getinfo“
1. coinname-cli getinfo – Prints json data. It displays information such as wallet version, block height, balance etc.
2. coinname-cli getmininginfo – Prints information related to mining such as mining difficulty, chain data, network hashrate etc.
3. coinname-cli getblockcount – Displays the total number of blocks processed. You can use this command to check the masternode wallet sync status. In addition to this you can also use “coinname-cli mnsync status” which should display MASTERNODE_SYNC_FINISHED.
4. coinname-cli masternode status – Used to check the masternode status.
5. coinname-cli masternodelist full | grep ip-address – Used to verify your masternode working status.
6. coinname-cli masternode current – Displays more specific information about your masternode such as: IP address, port, payee detail etc.
7. coinname-cli getconnectioncount – This displays the total number of connection count to your masternode.
8. coinname-cli getbalance – It will display the balance of your masternode wallet. The balance will be 0 since most masternodes are usually setup in hot / cold environment. Additionally you can also use “coinname-cli listaccounts“.
9. coinname-cli masternode list – Lists all the masternodes on the network and their current status.
10. nano coinname.conf (eg: nano ~/.dashcore/dash.conf) – Edit the masternode config file to add nodes or to change the configuration.
11. coinname-cli stop – Used to stop the wallet
We hope the above command list will be useful for you to manage your masternode server. If you find it useful then please do share it.
Are there any other important SSH commands that you’d like to share? Or is there any other masternode commands that we missed in this article? Please drop it in the comments below.
Other masternode guides:


Very Interesting.
Thank You for publishing this Guide.
Looking forward to learning more soon.
Thank You.