Are you facing trouble connecting your wallet to its network or is it taking a long time to synchronize? You’re not alone. It is one of the most common issue with the core wallet. On most wallet tutorials users comment stating that “wallet is not connecting to the network or is not syncing” what should be done? We say add nodes to your wallet and they ask what are nodes and how to add them? Well, here in this tutorial we are going to explain nodes and how to add nodes to sync wallets quickly.
What are nodes and why to add them?
A node is nothing but a junction or IP address. To put it in simpler words; In distributed peer to peer network like Bitcoin and other crypto currencies, nodes acts as a point of intersection or connection with the network. So why wallet needs these nodes? Your wallet needs nodes to connect to its network In order to download the blockchain and to relay transaction.
Usually your wallet comes will all the necessary nodes that is needed to connect to the network. However there are scenarios in which devs fail to add nodes to wallet or they release a new list of nodes after an update. In such cases you’ll have to add nodes manually. There are two different ways in which you can add nodes to your wallet.
1. From your Wallet Debug console window and 2. Adding it in your wallet configuration file. Now let’s see how to add nodes using both the methods.
How to add nodes to a wallet?
Before getting in to adding nodes do you know where to find the node list for your wallet? You can usually find the node list on the bitcointalk page of a coin or you can find it in their official website listed by the coin developers. Usually it’s a list of IP address and it looks something like this.
addnode=134.265.252.133
addnode=135.255.282.101
addnode=149.202.47.155
addnode=445.773.194.266
Method 1: Adding nodes from wallet debug console
You need to check this guide on console commands where we’ve explained about the debug console window and how to use them. There are so many command line options available for a wallet and one among them is addnode command which is used to add nodes. Follow the steps below to add nodes using debug console.
Step 1: On most wallets you can find the debug window under help or settings (HELP -> DEBUG -> CONSOLE) . Open your console window first.
Step 2: Now this is the command you need to add a node to your wallet.
addnode <node> <add|remove|onetry>
eg: addnode IPADDRESS add
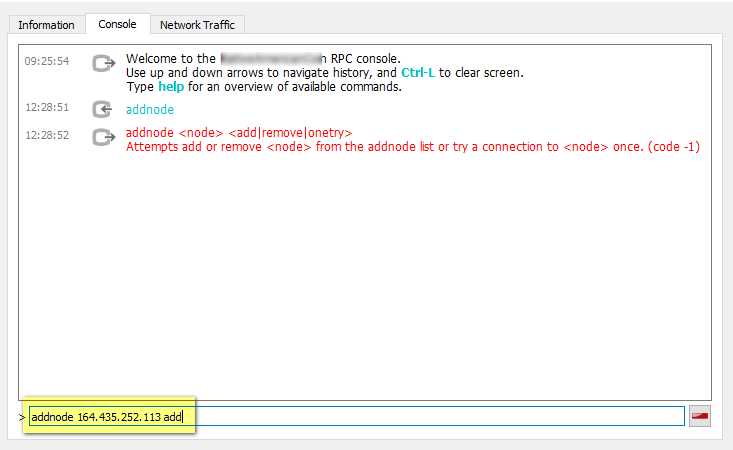
When done hit enter and it will add the node to your wallet. You can use the same command with remove at the end to remove a node.
Method 2: Adding nodes using configuration file
Using the above console method you’ll have to manually add nodes one by one but what if you want to add a huge list of nodes to your wallet. This can be done by adding the complete node list to your wallet’s config file.
- First you’ll need to find your wallet directory. In Windows it can be found at C:\Users\YOUR-USERNAME\Appdata\Roaming\COIN-FOLDER. In Linux it should be at /home/USER/.COIN-DIR.
- Inside your wallet folder you should see several files such as blocks, peers.dat, wallet.dat, .conf etc. Nodes should be added in the .conf file.
- In some wallets you may not find this .conf file and in such case you’ll have to create one. To create a .conf file all you have to do is copy the wallet folder name, create a text document and save it as walletname.conf (eg: zcash.conf).
- Now open the .conf file in notepad or notepad ++ and paste all the node lists.
- Once done, save the .conf file and re open your wallet.
That’s it! Your wallet should now connect to the network and start synchronizing. If you have any questions or concerns regarding this guide then feel free to post a comment.
Thanks for the information.
Nice to have people who knows how to do things.
Keep it alive!!
How do I do if the Node is Linux.. My Wallet File systems get’s full.. I have multiple address in the Wallet
Thanks for this very vital explanation. I manually added the nodes to my wallet through debug, console. When I exit my wallet and open the wallet again, all connections are gone. How do I keep it? Am I suppose to save or I should click on clear console? Thanks
Hi, how did you find the nodes to add?
I cant find the Litecoins nodes you talk about. A step by step directions for the wallet would be helpful. Been trying these nodes for two hours but not working.
Hi, Spenser
The node list that you see here is not for Litecoin. It is just an example that shows how to add nodes. We suggest you download a new Litecoin core client from official website and start syncing from scratch.
Where can I get the IP node for new coin wallet’s?