Just bought yourself a new Ledger hardware wallet but not sure how to use it? Setting up the device is very simple. Just follow the onscreen instructions and you should be ready to go. Just remember that the 24 word mnemonic seed generated by your wallet is the most important piece. Make sure to backup this information before you send any money and start using the wallet.
Even after completing the setup successfully you might not be comfortable in sending your bitcoins to your ledger. When it is your first time you might have so many confusions and questions. This is why we have the Bitcoin testnet where you can play with your wallet and experiment with various Bitcoin features without having to risk your actual Bitcoins.
So how do you use your Ledger Nano with Bitcoin Testnet.
Why use the Bitcoin testnet?
First of all there are no difference between Bitcoin testnet and mainnet in terms of usage except that testnet coins can be acquired for free and they have no value.
Test network is mainly used for experimenting without risking the real Bitcoins. If you are not sure how to store Bitcoin or how to sign a transaction then testnet is a good start.
If you are an advanced user and want to test out Multisig setup with Ledger then you can try out with testnet first.
Play with your ledger Nano. Experiment the features and functionalities on the testnet thoroughly until you are sure what you are doing. Once you get comfortable and got familiar with the device you can move on to the mainnet.
Here is how to connect your Ledger Nano S or Ledger Nano X to the Bitcoin testnet?
How to connect Ledger Nano to Bitcoin testnet?
Ledger Nano S and Nano X are two most popular hardware wallets in the market. It offers the safest way to store and secure large amount of assets. But the thing is you cannot use the device straight away.
You’ll need the Ledger Live application which is a must have companion to your Ledger device. Ledger live software is an interface app for your Ledger Nano X and Ledger Nano S device. The application allows users to manage their ledger device and is available for both desktop as well as mobile.
You’ll need this to install the Bitcoin and Bitcoin testnet app on your ledger. We hope you have ledger live application ready. If not you can download from here.
Ledger live download: https://www.ledger.com/ledger-live/download
Now before installing and using this app we recommend you to verify ledger live. Once that is done you can proceed with the setup.
BTC testnet on ledger
First of all you don’t need a different mnemonic seed for both mainnet and testnet. You can use the same 24 seed. Additionally you can use two different passphrase. One for the mainnet and one for the testnet. Again this is not necessary.
Remember to not confuse and complicate things. Proceed with the setting which you feel most comfortable with. Most importantly write down your seed word / passphrase and put it in a safe place.
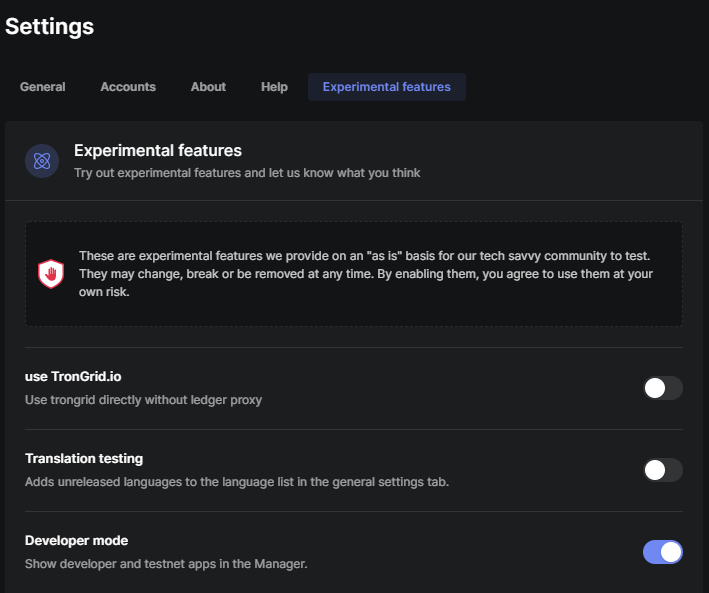
Bitcoin testnet app does not show on Ledger live manager by default. To be able to see the BTC test app you need to enable the developer mode in Ledger live.
- Connect your ledger hardware device and unlock it.
- Open Ledger live and open settings. Now navigate to experimental features menu and enable developer mode. This will show developer and testnet apps in the manager.
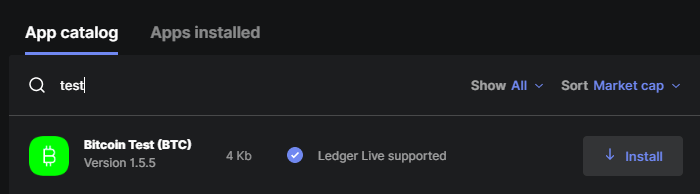
- Now go to Ledger live manager and search for Bitcoin testnet app. To use the testnet app you also need the main Bitcoin app. So install both the app to your device.
That’s it you got it all ready.
Getting Testnet address on Ledger
On your ledger device you’ll now find both the apps. Bitcoin which is the main app you should be using for the mainnet. Bitcoin Test which is used for the testnet.
To get the testnet address and to start using the test network open Bitcoin test app on your ledger device.
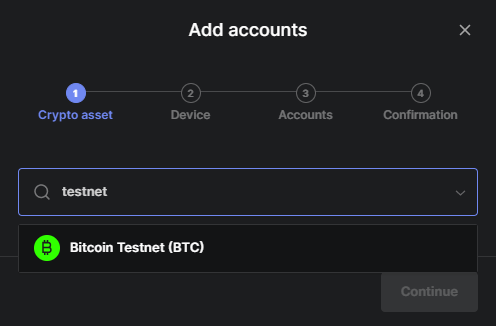
Now in ledger live app go to accounts tab, click add account and search testnet. Then select Bitcoin Testnet (BTC).
On the next screen choose the address format (Native SegWit / SegWit).
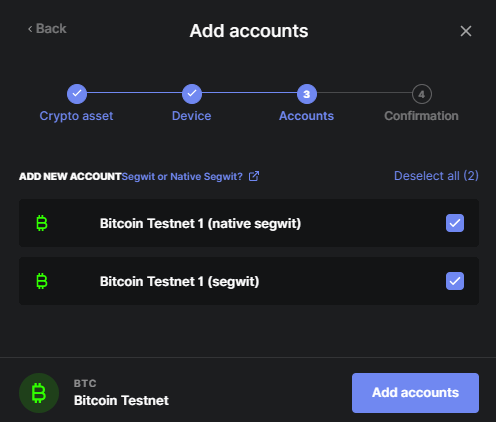
Note: Mainnet and testnet address are completely different. Native SegWit addresses on the testnet starts with tb. SegWit address on the testnet starts with 2M and 2N.
Example: 1qk6muq94wxwhk4wjnssnpz59g6qrl3cvlppjy0a – native segwit
2MsyJbQpqDZ2kpobYwBPo8FCNHcAQhkLF3Z – segwit
That’s it. Your Ledger nano device is on the BTC testnet. To start using the test environment you’ll need test coins.
Getting test coins
Go to receive tab on Ledger live, select Bitcoin testnet and copy the address. Now use the following faucets to receive free testnet coins.
https://bitcoinfaucet.uo1.net/
https://testnet-faucet.mempool.co/
Bitcoin testnet explorer: https://live.blockcypher.com/btc-testnet/
That’s it!
Alright! What about Ethereum Testnet?
Ethereum Testnet
There is no Ethereum testnet app separately. You can use the main ETH app for the Ethereum test network. Additionally you can connect the wallet to services like MetaMask and use the testnet from there.
Hope it helps.
Now learn everything on the test environment and get familiar with the wallet. Wipe out your wallet completely and restore from seed to ensure the test coins and transactions reappear. Once you get fully comfortable with the device you can start to receive and manage Bitcoin on the mainnet.
Also read: How to connect Bitcoin core and electrum wallet to testnet